
That moment when you’re standing beside your rig, manually deflating each tire with a valve core tool while your trail buddies are already hitting the trail? It’s frustrating, time-consuming, and completely unnecessary with the right equipment. Learning how to use Staun tire deflators properly transforms what should be a five-minute setup into a 30-minute chore. These precision instruments automatically reduce your tire pressure to a pre-set threshold without requiring constant attention—freeing you to focus on trail preparation rather than standing around monitoring air gauges. Whether you’re heading to the dunes, tackling technical rock formations, or simply improving traction on forest service roads, mastering how to use Staun tire deflators correctly is essential for any serious off-roader.
The factory 18 PSI setting that comes pre-calibrated on your Staun deflators works adequately for maintained fire roads but falls short for most off-road applications. Many enthusiasts immediately recalibrate their deflators to 10-15 PSI depending on their vehicle and typical terrain. This guide walks you through the exact process of calibration and usage that transforms these devices from confusing gadgets into indispensable trail tools—no more guessing about pressure settings or wasting time manually checking each tire.
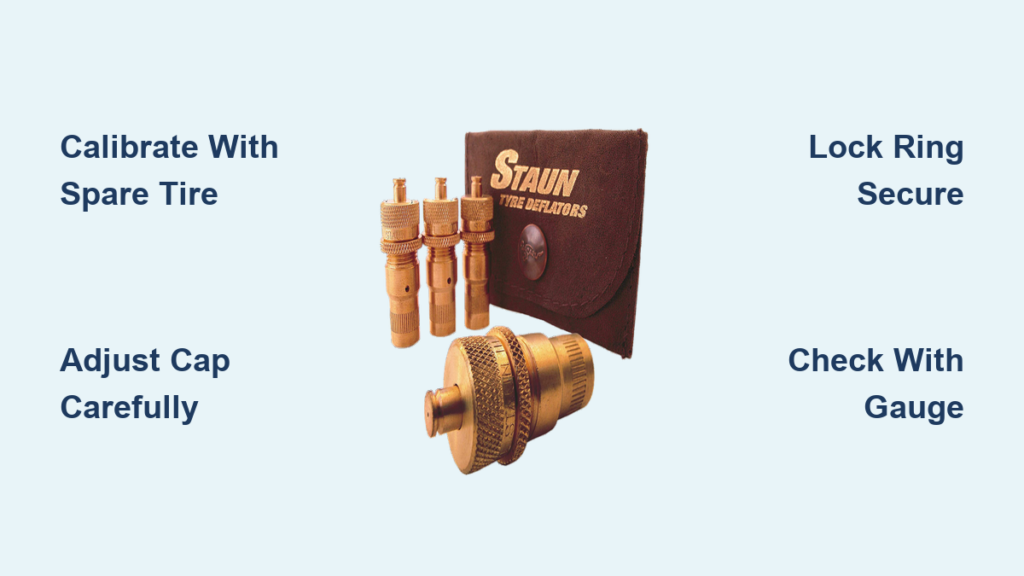
Identify Critical Staun Deflator Components Before Calibration
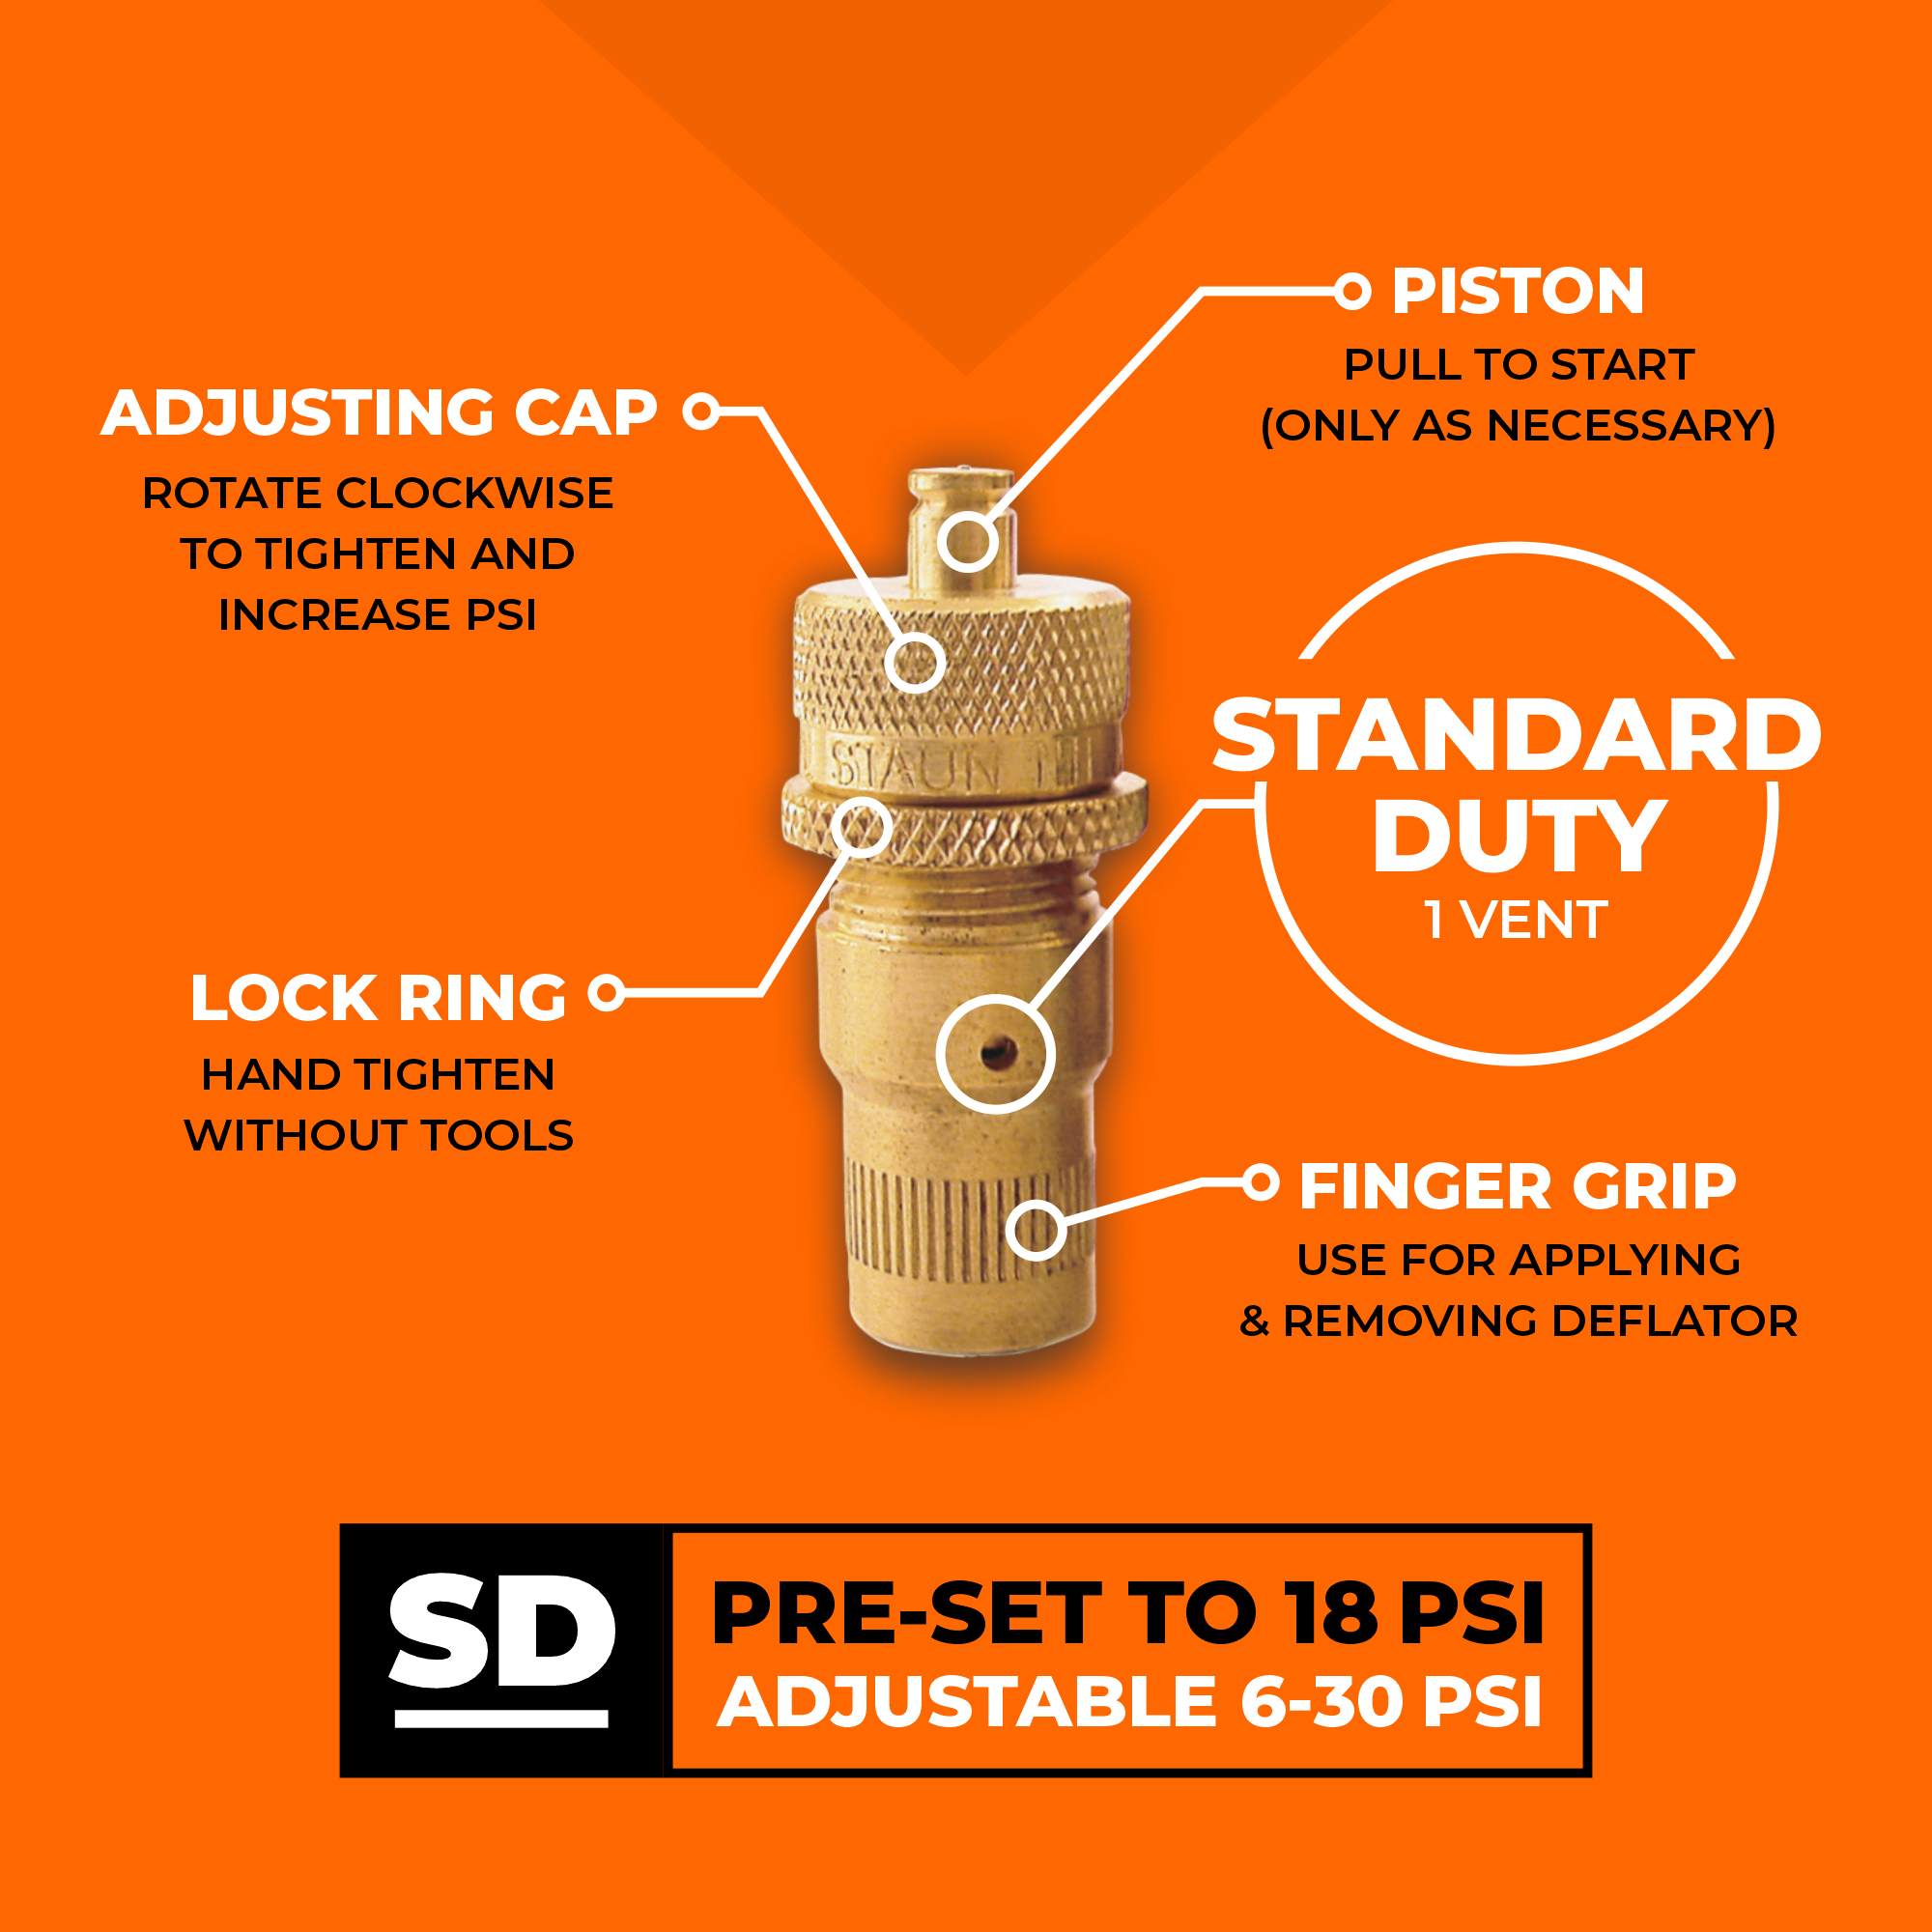
Understanding the two main components of your Staun deflator is the first step in learning how to use Staun tire deflators effectively. The lock ring—the thinner ring positioned lower on the shaft—acts as your security mechanism to prevent accidental pressure changes during use. The adjusting cap, the larger upper component, controls the precise pressure threshold where deflation automatically stops.
Both components move along the shaft when rotated: clockwise turns move them downward toward the deflator body, while counter-clockwise rotations move them upward. This seemingly simple relationship is actually crucial to proper calibration. When you turn the adjusting cap, you’re directly changing your target pressure setting. The lock ring serves only to secure that setting once achieved—turning it without adjusting the cap changes nothing about your pressure threshold.
Critical mistake to avoid: Many beginners accidentally rotate both components simultaneously during calibration, throwing off their settings. When adjusting, hold the lock ring stationary with one hand while turning only the adjusting cap with the other. This separation of functions is what makes Staun deflators both precise and frustrating for first-time users.
Perfect Your Calibration with This 6-Step Process
Why Calibrate Using Your Spare Tire First
Before touching your main tires, use your vehicle’s spare for calibration. This approach saves significant time since spare tires contain less air volume, reducing deflation and re-inflation cycles during testing. You’ll only need to calibrate one deflator perfectly, then match the others to it—a much more efficient process than calibrating all four simultaneously.
Step-by-Step Calibration Procedure
Start with both the lock ring and adjusting cap turned all the way clockwise (tightened down toward the deflator body). Screw this fully closed deflator onto your manually deflated spare tire—set to your target pressure (10-15 PSI for most off-road applications). At this position, no air should escape.
Now, slowly rotate the adjusting cap counter-clockwise while listening carefully. Within a quarter-turn, you’ll hear or feel the deflation pin “pop” open as air begins escaping. This moment represents the transition point from closed to open state. Immediately reverse direction, tightening the cap clockwise just until the air stops flowing—this establishes your precise shut-off pressure.
Pro tip: The adjustment is extremely sensitive—1/8 turn can equal 1-2 PSI difference. Make tiny adjustments and be patient. Once set, move the lock ring upward (counter-clockwise) until it contacts the adjusting cap, then tighten firmly to lock your setting. Avoid rotating the adjusting cap during this step!
Verify your calibration by inflating the tire 5 PSI above your target, reinstalling the deflator, and gently pulling up on the deflation pin to initiate flow. When air stops, check pressure with a quality gauge. Repeat with minor adjustments until consistent.
Match Remaining Deflators to Your Master Setting
With one perfectly calibrated deflator as your reference, matching the others becomes simple. Screw your master deflator onto a tire inflated to your target pressure—it shouldn’t leak. Now adjust your second deflator until it matches the master’s position, checking by installing on the same tire. Repeat for all deflators. This method eliminates repeated deflation/re-inflation cycles for each unit.
Deploy Your Calibrated Deflators for Hands-Free Tire Deflation

Once properly calibrated, using your Staun tire deflators becomes remarkably straightforward. Simply screw each deflator onto your vehicle’s tire valve stems with both components locked in position. The automatic mechanism activates immediately, deflating each tire unattended until reaching your pre-set pressure.
Time-saving insight: Attach all four deflators simultaneously, then walk away to prepare other gear while they work. Most deflation completes within 2-3 minutes depending on starting pressure and tire size. This hands-free operation is why learning how to use Staun tire deflators properly saves such significant trail time.
For extreme rock crawling requiring pressures below your deflator setting (like dropping to 8 PSI after setting to 10 PSI), first let the Stauns bring tires to their set point, then manually release the final few PSI using a valve core tool. This hybrid approach maintains the efficiency of automatic deflation while allowing ultra-precise final adjustments.
Optimize Pressure Settings for Different Off-Road Conditions
Your calibrated Staun deflators become truly versatile when you understand how to match pressure settings to specific terrain challenges:
- Fire roads & maintained trails: 18 PSI (factory setting)
- Mixed off-road trails: 15-18 PSI for balanced traction and sidewall protection
- Deep sand/dunes: 10-12 PSI to maximize footprint and “floatation”
- Technical rock crawling: 7-10 PSI for extreme sidewall flex and grip
Pressure adjustment shortcut: On the Staun 6-30 PSI model, approximately ½ turn of the adjusting cap equals 3 PSI change. This relationship allows quick recalibration between trips without restarting the entire process—simply note your current position and adjust by estimated turns based on your pressure gauge readings.
Diagnose and Fix Common Staun Deflator Issues
Even properly calibrated Staun deflators occasionally present problems that frustrate new users. When a deflator won’t start deflating after installation, your tire pressure is likely too close to or below the set point. Simply inflate 5 PSI higher, reinstall, and gently pull up on the deflation pin to initiate flow.
Inconsistent readings between tires (more than 1-2 PSI difference) typically indicate calibration drift rather than malfunction. Recalibrate using your master reference method. Always verify with a quality pressure gauge—cheap gauges cause more “deflator problems” than actual defective units.
If a deflator leaks after removal or fails to shut off completely, inspect for debris in the mechanism. A quick blast of compressed air through the valve stem connection often clears minor obstructions. For persistent issues, disassemble carefully (note spring orientation!) and check the internal seal for damage.
Extend Deflator Lifespan with Proper Storage and Maintenance
Protect your investment by following these maintenance practices after learning how to use Staun tire deflators correctly:
- Always double-check that lock rings remain tight before storage—vibration during transport can loosen them
- Store deflators in their original pouch or a dedicated container to protect threads from damage
- Consider wrapping electrical tape around the lock ring after tightening for added security
- Never store deflators loose in pockets where vibration can alter calibration
Critical warning: Avoid dropping deflators onto hard surfaces. While remarkably durable, the precision internal mechanism can be damaged by significant impacts, affecting calibration accuracy. Treat them like the precision instruments they are.
Taking just five extra minutes during initial calibration pays off with years of reliable service. Rushing through the process leads to inconsistent results and frustration on the trail. Once properly set, your Staun deflators will deliver the same precise pressure every time—proving why they remain the gold standard for automatic tire deflation despite newer competitors on the market.
Mastering how to use Staun tire deflators properly transforms trail preparation from a tedious chore into a seamless part of your off-road routine. With calibrated units ready in your gear bag, you’ll spend less time monitoring tire pressure and more time enjoying the trails that matter most.


