
Stranded with a flat tire but no spare? Your Ford’s Tire Mobility Kit can save you from roadside distress by sealing small punctures and reinflating your tire. Most Ford vehicles manufactured after 2010 come equipped with this compact solution instead of a traditional spare tire, helping reduce weight and maximize cargo space. Knowing exactly how to use your Ford tire mobility kit before an emergency strikes means you can fix minor tire damage in about 15 minutes and continue your journey safely.
This comprehensive guide reveals everything you need to know about activating your Ford Tire Mobility Kit effectively—from identifying qualifying punctures to executing the repair correctly. You’ll learn critical safety steps, common mistakes to avoid, and when professional help becomes necessary. Understanding these procedures could mean the difference between a minor inconvenience and a major roadside delay.
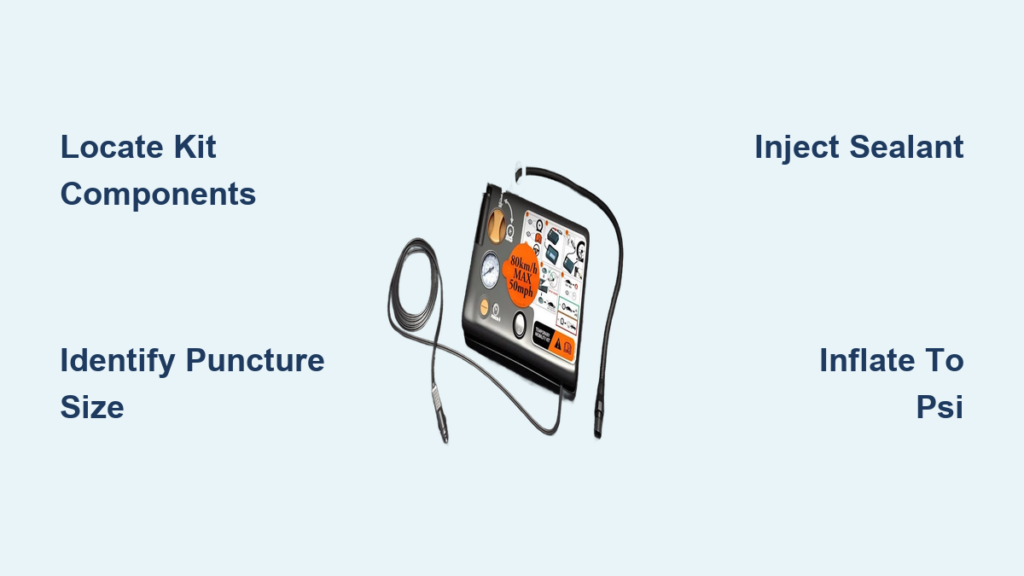
Locate and Verify Your Tire Mobility Kit Components
Your Ford Tire Mobility Kit typically resides in the trunk beneath the cargo floor or in a dedicated storage compartment. Before an emergency occurs, pull back the floor mat or cargo cover to confirm all components are present and in working order. Most Ford models store the kit in the rear cargo area, often secured with straps or in a molded tray that keeps everything organized.
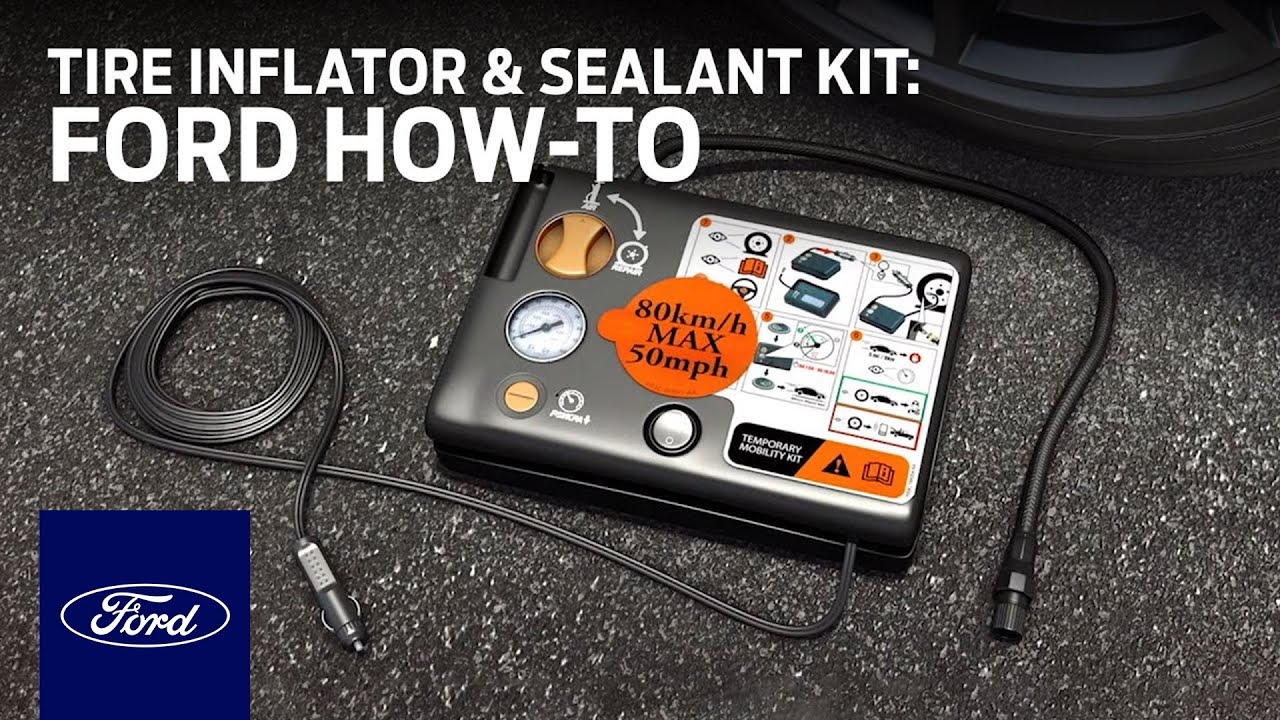
The complete repair system consists of three essential elements working in concert. The 12-volt air compressor plugs into your vehicle’s power outlet and delivers precise inflation pressure. The sealant canister contains approximately 16 ounces of specially formulated tire sealant designed to coat the tire interior and seal punctures up to 6mm in diameter. You’ll also find hoses and adapters that connect these components, plus a cleaning cloth for post-repair cleanup.
Check your kit quarterly to ensure everything functions properly. Verify the sealant hasn’t expired—most Ford sealants remain effective for 3-4 years from the manufacturing date stamped on the canister. Inspect the compressor hose for cracks or kinks that could restrict airflow. Confirm the power cord shows no fraying or exposed wires that could create electrical hazards. If any component appears damaged, visit your Ford dealer for replacement parts before you need them roadside.
Identify Repairable Tire Punctures
Not every flat tire qualifies for a Tire Mobility Kit repair. Understanding which punctures you can safely fix prevents wasted effort and dangerous situations. The kit works only on small tread punctures—typically holes caused by nails or screws measuring 6 millimeters or less in diameter. Punctures larger than this won’t seal properly, even with multiple applications of sealant.
Crucially, the damage must be located in the tire’s tread area, not on the sidewall or shoulder. Sidewall punctures cannot be sealed effectively due to the flexing motion during driving that breaks any potential seal. If you notice bulging, cracking, or visible steel belts on the tire’s side, the Tire Mobility Kit won’t help—you need immediate professional assistance.
Assess your tire’s condition before attempting repair. If you’ve driven more than a mile on the flat tire, internal damage likely occurred that the sealant cannot address. Similarly, if the tire lost air rapidly after hitting a pothole or curb, structural damage may exist that requires replacement rather than temporary sealing. When in doubt about the puncture’s severity, contact Ford Roadside Assistance for professional guidance.
Execute the Tire Sealant Injection Process
Begin the repair by parking on level ground away from traffic and engaging your parking brake. Locate the puncture site—if a nail or screw remains embedded, leave it in place as removing it creates an immediate air leak. Remove the valve stem cap and wipe the area clean with the provided cloth to ensure proper sealant flow.
Connect the sealant canister to the compressor by aligning the tabs and twisting clockwise until it locks securely. Attach the hose assembly to your tire’s valve stem, ensuring a snug connection that prevents sealant leakage during injection. Open the sealant valve according to your kit’s instructions—most models require pressing a button or rotating a lever.
Allow the entire canister contents to flow into the tire, which typically takes 60-90 seconds. You’ll hear the sealant moving through the hose as it enters the tire cavity. Once empty, disconnect the hose immediately and replace the valve stem cap to prevent air loss. The sealant will begin coating the tire interior as you prepare for inflation.
Properly Inflate Your Repaired Tire
With sealant injected, connect the compressor directly to your vehicle’s 12-volt power outlet—do not use the sealant canister for inflation. Attach the inflation hose to the tire valve stem and press the power button to activate the compressor. Most Ford compressors feature an automatic shut-off when reaching the target pressure, but monitor the gauge regularly.
Inflate to the pressure specified on your driver’s side door jamb sticker—typically 32-35 PSI for passenger vehicles. The inflation process usually takes 3-7 minutes depending on how much air your tire lost. If the compressor runs continuously without reaching target pressure, the puncture may be too large for effective sealing.
After reaching proper inflation, disconnect the hose and replace the valve cap securely. Gently press on the tire to confirm firmness—your tire should feel solid with no obvious air leaks. If pressure drops significantly within minutes, the repair hasn’t held and you’ll need professional assistance.
Drive Correctly After Tire Repair

Ford specifically recommends driving immediately after repair for 10-15 minutes at speeds below 50 mph to properly distribute the sealant. This critical step allows centrifugal force to spread the sealant throughout the tire interior and forces remaining material toward the puncture site for a stronger seal.
During this initial drive, monitor your vehicle’s handling carefully. Mild vibrations may occur as the sealant settles—this is normal. However, significant shaking, pulling to one side, or unusual noises indicate the repair failed or additional damage exists. If you notice these symptoms, pull over safely and assess the situation.
Remember that the Tire Mobility Kit provides only a temporary repair designed to get you to a service facility. Plan to visit a tire professional within 50 miles of your repair to inspect the tire. Most technicians recommend replacing any tire that has been punctured and sealed, as the structural integrity may be compromised even if the immediate repair holds.
Clean Components and Store Properly Post-Use
Sealant contains latex compounds that harden quickly and can permanently damage surfaces if not cleaned promptly. After completing your repair, wipe down all kit components thoroughly with the provided cloth or a damp rag. Focus on the hose connections and valve stem areas where sealant tends to pool and drip.
The sealant canister empties completely during use and cannot be refilled—you’ll need a replacement before your next emergency. Store the empty canister in a sealed plastic bag to contain residual leakage. Ford genuine replacement kits are available through dealerships, with prices typically ranging from $50-$100 depending on your vehicle model.
Replace the entire kit every 3-4 years regardless of use, as sealant degrades over time. Mark your replacement date on the new canister with permanent marker so you know when to refresh your emergency supplies. Consider keeping a spare sealant canister in your garage for extended trips where service stations may be scarce.
Recognize When Professional Help Is Essential

Some tire damage scenarios require immediate professional assistance rather than attempting a DIY repair. If your tire loses air rapidly after sealant application, the puncture likely exceeds the kit’s capabilities. Similarly, multiple punctures in the same tire generally cannot be sealed effectively with a single canister.
Seek professional help immediately if you notice:
– Sidewall damage of any kind (bulges, cracks, or exposed cords)
– Punctures larger than 6mm (about the width of a pencil)
– Significant tire deformation from driving on a flat
– Air pressure dropping more than 5 PSI within 24 hours
Ford Roadside Assistance provides complimentary towing to the nearest Ford dealer for eligible vehicles. If you’re uncertain about your tire’s condition or feel uncomfortable performing the repair, don’t hesitate to call for professional support—your safety outweighs any time savings from a DIY fix.
Final Note: Mastering how to use your Ford tire mobility kit transforms a potential roadside crisis into a manageable 15-minute procedure. By understanding the precise steps for sealant injection, proper inflation techniques, and critical safety limitations, you maintain control when tire emergencies strike. Remember that this system provides only temporary relief—always schedule professional tire inspection after using the kit to ensure your continued safety on the road. Keep your kit components accessible, regularly check expiration dates, and practice the procedure once a year so you’re prepared when you need it most.


