

That persistent orange tire pressure warning light on your Honda CR-V dashboard can be both distracting and concerning, especially when you’ve already checked and inflated your tires to the proper pressure. Whether you recently filled your tires at a gas station, rotated your wheels, or simply noticed the light after a temperature drop, knowing exactly how to turn off tire light Honda CR-V models require will save you unnecessary trips to the dealership. This comprehensive guide covers every proven method to reset your TPMS warning light, from simple button presses to troubleshooting stubborn indicators that refuse to clear. You’ll learn the precise steps based on your specific CR-V model year, avoid common mistakes that keep the light illuminated, and understand when professional service is actually needed.
Confirm Low Pressure Isn’t the Real Issue
Before attempting any reset procedure, verify whether low tire pressure actually triggered the warning. The tire pressure light activates when one or more tires fall below 25% of the recommended PSI, but many drivers mistakenly assume the system is faulty without checking actual pressures. Different CR-V trims require specific pressure levels—2019 EX-L AWD models need 33 psi front and 30 psi rear, as indicated on your driver’s side door jamb sticker. Never rely solely on gas station air compressors, as they’re often inaccurate; use a digital tire gauge for precise measurements when tires are cold.
Critical checks before resetting:
- Measure pressure on all four tires with your own gauge
- Inflate to the exact specifications on your door jamb sticker
- Check for slow leaks by inspecting tires for nails or punctures
- Verify valve caps are securely tightened to prevent air loss
If your tire light flashes for 60-90 seconds before staying illuminated, this indicates a sensor malfunction rather than low pressure, requiring different troubleshooting than a steady light.
Locate and Use Your CR-V’s TPMS Reset Button
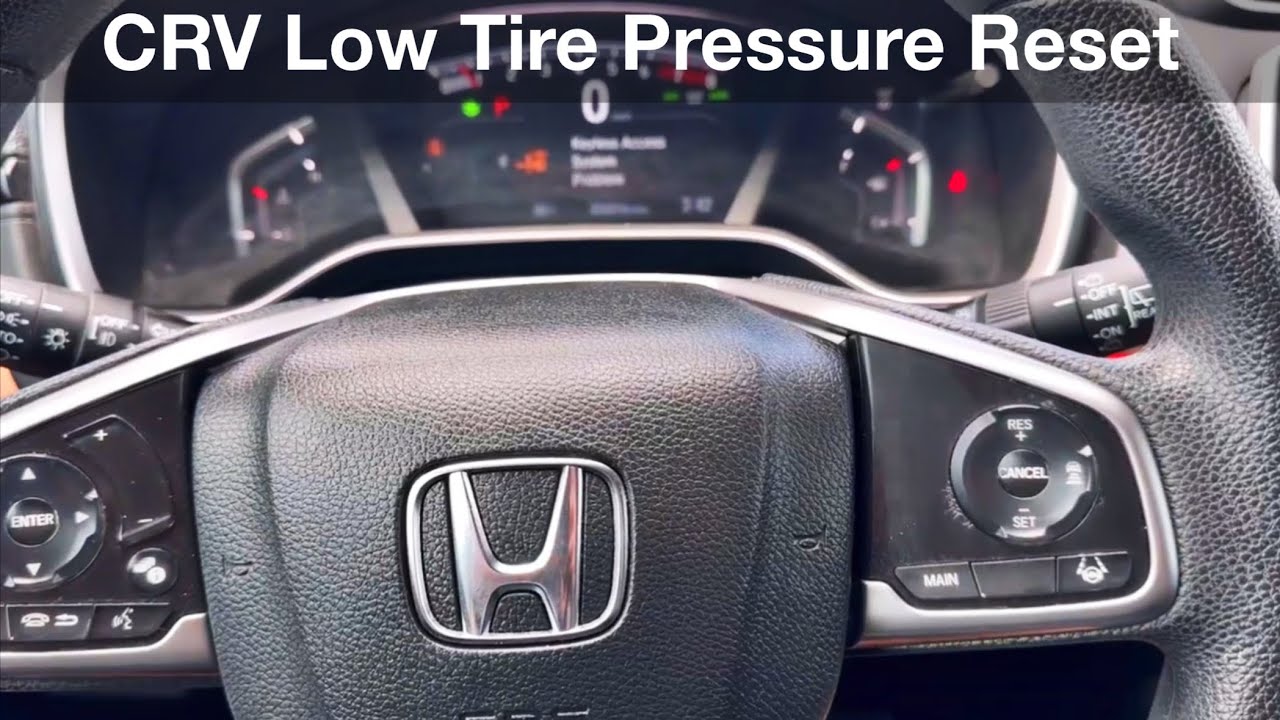
The most direct method to turn off tire light Honda CR-V owners use involves the dedicated TPMS reset button, typically positioned beneath the steering column near the instrument panel. This physical button works across most CR-V generations from 2012-2025, though its exact location varies slightly by model year. On newer models (2017+), you may need to remove a small plastic cover to access it, while older models have it more visibly exposed.
Follow these precise steps for successful reset:
- Inflate all tires to the pressure specified on your driver’s door jamb sticker
- Insert your key and turn ignition to “ON” position (do not start engine)
- Press and hold the TPMS reset button firmly for 10-15 seconds
- Watch for the tire pressure light to flash slowly three times
- Release the button once the light turns off completely
- Start your engine to confirm the reset was successful
Pro tip: If the light remains on after release, repeat the process while ensuring you’re holding the button continuously without interruption. Some owners report needing 2-3 attempts before the system recognizes the reset command.
Navigate Steering Wheel Controls for Digital Reset
CR-V models from 2017 onward with Display Audio systems require using steering wheel controls instead of a physical reset button. This method provides visual confirmation on your instrument cluster display, making it more reliable than the button method for newer models. The process involves navigating through your vehicle’s menu system to initiate the TPMS recalibration sequence.
Complete this digital reset procedure:
- Ensure all tires are properly inflated to door jamb specifications
- Turn ignition to “ON” without starting the engine
- Press the “Menu” button on your steering wheel
- Navigate to “Vehicle Settings” using the arrow controls
- Select “TPMS Calibration” or “Tire Pressure Monitor”
- Confirm the calibration process when prompted
- Drive the vehicle briefly to complete the sensor relearning
This method automatically recalibrates the system to recognize current tire pressures, making it particularly effective after tire rotations or replacements. The display will show a confirmation message once calibration is complete.
Activate Automatic Reset by Driving
For certain Honda CR-V models (particularly 2015-2019 trims), driving at highway speeds triggers an automatic TPMS reset when tire pressures are correct. This passive method works because the sensors require vehicle movement to accurately measure pressure and communicate with the vehicle’s computer system. The system needs consistent pressure readings over a sustained period to clear the warning light.
Execute this driving reset properly:
- Drive continuously at 50+ mph for at least 10 minutes
- Maintain steady speed without rapid acceleration or braking
- Avoid sharp turns that could temporarily affect pressure readings
- The light should turn off automatically during your drive
- If it remains on, restart your vehicle after the drive to complete reset
Important: This method only works if all tires maintain proper pressure throughout the drive. Temperature changes during driving can cause pressure fluctuations that prevent successful reset.
Perform Full Calibration After Tire Service
Whenever you rotate, replace, or balance tires on your Honda CR-V, a complete TPMS calibration is essential—simply resetting the light isn’t sufficient. The system needs to relearn which sensor corresponds to each wheel position, especially after rotation. Without proper calibration, your CR-V may continue displaying inaccurate readings or false warnings despite correct tire pressure.
Complete post-maintenance calibration:
- Inflate all tires to specified pressure when cold
- Turn ignition to “ON” position
- Access TPMS settings through steering wheel controls or physical button
- Initiate “Relearn” or “Calibration” mode
- Drive 15-20 minutes at varying speeds (25-65 mph)
- Confirm calibration completion when light turns off
This process allows each sensor to transmit its unique ID to the vehicle’s computer, establishing accurate wheel position recognition. Calibration should be performed within 30 minutes of completing tire service for best results.
Diagnose Stubborn Warning Lights That Won’t Clear
When your tire light remains illuminated despite multiple reset attempts and verified proper pressure, deeper issues may be present. A persistent light after correct inflation typically indicates sensor communication problems rather than actual low pressure. The most common culprits include depleted sensor batteries (which last 5-10 years), damaged sensors from tire mounting, or electrical interference from aftermarket accessories.
Systematic troubleshooting approach:
- Recheck all tire pressures with your own gauge (don’t trust station compressors)
- Inspect valve stems for damage or debris preventing proper sealing
- Test each sensor by rotating tires to different positions
- Scan for TPMS error codes using an OBD-II reader
- Check for aftermarket wheels that may block sensor signals
Critical warning: If the light flashes rapidly for 90 seconds before staying on, this specifically indicates a sensor fault requiring professional diagnosis—reset procedures won’t resolve this issue.
Recognize When Sensor Replacement Is Necessary
TPMS sensors contain non-replaceable batteries that eventually deplete, typically after 7-10 years of service. When these batteries fail, your CR-V can no longer receive accurate pressure data, causing persistent warning lights despite proper inflation. Sensor replacement becomes necessary when you experience intermittent warnings, inconsistent pressure readings between tires, or complete system failure.
Signs requiring professional sensor service:
- Flashing tire light followed by steady illumination
- Inconsistent pressure readings across tires
- Warning light appearing only at certain speeds
- One tire consistently showing incorrect pressure
- System failing to recognize reset attempts completely
Sensor replacement costs $50-$100 per sensor plus programming fees. Honda dealerships can reprogram new sensors to your specific VIN, while some independent tire shops offer this service at lower cost.
Establish a Proactive Tire Maintenance Routine
Preventing unnecessary tire light activations starts with consistent tire care. Monthly pressure checks with your own gauge—not relying solely on the TPMS—catch gradual air loss before it triggers warnings. Temperature fluctuations significantly affect tire pressure, with every 10°F change causing approximately 1 PSI variation, making seasonal checks essential.
Monthly maintenance checklist:
- Check pressures when tires are cold (before driving)
- Inspect tread for uneven wear indicating alignment issues
- Examine tires for nails, punctures, or sidewall damage
- Rotate tires every 5,000-7,500 miles to ensure even wear
- Replace valve cores annually to prevent slow leaks
Documenting your pressure readings helps identify developing issues before they trigger warning lights. Remember that proper inflation improves fuel economy by up to 3% and extends tire life by thousands of miles.
Final Note: When your Honda CR-V tire light appears, first verify actual tire pressures with your own gauge before attempting any reset. Use the steering wheel menu method for 2017+ models or the physical reset button for older trims, driving at 50+ mph if the light persists. A flashing light indicates sensor failure requiring professional service, while a steady light usually responds to proper reset procedures. Always consult page 528 of your owner’s manual for model-specific instructions—this single reference contains the exact reset procedure for your specific CR-V year and trim level. Consistent monthly pressure checks prevent most unnecessary warning lights and keep you driving safely.


