

If you’ve ever found yourself stranded with a flat tire on your Tesla, you know the urgency of getting that wheel off quickly and safely. Unlike traditional vehicles, Teslas present unique challenges for tire removal with their low ground clearance, specialized wheel designs, and integrated safety systems. Properly removing a Tesla tire requires specific knowledge of jacking points, torque specifications, and safety protocols that differ from conventional cars. This guide provides the exact procedures you need to safely remove your Tesla tire without damaging your vehicle or risking personal injury. By following these verified steps, you’ll learn how to properly position your jack, remove stubborn lug nuts, and complete the tire change efficiently—whether you’re on a city street or a remote highway.
Essential Safety Preparations Before Removing Tesla Tires
Before attempting to remove your Tesla’s tire, proper safety preparation is non-negotiable. Teslas sit significantly lower to the ground than most vehicles, making incorrect jacking extremely dangerous. Always park on a firm, level surface away from traffic, engage your parking brake fully, and place wheel chocks against the tires opposite the one you’re changing. For Model 3 and Model Y owners, remember these vehicles lack traditional lug nut caps—what appears to be a smooth wheel cover actually conceals the lug nuts beneath. Keep your hazard lights activated throughout the process, and wear high-visibility clothing if working near traffic. Most critically, never place any part of your body under a Tesla supported only by a jack—these vehicles weigh between 3,800-5,000 pounds and can slip off improperly positioned jacks with catastrophic consequences.
Identifying Your Tesla’s Correct Jacking Points
Finding the proper jacking points on your Tesla is crucial for safe tire removal. Each model has specific reinforced sections along the rocker panels designed to support the vehicle’s weight:
- Model S and Model X: Look for the small notches molded into the lower rocker panel, approximately 12 inches behind the front wheel and 12 inches ahead of the rear wheel
- Model 3 and Model Y: These have discreet rubber plugs along the rocker panel that cover the official jacking points—press firmly on potential spots until you feel a slight give indicating the reinforced section
Never jack your Tesla on plastic body panels, suspension components, or the battery pack housing. If you’re uncertain, consult your owner’s manual for diagrams showing exact jacking point locations for your specific model year, as these have changed slightly across production runs.
Required Tools for Tesla Tire Removal
Unlike conventional vehicles, Teslas require specialized tools for safe tire removal:
- Tesla-approved floor jack (the included scissor jack works but is extremely difficult with low ground clearance)
- Two high-quality jack stands rated for at least 3 tons each
- 21mm 12-point impact socket (most Teslas use this size)
- Torque wrench capable of 140-160 lb-ft
- Rubber mallet (for stubborn wheels)
- Wheel chocks
- Heavy-duty gloves
- LED work light
Critical warning: Never use an impact wrench directly on Tesla wheels—their aluminum hubs are easily damaged by excessive torque. Hand-tighten all lug nuts to avoid stripping the threads, which creates expensive repair situations.
Step-by-Step Tesla Tire Removal Process
Loosening Lug Nuts Before Lifting Your Tesla
The most common mistake Tesla owners make is attempting to loosen lug nuts while the vehicle is lifted. With Teslas’ low clearance, you must break lug nut torque while the tire remains on the ground:
- Remove any decorative center caps if present (most newer models don’t have these)
- Position your 21mm socket on the first lug nut and tap it counterclockwise with a mallet to break initial resistance
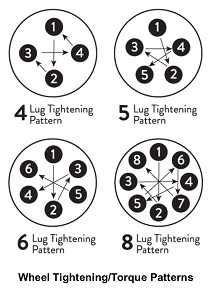
- Loosen each lug nut approximately 1/4 turn in a star pattern (never remove completely yet)
- If lug nuts are extremely tight, use your jack handle as a breaker bar extension for additional leverage
Pro tip: Spray penetrating oil around lug nut bases if they’re corroded, but avoid getting oil on brake components. Wait 10 minutes before attempting to loosen stubborn nuts.
Properly Lifting and Supporting Your Tesla
Tesla’s low ground clearance requires precise lifting technique:
- Position your floor jack exactly at the manufacturer-specified jacking point
- Lift slowly while watching for proper contact with the reinforced section
- Raise the vehicle just enough to create 1-2 inches of clearance between tire and ground
- Immediately position jack stands under reinforced frame points—not under the jack itself
- Gently lower the vehicle onto the jack stands until fully supported
- Double-check stability by shaking the vehicle before proceeding
Critical safety check: Never work under a Tesla supported only by a jack. The included scissor jack is for emergency use only and should never be trusted for extended periods.
Removing the Wheel and Tire Assembly
With your Tesla properly supported, complete the tire removal:
- Fully remove all lug nuts (keep them organized to prevent loss)
- Grip the tire at 3 and 9 o’clock positions and pull straight toward you
- If the wheel is stuck due to corrosion, tap the tire’s sidewall with a rubber mallet (never strike the rim)
- Carefully slide the wheel straight off the hub, watching for any retaining clips
- Place the removed wheel flat on the ground with the outer surface down
Common mistake: Trying to “kick” the wheel off can damage your Tesla’s delicate hub assembly. If the wheel won’t release after moderate force, re-tighten two opposite lug nuts slightly and drive forward/backward 6 inches to break the wheel free.
Troubleshooting Common Tesla Tire Removal Problems

Dealing with Seized Lug Nuts on Tesla Wheels
Seized lug nuts are increasingly common on Teslas due to aluminum wheel and steel nut corrosion:
- Solution 1: Apply penetrating oil around the nut base and wait 15 minutes before attempting removal
- Solution 2: Use a six-point socket instead of twelve-point for better grip
- Solution 3: Tap the socket firmly onto the nut with a mallet before applying torque
- Emergency solution: If nuts are completely seized, carefully drill them out starting with a 1/8″ pilot hole
Warning: Never use heat on lug nuts—this can damage your Tesla’s sensitive wheel sensors and brake components.
Handling Stuck Wheels That Won’t Release
Tesla wheels sometimes bond to the hub due to corrosion:
- Reinstall two lug nuts loosely (3-4 threads)
- Lower the vehicle slightly so the tire touches the ground
- Drive forward approximately 6 inches then reverse the same distance
- Raise the vehicle again and attempt removal
Pro tip: Apply anti-seize compound to hub surfaces before reinstalling wheels to prevent future bonding—just avoid getting it on brake surfaces.
Reinstalling Tires and Final Safety Checks
Proper Wheel Installation Sequence
Reinstalling your Tesla’s tire requires precision to prevent damage:
- Clean hub mating surfaces thoroughly with a wire brush
- Lift the wheel straight onto the hub (avoid tilting)
- Hand-tighten all lug nuts in star pattern
- Lower vehicle until tire touches ground but doesn’t bear full weight
- Tighten lug nuts to 90 lb-ft in star pattern
- Fully lower vehicle and torque to final specification (144 lb-ft for most models)
Critical step: Never fully tighten lug nuts while the vehicle is lifted—this creates uneven pressure on the wheel hub.
Post-Installation Verification
After completing your tire change:
- Check lug nut torque again after driving 50 miles
- Inspect for any unusual vibrations or noises
- Reset your tire pressure monitoring system if applicable
- Store your flat tire properly (never leave it in your trunk loose)
Important: If you hear clicking noises after reinstalling the tire, stop immediately—this usually indicates improper lug nut tightening that could lead to wheel detachment.
Preventing Future Tire Removal Difficulties

Applying Proper Anti-Seize Compound
Prevent future corrosion issues by applying anti-seize compound correctly:
- Use nickel-based anti-seize (not copper) on wheel studs
- Apply a thin film to the hub mating surface
- Never apply to the tapered lug nut seat
- Wipe excess away to prevent contamination
Pro tip: Mark one lug nut with paint after proper tightening to easily identify if nuts loosen over time.
Maintaining Your Tesla’s Wheel System
Regular maintenance prevents emergency tire removal headaches:
- Remove wheels annually to inspect hub surfaces
- Clean brake dust buildup that accelerates corrosion
- Check lug nut torque monthly (Teslas are prone to loosening)
- Replace damaged wheel studs immediately
By following these precise procedures, you’ll safely remove and reinstall your Tesla tires while protecting your vehicle’s integrity. Remember that Tesla’s unique design demands specific approaches—what works for conventional vehicles could damage your electric car or put you at risk. Always prioritize safety over speed when working with these heavy vehicles, and when in doubt, consult a Tesla service center rather than risking improper procedures.


