
Struggling to remove a stubborn tire valve when preparing for maintenance or replacement? You’re not alone. Many DIY mechanics and vehicle owners face challenges when attempting to safely remove tire valves without damaging the rim or causing air leaks. Knowing how to properly remove a tire valve is essential for tire maintenance, pressure sensor replacements, or preparing for tire changes. This guide delivers precise instructions you can trust, covering everything from identifying valve types to executing the removal process safely. By the end of this article, you’ll understand exactly how to remove tire valves on your car, bicycle, or other vehicles without causing damage or compromising safety.
Improper valve removal can lead to costly rim damage, air leaks, or even dangerous tire failures while driving. Whether you’re replacing a faulty TPMS sensor, fixing a slow leak, or preparing for winter tire changes, having the right technique makes all the difference. Many people waste time and risk equipment damage by using improper tools or techniques that strip valve cores or damage valve stems. This comprehensive guide eliminates those problems by providing field-tested methods that work for most common valve types.
Identifying Your Tire Valve Type Before Removal

Before attempting removal, correctly identifying your valve type prevents costly mistakes. Most vehicles use Schrader valves (standard car tires), while higher-end bicycles and some specialty vehicles use Presta valves. Schrader valves feature a spring-loaded pin in the center and have a wider diameter (approximately 8mm), making them the most common type found on passenger vehicles, trucks, and motorcycles. Presta valves are narrower (approximately 6mm) with a small knurled nut at the top that must be unscrewed before air can be added or released.
How to Spot Schrader Valve Components
Schrader valves consist of three main components you’ll interact with during removal: the valve stem (the visible rubber or metal portion extending from the rim), the valve core (the threaded brass insert inside the stem), and the dust cap (the small plastic cover protecting the valve mechanism). The valve core contains a spring-loaded pin that seals the tire when not in use. When preparing for removal, inspect the valve stem for cracks, corrosion, or damage that might complicate the process or indicate the need for complete replacement rather than simple core removal.
Presta Valve Specifics for Bicycle and Specialty Tires
Presta valves require different handling than Schrader valves. These feature a lock nut at the top that must be loosened before the valve will release air, and they lack the spring-loaded mechanism of Schrader valves. When removing Presta valves, you’ll typically need to unscrew the entire stem from the rim rather than just removing the core. The narrower design means using appropriately sized tools is critical—standard Schrader tools won’t fit Presta valves and could damage them.
Essential Tools for Safe Tire Valve Removal
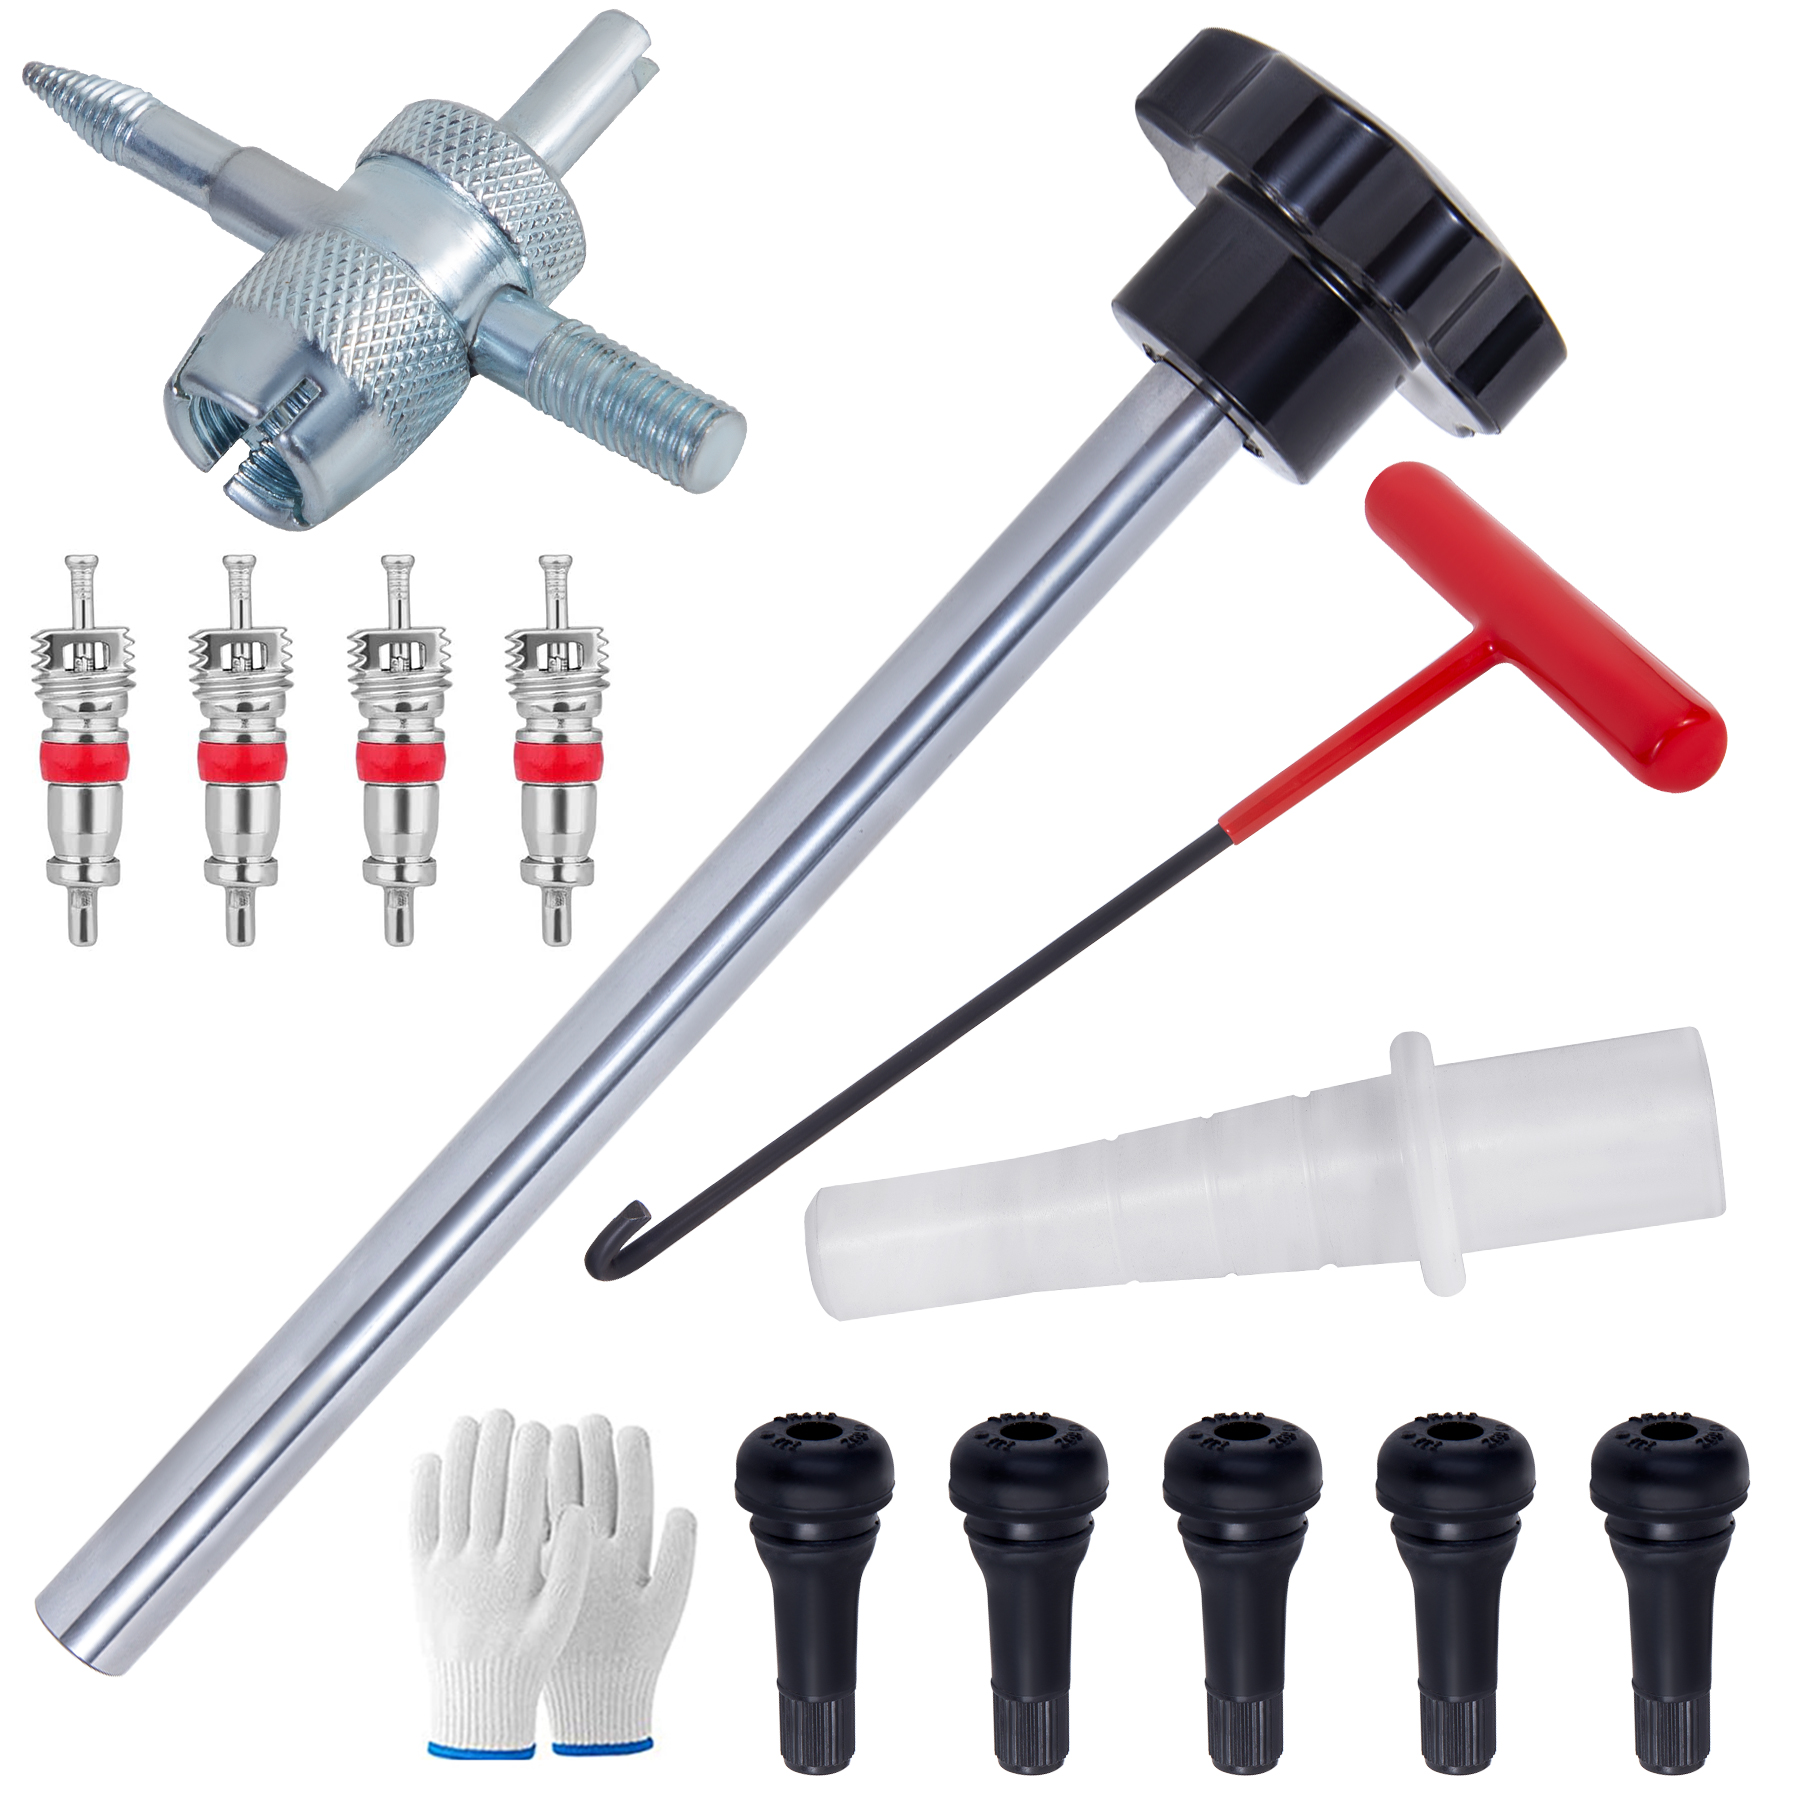
Having the right tools prevents damage to both the valve and your wheel rim during removal. For Schrader valves, a dedicated valve core removal tool is essential—it’s a small, inexpensive tool that screws onto the valve core for controlled removal. You’ll also need rubber gloves for grip, safety glasses to protect your eyes from sudden air release, and a towel to contain any tire sealant that might spray out. For Presta valves, you’ll need a specific Presta valve tool or a small wrench that fits the valve nut.
Why Standard Pliers Cause More Harm Than Good
Many people mistakenly use needle-nose pliers to remove valve cores, but this often leads to stripped cores that become impossible to remove without specialized extraction tools. The rounded edges of pliers don’t grip the valve core’s notches properly, causing slippage that damages the core’s exterior. A proper valve core tool has precisely machined notches that match the valve core’s shape, providing full contact and even pressure distribution during removal. Investing in the correct $3-$5 tool saves time, frustration, and potentially costly rim damage.
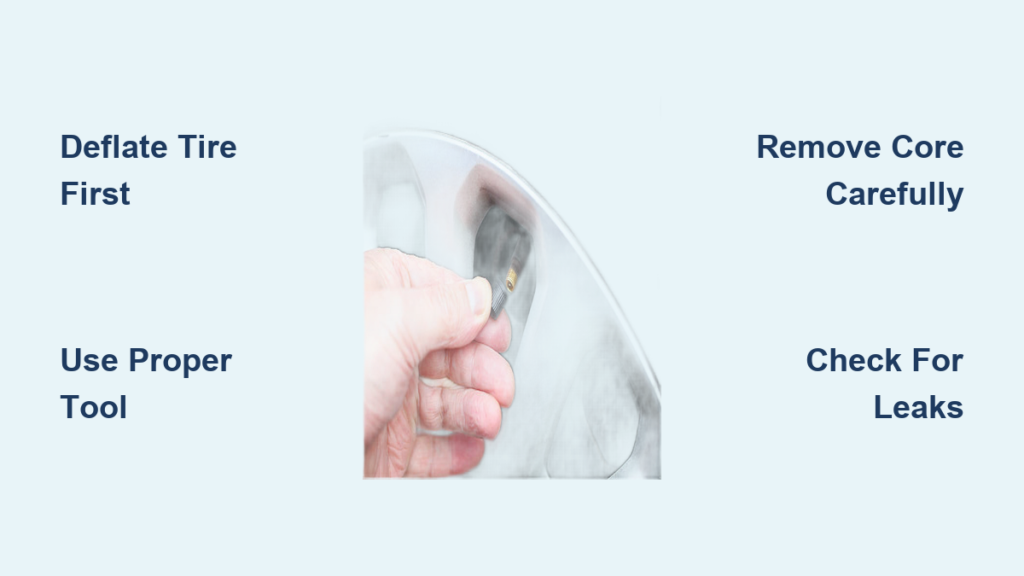
Step-by-Step Schrader Valve Core Removal Process
Complete valve core removal requires careful execution to avoid damaging components. Begin by fully deflating the tire—never attempt valve work on an inflated tire as this creates dangerous projectile hazards. Remove the dust cap and set it aside in a safe place. Place your valve core tool onto the valve core, pressing down firmly while turning counterclockwise. Apply steady, even pressure; if the core resists, don’t force it as this indicates possible corrosion or damage requiring additional preparation.
Troubleshooting Stuck Valve Cores Without Damage
When valve cores refuse to budge, several safe techniques can help without damaging the stem. First, apply penetrating oil around the core and let it sit for 10-15 minutes to break down corrosion. If that fails, gently tap the core tool with a small hammer to break the initial resistance—use light taps only to avoid damaging internal components. For severely stuck cores, specialized valve core extractors with left-handed threads can grip the damaged core for removal. Never use excessive force as this can strip the stem threads, requiring complete valve stem replacement.
Complete Schrader Valve Stem Replacement Procedure
Sometimes the entire valve stem needs replacement rather than just the core. This requires completely deflating the tire and partially removing it from the rim. Support the wheel safely on jack stands, then deflate completely. Use a tire spoon or pry bar to carefully separate the tire bead from the rim near the valve stem. Once accessible, unscrew the old valve stem from the rim’s interior using a valve stem wrench, being careful not to scratch the rim surface.
Installing a New Valve Stem Correctly
After removing the old stem, clean the valve hole thoroughly before installation. Apply a small amount of soapy water to the new stem’s rubber grommet to ease installation and create a better seal. Insert the new stem and tighten it to manufacturer specifications—typically 2-3 inch-pounds of torque. Over-tightening cracks the rubber seal, while under-tightening causes slow leaks. Re-seat the tire bead properly and reinflate slowly while checking for proper seating and leaks.
Presta Valve Removal Specific Techniques

Presta valve removal differs significantly from Schrader valves. First, unscrew the lock nut at the top of the valve completely. Deflate the tire fully, then unscrew the entire valve stem from the rim by turning counterclockwise. Presta valves often have a retaining nut on the inside of the rim that must be held stationary with a wrench while unscrewing the outer portion. Keep track of all components as Presta systems typically include multiple small parts that must be reassembled correctly.
Common Presta Valve Mistakes to Avoid
Many people damage Presta valves by attempting to remove just the core like with Schrader valves—Presta cores aren’t designed for separate removal in most cases. Another common error is not supporting the inner nut during removal, which causes the entire assembly to spin uselessly. When reinstalling, failing to properly tighten both the inner and outer nuts leads to valve movement that damages the rim hole over time. Always use the correct size wrenches for Presta valves as their smaller components are easily damaged by improper tools.
Safety Precautions During Valve Removal
Never skip safety measures when working with tire valves. Always completely deflate tires before valve work—compressed air contains tremendous energy that can turn a valve into a dangerous projectile. Wear safety glasses to protect your eyes from sudden air releases or flying debris. Work in a well-ventilated area as tire sealants often contain chemicals that shouldn’t be inhaled. Keep your face and body clear of the valve during initial deflation and removal attempts.
Recognizing When to Seek Professional Help
Certain situations warrant professional assistance rather than DIY valve removal. If you notice cracks in the valve stem base where it meets the rim, this indicates potential rim damage requiring expert assessment. TPMS (Tire Pressure Monitoring System) valves contain electronic components that often need specialized tools for proper removal and recalibration. Aluminum rims with corroded valve stems risk damage during DIY removal due to the soft metal’s vulnerability. When in doubt, consult a tire professional to avoid costly mistakes.
Post-Removal Testing and Validation
After valve removal or replacement, thorough testing ensures safety and functionality. Reinflate the tire slowly while monitoring for leaks using soapy water solution applied to all connections. Check that the valve operates smoothly and maintains pressure over 24 hours. For vehicles with TPMS, drive the vehicle at highway speeds for several minutes to allow the system to recalibrate. Verify proper tire pressure with an accurate gauge—not the vehicle’s TPMS display which may need time to update.
Preventing Future Valve Problems Through Proper Maintenance
Extend valve life and prevent future removal difficulties with simple maintenance habits. Replace dust caps regularly as they protect against dirt and moisture that cause corrosion. Check valve cores annually for tightness—loose cores cause slow leaks. When inflating tires, avoid pressing the pin excessively as this wears the sealing mechanism. For seasonal tire changes, consider replacing valve cores as preventative maintenance since they’re inexpensive and critical for proper sealing.
When Valve Removal Isn’t the Solution to Your Problem
Many tire pressure issues don’t actually require valve removal at all. Slow leaks often originate from the tire bead rather than the valve. Before attempting valve removal, perform a complete leak check by submerging the entire tire in water or using soapy solution on all potential leak points. Rim damage from potholes can cause persistent leaks that valve replacement won’t fix. Understanding when valve removal is necessary versus when other solutions are appropriate saves time and prevents unnecessary work.
Proper valve maintenance contributes significantly to tire longevity, fuel efficiency, and most importantly, safety. By mastering these valve removal techniques, you gain valuable self-sufficiency for routine tire care while avoiding common pitfalls that lead to expensive repairs. Whether you’re a weekend DIYer or regular vehicle maintainer, these skills serve you well through countless tire rotations, seasonal changes, and emergency situations. Remember that patience and the right tools make all the difference—rushing valve work risks damage that turns a simple $5 repair into a $100+ problem.


