

Your tires feel stiff and bouncy after filling up at the gas station, creating a harsh ride that makes every bump feel like a pothole. This uncomfortable sensation means you’ve overinflated your tires, a common mistake that happens when drivers add air without checking pressure mid-process. Overinflated tires reduce traction, wear out faster, and increase blowout risk—especially on hot days or rough roads. Knowing exactly how to remove extra air from tire ensures you can quickly correct this problem and restore safe driving conditions. In this guide, you’ll learn the precise techniques to release air safely while avoiding common mistakes that could leave you stranded.
Why Overinflated Tires Lose Traction and Wear Out Faster
When your tire pressure exceeds the manufacturer’s recommended PSI, the center of your tire bulges outward, reducing the contact patch that grips the road. This creates longer stopping distances on wet surfaces and makes your vehicle feel unstable during turns. Summer heat exacerbates the problem as air inside your tires expands, sometimes pushing pressure 5-8 PSI above safe levels. Off-road drivers intentionally “air down” to 15-20 PSI for better traction, but accidental overinflation creates the opposite effect—less grip, not more.
Overinflated tires also wear unevenly, with the center tread wearing down rapidly while the edges remain intact. This premature wear pattern forces you to replace tires sooner than necessary. In extreme cases, overinflated tires become dangerously rigid, making them more susceptible to punctures from road debris and increasing the risk of blowouts when hitting potholes at highway speeds.
5 Essential Tools for Removing Air from Tires Properly

Why a Reliable Pressure Gauge Is Non-Negotiable
Your digital or analog pressure gauge prevents guesswork during deflation. Without one, you cannot distinguish between 32 PSI (safe) and 40 PSI (dangerous overinflation). Digital gauges offer 1-2 PSI accuracy while analog versions work adequately for home use. Keep your gauge in your glove compartment for immediate access whenever you suspect overinflation. Check it monthly against a known accurate gauge to ensure it hasn’t become unreliable.
Valve Core Tool for Rapid Air Release
This specialized tool inserts into the valve stem and unscrews the core to release air 3-5 times faster than standard methods. Use it when preparing for off-road adventures or correcting significant overinflation (more than 5 PSI above recommended). Turn counterclockwise just 1/4 turn for controlled release—full removal dumps all air instantly. Always carry this $5 tool in your emergency kit if you frequently adjust tire pressure.
3 Emergency Substitutes When Tools Are Missing
- Flathead screwdriver – Press the tip gently against the valve pin (the small metal protrusion inside the stem)
- House key – Insert sideways into the valve opening and press down steadily
- Pen with firm plastic tip – Apply consistent pressure to release air in short bursts
These improvised methods work in emergencies but lack precision—always verify pressure with a gauge afterward.
Where to Find Your Exact Tire PSI Requirements (Not the Sidewall!)
Door Jamb Sticker: Your Manufacturer’s True Recommendation
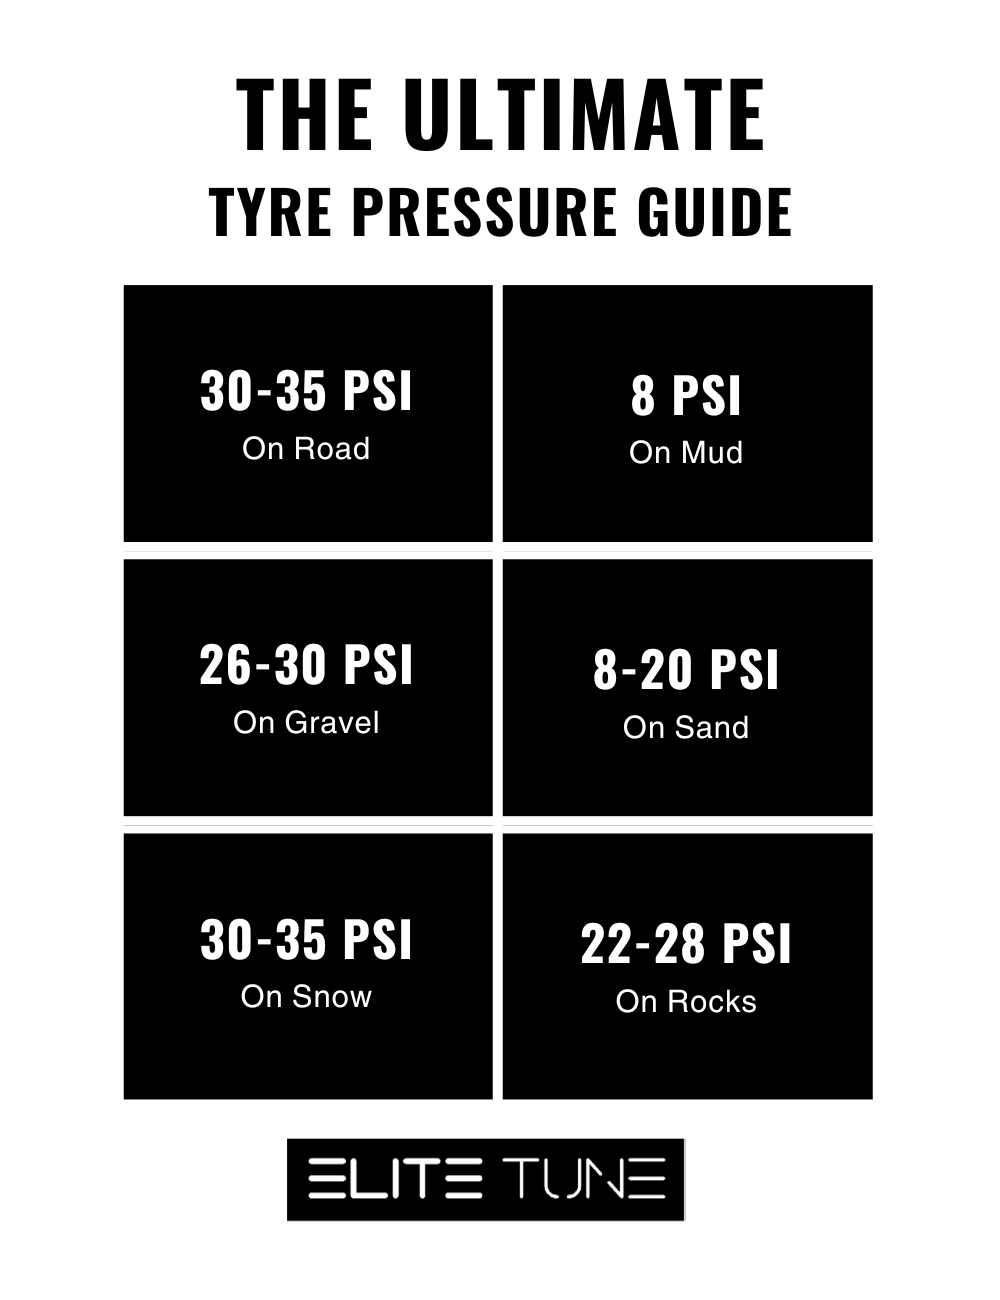
The white sticker on your driver’s side door jamb contains your vehicle-specific PSI requirements, typically between 30-35 PSI for most passenger vehicles. This number balances comfort, handling, and tire longevity for your exact make and model. If the sticker is missing, check inside the fuel filler flap or glove compartment door—never rely on the maximum PSI printed on the tire sidewall, which represents structural limits, not operating specifications.
Why Winter Driving Needs Different Pressure
Cold temperatures cause air to contract, sometimes dropping pressure 1-2 PSI for every 10°F decrease. While some drivers reduce pressure 1-2 PSI below recommendations for winter traction on packed snow, never drop more than 3 PSI total. Excessive underinflation damages sidewalls and reduces steering response. Restore normal pressure when temperatures rise to prevent uneven wear.
How to Locate Your Valve Stem in 10 Seconds
The valve stem appears as a 1-2 inch metal or rubber protrusion between your wheel spokes. Most stems feature a black rubber base with a chrome or brass center cap. Remove the protective cap by twisting counterclockwise—this reveals the valve core pin you’ll press to release air. For trucks and SUVs, check behind wheel covers if the stem isn’t immediately visible. If you struggle to find it, shine a flashlight at a 45-degree angle to catch the reflective metal surface.
Step-by-Step: Removing Air with a Pressure Gauge (Most Accurate Method)
1. Prepare Your Vehicle Safely
Park on level ground with the parking brake engaged. If deflating significantly (more than 5 PSI), consult your owner’s manual for proper jack points. Never work on tires while the vehicle is moving or unstable.
2. Release Air in Controlled Bursts
Attach your gauge firmly to the valve stem and press down—the built-in pin depressor releases air automatically. Release in 1-2 second bursts rather than continuous flow. You’ll hear a distinct hissing sound indicating air escape. This controlled approach prevents overshooting your target PSI.
3. Verify Pressure After Each Release
Remove the gauge after each burst and check the reading. Compare against your door jamb sticker recommendation. Repeat the process until reaching the exact PSI—most corrections require 3-5 short bursts. Replace the valve cap securely when finished to prevent contamination.
How to Release Air 3x Faster Using a Valve Core Tool
Partial Unscrewing Technique for Controlled Deflation
Insert the valve core tool fully into the stem and turn counterclockwise just 1/8 to 1/4 turn—this creates a steady air stream without complete deflation. Check pressure every 5-10 seconds since air releases rapidly. When approaching your target PSI (within 2-3 PSI), tighten the core by turning clockwise until snug. Over-tightening damages the valve mechanism, so stop when resistance increases noticeably.
Critical Warning: Never remove the valve core completely unless intentionally flatting the tire—this causes instantaneous air loss that can’t be controlled. If the core pops out accidentally, retrieve it immediately (it’s small but reusable) and reinstall with the tool.
3 Emergency Methods to Deflate Tires Without Tools

Key or Screwdriver Pin-Pressing Technique
Insert your key sideways into the valve opening and press down steadily. Release immediately when you hear air escaping—this gives you 2-3 seconds of controlled release before checking pressure. A flathead screwdriver works similarly but requires more precision to avoid damaging the valve pin. Apply just enough pressure to depress the pin 1-2mm.
When to Use Needle-Nose Pliers for Fast Deflation
For urgent situations requiring rapid deflation (more than 8 PSI over), grip the valve core with needle-nose pliers and turn counterclockwise 1/4 turn. Monitor pressure every 3-5 seconds—this method releases air 5x faster than pin-pressing. Stop deflation 3-4 PSI above target and finish with precise pin-pressing to avoid underinflation.
Why Your Pressure Reading Is Wrong (And How to Fix It)
Cold Tire Measurement Mistake
Checking pressure after driving gives falsely high readings because heat expands air inside tires—always measure when tires are “cold” (vehicle hasn’t moved for 3+ hours). A tire driven just 1 mile can show 3-4 PSI higher than actual cold pressure. For accurate readings, check first thing in the morning before driving.
Inconsistent Gauge Application Error
Failing to seat the gauge firmly on the valve stem causes air leaks during measurement. Push straight down with firm, even pressure until you hear a single “hiss” of air equalizing—this ensures an airtight seal for accurate readings. Digital gauges with swivel heads work best for awkward valve angles.
When to Deflate Tires for Winter Driving and Off-Road
Winter Pressure Adjustment Guidelines
Reduce pressure 1-2 PSI below recommendations for better snow traction, but never exceed 3 PSI reduction. This slight deflation increases the tire’s contact patch on packed snow while maintaining structural integrity. Restore normal pressure when temperatures rise above freezing consistently—extended underinflation causes shoulder wear and heat buildup.
Off-Road “Airing Down” Best Practices
For sand or mud, reduce to 15-20 PSI; for rocky terrain, 20-25 PSI works best. Always use a portable air compressor to reinflate before returning to pavement—driving over 15 mph on underinflated tires risks bead separation. Carry a tire repair kit since aired-down tires are more vulnerable to punctures.
5 Costly Mistakes When Removing Air from Tires
Complete Valve Core Removal Disaster
Unscrewing the core more than 1/2 turn causes it to eject completely, dumping all air in seconds. Solution: Turn tools slowly and stop at the first sign of rapid airflow.
Skipping Pressure Checks During Deflation
Releasing air without verification leads to underinflation—a tire at 25 PSI instead of 32 PSI wears 25% faster. Always check after each release burst.
Forgetting Valve Caps After Adjustment
Missing caps allow moisture and debris into the valve mechanism, causing slow leaks. Replace caps immediately after finishing.
Using Fingers to Control Airflow
The high-pressure stream can injure fingers and provides zero precision. Always use tools for controlled release.
Ignoring TPMS Warning Lights
Modern vehicles have Tire Pressure Monitoring Systems that alert to incorrect pressure. Address warnings immediately rather than disabling the system.
How to Fix an Accidentally Underinflated Tire in 5 Minutes
If you’ve released too much air, attach a portable air compressor or gas station pump to the valve stem. Add air in 10-second bursts, checking pressure after each addition. Stop 2 PSI below target, then use pin-pressing for final adjustments. Driving on severely underinflated tires (more than 5 PSI low) causes immediate sidewall damage—reinflate before driving more than 1 mile.
Monthly Tire Pressure Maintenance That Saves Money
Check pressure every 30 days using a reliable gauge, always when tires are cold. Record readings in your maintenance log—consistent drops in one tire indicate slow leaks. Inspect valve stems for cracks during checks and replace damaged caps immediately. Properly maintained tires last 3,000-5,000 miles longer and improve fuel economy by 3%. This simple habit pays for itself in extended tire life and reduced fuel costs.


