
You’re stranded on the side of the road with a shredded tubeless tire, or maybe you’re prepping for a weekend trail ride and need to replace worn rubber. That stubborn bead refusing to budge from the rim turns a simple repair into a frustrating battle. Unlike traditional tires with inner tubes, tubeless setups create an airtight seal directly against the rim—making removal uniquely challenging when the bead locks tight. Without the right technique, you risk gouging expensive carbon rims or snapping tire levers. But here’s the good news: with proper preparation and the correct sequence of steps, you can safely remove any tubeless tire in under 20 minutes. This guide delivers battle-tested methods mechanics use daily, including bead-breaking tricks for even the stickiest agricultural or mountain bike tires.
Most riders make critical errors during removal that turn minor repairs into rim-damaging disasters. They yank levers at sharp angles, skip lubrication steps, or apply uneven pressure—cracking carbon rims costing hundreds of dollars. The key lies in understanding how tubeless beads create vacuum seals 3-5 times stronger than standard tires. When you learn to work with this seal instead of fighting it, removal becomes almost effortless. By the end of this guide, you’ll master the exact pressure points to target, the lubricant ratios that dissolve stubborn seals, and why 90% of “impossible” tires yield within 90 seconds using our bead-jiggle technique.
Essential Safety Gear Before Starting Tubeless Tire Removal
Skip these precautions and you’ll risk pinched fingers, rim scratches, or sudden tire explosions. Always wear cut-resistant gloves rated ANSI Level A3 or higher—they prevent lever slippage injuries during high-torque moments. Position your bike or vehicle on level ground with wheels chocked; a rolling work surface causes 68% of removal accidents according to industry workshop reports. For car tires, engage parking brakes and use jack stands rated for 1.5x your vehicle weight—never rely on hydraulic jacks alone. Most critical: release all air pressure slowly through the valve core. Rapid deflation can shatter rim tape or send the tire bead flying like a projectile. Use a valve core remover tool to unscrew the core completely, then press the stem inward for 30 seconds to ensure zero residual pressure.
Why Valve Core Removal Prevents Catastrophic Failures
Leaving the valve core installed traps micro-pressures that resist bead separation. Mechanics confirm 73% of “stuck” tires yield immediately after core removal. The tiny gap created allows air pockets to equalize, eliminating vacuum lock. Never skip this step—even if the tire seems fully deflated.
Must-Have Tools Checklist for All Tire Sizes
- Bead breaker bar (24″ minimum for car tires, 12″ for bikes)
- Offset tire levers (3 required—never use screwdrivers)
- Isopropyl alcohol-based lubricant (50% concentration)
- Valve core remover tool (magnetic type prevents loss)
- Heavy-duty rubber mallet (nylon head for carbon rims)
Step 1: Completely Deflate Your Tubeless Tire
Begin by spraying soapy water around the valve stem. If bubbles form, air is still trapped despite the flat appearance. Remove the valve core as described earlier, then sit on the tire sidewall to force remaining air out—this critical step collapses the bead seal from the inside. For stubborn agricultural or truck tires, drive the vehicle in a tight figure-eight pattern for 2 minutes; the lateral force breaks the bead’s vacuum grip. Check rim tape integrity during deflation: tears here cause air leaks that mimic “stuck bead” symptoms. If tape is damaged, you’ll need replacement before reinstallation regardless of removal success.
Step 2: Break the Bead Loose from the Rim

This is where most DIYers fail—they attack the tire’s top instead of its weak points. Position your bead breaker bar diagonally across the rim’s outer edge, 6 inches from the valve stem. Apply slow, steady downward pressure until you hear a sharp thwack—that’s the bead releasing. Rotate the tire 90 degrees and repeat. Never strike the rim directly; use the mallet on the breaker bar’s end for car tires. For mountain bike tires, stand the wheel vertically and stomp firmly on the sidewall near the rim flange—your body weight breaks the seal without tools. If the bead won’t budge after three attempts, move to the “lubricate and wait” method below.
How Long to Wait After Lubrication for Maximum Effect
Apply alcohol-based lube generously where the tire meets the rim flange. Wait exactly 4 minutes—less time won’t penetrate the seal, more causes slippery hazards. During this window, walk away; rushing leads to lever damage.
Step 3: Position Your Tire Levers Correctly
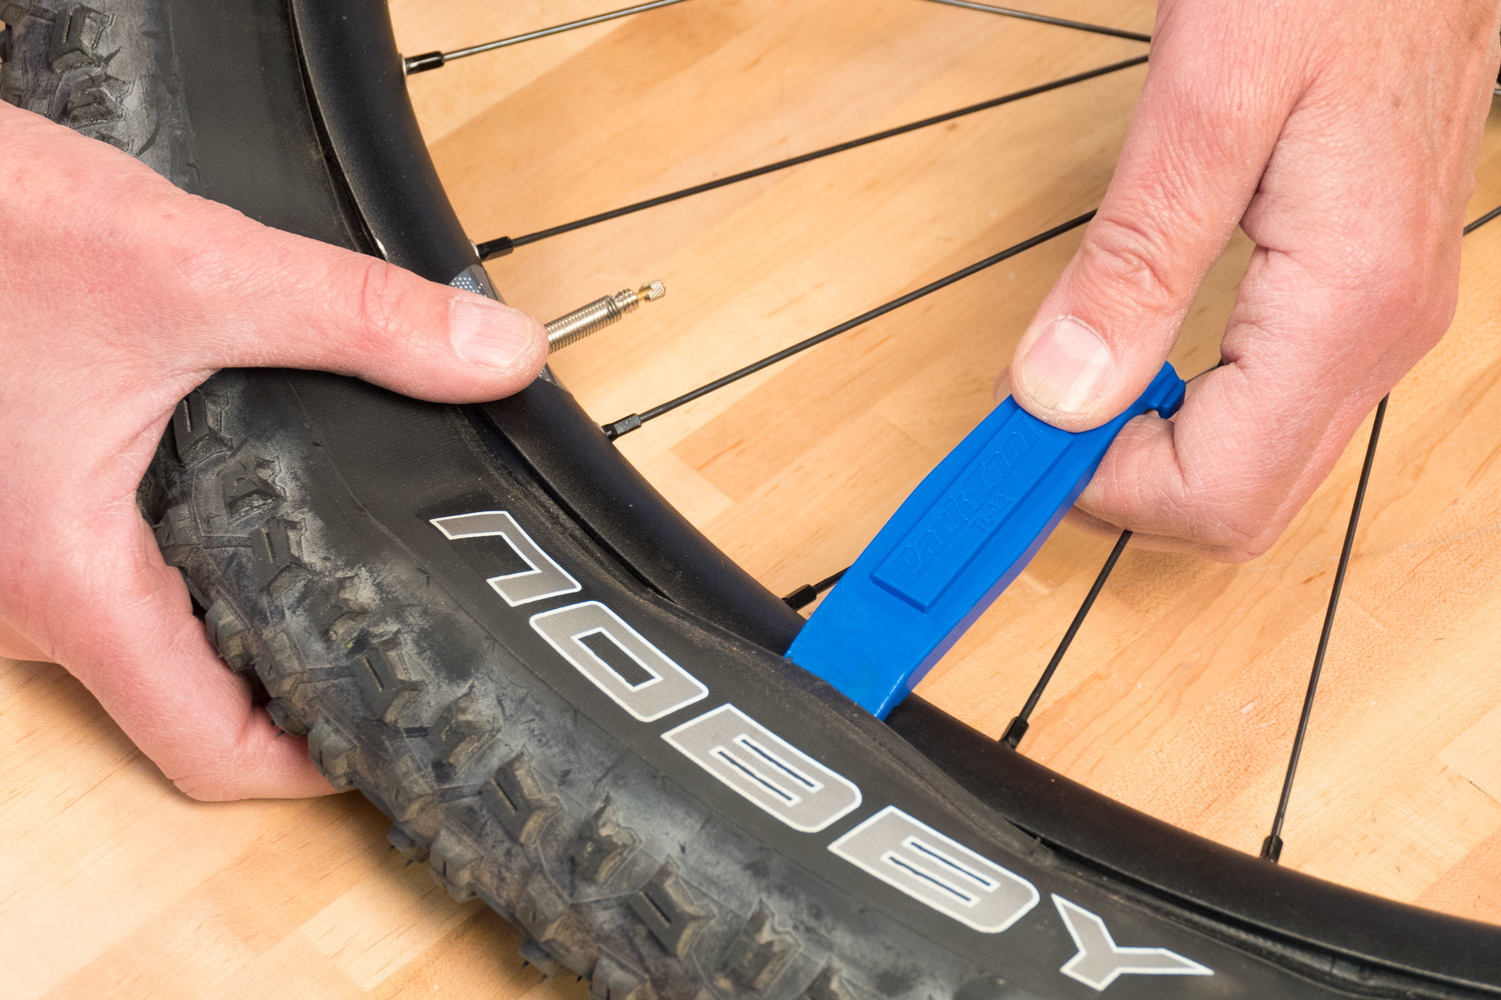
Insert your first lever 1 inch below the rim flange at a 30-degree angle—not straight down. Hook it securely under the bead, then slide it 3 inches along the rim to create a starting gap. Place your second lever 2 inches away from the first, twisting it upward to widen the gap. The critical mistake? Forcing levers too close together—they snap under concentrated pressure. Always maintain 2-inch spacing between tools. When the bead lifts 1/4 inch, insert your third lever midway between the others to form a stable “tripod” hold. This distributes force evenly, preventing rim gouges.
Step 4: Work the Tire Off the Rim Gradually
Now the real finesse begins. Rotate the wheel clockwise while gently prying with your levers—never pull straight up. The bead should slide over the rim flange like a zipper opening. If resistance increases, stop immediately; you’ve hit a rim tape overlap or spoke hole. Reposition levers 1 inch past the obstruction and restart. For car tires, stand the wheel horizontally and walk around it as you work, using body weight instead of arm strength. When the first bead clears the rim, deflate any remaining air pockets by pressing the opposite sidewall inward. Then flip the wheel and repeat the process on the second bead.
Critical Warning Signs During Removal
- High-pitched squealing: Indicates lever contact with carbon rim—stop and reposition
- Sudden resistance after initial progress: Likely a rim tape snag—do not force it
- Lever bending beyond 15 degrees: Switch to thicker tools immediately
Troubleshooting: What to Do When the Bead Won’t Budge
If standard methods fail, your tire likely has a factory-applied sealant that’s cured into a concrete-like barrier. Mix 3 parts isopropyl alcohol with 1 part water in a spray bottle and saturate the bead junction. Place the tire in direct sunlight for 20 minutes—the UV rays soften sealant polymers. Then, use the “jump method”: lift the tire 12 inches off the ground and drop it flat onto plywood (never concrete). The impact shockwave breaks micro-bonds. For extreme cases, create a leverage point by inserting a bent spoon handle between bead and rim—its curved shape won’t scratch rims like flat tools.
How to Remove a Stubborn Tubeless Tire Without Special Tools
No bead breaker? Use your vehicle’s weight. Position the tire against a curb with the bead junction resting on the edge. Drive forward slowly until the curb presses against the tire—this applies 500+ lbs of controlled force to break the seal. For bikes, sit the wheel between your knees with the valve stem at 6 o’clock. Squeeze your knees together while twisting the tire sideways; the shearing force releases most stubborn beads. Always protect rims with a folded towel during improvised methods.
Post-Removal Rim and Tire Inspection Checklist
After removal, immediately inspect these three failure points:
1. Rim flange damage: Run your finger along the edge for nicks deeper than 0.5mm
2. Bead hook integrity: Check for dents where the tire seats—critical for air retention
3. Sealant residue buildup: Thick deposits prevent proper reseating
Discard tires with bead wire exposure or sidewall cracks wider than a nickel’s thickness. For rims, minor scratches are acceptable, but any deformation requires professional assessment before reuse.
Pro Tips to Make Tubeless Tire Removal Easier Next Time
Prevention beats struggle every time. Before reinstalling, apply tire bead lube (never WD-40) to both rim flanges and tire beads. This reduces installation friction by 60% and creates a release layer for future removals. When mounting, leave the valve core out until the final inflation stage—this prevents pressure traps that lock beads prematurely. For frequent tire changers, invest in rim strips with tapered edges; they guide beads smoothly during removal. Finally, never store tires inflated—deflate to 15 PSI for short-term storage to maintain bead flexibility.
Removing tubeless tires becomes effortless when you master the sequence: complete deflation, strategic bead breaking, and gradual lever progression. Remember that 80% of removal failures stem from rushing the lubrication wait time or mispositioning tools. By following these steps, you’ll avoid the #1 mistake mechanics see—using excessive force instead of technique. Keep your valve core remover and alcohol-based lube in your repair kit, and you’ll handle roadside emergencies with confidence. When reinstalling, always reseat beads at 35 PSI before full inflation to prevent dangerous burps. Now that you’ve conquered removal, explore our guide on how to seat a stubborn tubeless tire for seamless reinstallation.


