

Knowing how to measure a tire properly is an essential skill for any vehicle owner. Whether you’re checking tread wear for safety, selecting replacement tires, or verifying wheel specifications, accurate measurements ensure proper fitment and optimal performance. Worn or incorrectly sized tires can compromise traction, handling, and fuel efficiency while potentially creating dangerous driving conditions. This comprehensive guide walks you through every measurement technique, from basic tread depth checks to precise wheel diameter calculations, helping you maintain your vehicle with confidence and avoid costly mistakes.
Regular tire measurements also help you track wear rates, plan for replacements, and stay compliant with state laws. Many drivers overlook this simple maintenance task until problems arise, but a few minutes of inspection can prevent accidents and extend tire life. By learning these fundamental measurement techniques, you’ll gain deeper insight into your vehicle’s condition and make smarter decisions about tire maintenance and replacement.
Measure Tread Depth Accurately
Tread depth directly impacts your vehicle’s grip on the road, especially in wet or slippery conditions. Measuring tread wear helps you determine when replacement is necessary and ensures your tires provide adequate traction for safe driving.
The Penny Test Method
The penny test remains the most accessible way to estimate tread depth without specialized tools. Simply insert a U.S. penny into a tire groove with Abraham Lincoln’s head facing upside down. If the tread does not reach the top of Lincoln’s head, you have less than 2/32 inch of tread remaining and should replace the tire immediately. When the tread touches or slightly covers the top of Lincoln’s head, you have at least 2/32 inch remaining. This quick check takes seconds and requires no equipment, making it ideal for regular monthly inspections.
The penny test provides only an estimate, so consider it a preliminary screening tool rather than a precise measurement. Some states require tires to be replaced before they reach the legal minimum, so when in doubt, measure more precisely or consult a professional.
Using a Tread Depth Gauge
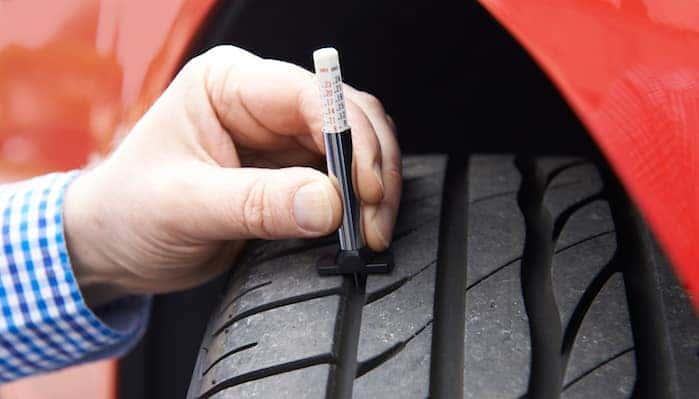
For exact measurements, a dedicated tread depth gauge delivers precision that coin tests cannot match. These inexpensive tools are available at automotive stores and online, featuring a probe that inserts between tread blocks with a calibrated display showing depth in 32nds of an inch or millimeters. Press the gauge firmly into the groove until it stops, then read the measurement directly without estimation or calculation.
Tread depth gauges eliminate guesswork entirely, which proves valuable when documenting wear for lease returns, insurance purposes, or safety-critical decisions. Most gauges display both measurement systems, with 32nds being the standard for U.S. tire specifications.
Alternative Measurement with a Ruler
A standard ruler can measure tread depth when specialized tools are unavailable. Use a ruler with 1/16-inch markings and measure from the tread base to the top of the tread block. Since each 1/16-inch increment equals 2/32 inch, multiply your measurement by two to convert to the standard tread depth unit. Be aware that some rulers have unused space at the end, which can produce inaccurate readings if not accounted for during measurement.
Decode Legal Tread Depth Requirements

State laws establish minimum tread depth standards that all vehicles must meet for street use. Understanding these requirements keeps you compliant and safe on the road.
State-by-State Requirements
Minimum tread depth laws vary across the United States, with most states requiring at least 2/32 inch of tread depth. California and Idaho set their minimum at 1/32 inch, while Texas mandates the highest standard at 3/32 inch. Six states currently have no specific tread depth regulations, though driving with excessively worn tires remains unsafe regardless of legal status.
When traveling through multiple states, research each jurisdiction’s requirements to avoid potential fines and ensure your vehicle remains street-legal throughout your journey. The legal minimum represents the absolute threshold, but many safety experts recommend replacing tires before they reach this point to maintain optimal wet-weather traction.
Understanding Tire Indicator Bars
Tire manufacturers embed wear indicators directly into tire grooves at regular intervals. These small bars become visible when tread depth reaches 2/32 inch, providing a built-in warning system without requiring any measurement tools. When you can see these bars partially or fully exposed across multiple grooves, your tires have reached or exceeded their useful life and require immediate replacement.
Indicator bars offer convenience for quick visual inspections but only signal that the legal minimum has been reached. They don’t provide exact measurements, so pairing this visual check with periodic depth gauge measurements gives you the most complete picture of tire condition.
Find Tire Width and Size
Tire width, also called section width, represents the cross-sectional measurement of the tire when mounted and inflated. This specification is critical for proper fitment within wheel wells and compatibility with rim widths.
Reading Width from Sidewall Markings
The tire sidewall displays width as part of the tire size code, expressed in millimeters. In codes like P215/65 R15, the number immediately following the load type indicator (the “P” for passenger vehicles) represents the width. Here, 215 mm indicates the tire’s section width when mounted on the recommended rim and inflated to proper pressure. This marking provides the most accurate width specification without requiring manual measurement.
Manual Width Measurement Technique
When sidewall markings are missing or illegible, measure width directly using a flexible tape measure. For mounted tires, measure across the tread width from side to side at the widest point. For removed tires, stand the tire upright and measure across the widest section from endpoint to endpoint. Tires that don’t stand stable can be propped against a wall or other straight surface to maintain position during measurement.
Calculate Aspect Ratio
The aspect ratio describes the relationship between tire height and width, expressed as a percentage representing sidewall height as a portion of tire width. This specification significantly affects ride comfort, handling characteristics, and overall tire dimensions.
Understanding Aspect Ratio Calculation
On tire sidewalls, the aspect ratio appears after the width number, separated by a backslash. In P215/65 R15, the 65 indicates the aspect ratio, meaning the sidewall height equals 65% of the 215 mm width, resulting in approximately 140 mm of sidewall height. This calculation helps you understand how tire dimensions change when comparing different sizes or verifying manufacturer specifications.
To calculate aspect ratio manually, measure the tire’s section height from the bead seat to the tread outer edge, divide by the section width, and multiply by 100. This measurement becomes important when selecting replacement tires or modifying wheel and tire combinations.
Why Aspect Ratio Matters
Aspect ratio directly influences ride quality and handling. Lower aspect ratios (closer to 35 or 40) typically provide sharper handling but a harsher ride due to shorter sidewalls. Higher aspect ratios (70 or 75) offer more cushioning and comfort but may reduce steering response. When changing wheel sizes, maintaining the same overall diameter requires adjusting the aspect ratio proportionally, which affects both performance and comfort characteristics.
Determine Rim Size and Fitment
Rim size must match tire specifications exactly for proper mounting and safe operation. Understanding how to verify rim dimensions prevents costly mistakes when purchasing wheels or tires.
Reading Rim Size from Tire Codes
The tire size code contains all the information needed to identify correct rim size. In P215/65 R15, the “R15” indicates a 15-inch rim diameter. This relationship remains consistent whether you’re selecting replacement tires for existing rims or shopping for new wheels to mount current tires. The tire code, found on the sidewall, in your owner’s manual, or on the driver’s side door jamb, provides authoritative guidance for matching components.
Manual Rim Measurement
When tires aren’t mounted or sidewall markings are unavailable, measure rims directly using a tape measure. Measure horizontally across the rim’s front face from edge to edge, passing over the center hub for accurate diameter calculation. A stiff tape measure produces more reliable results than flexible cloth tapes, which can bend and distort readings.
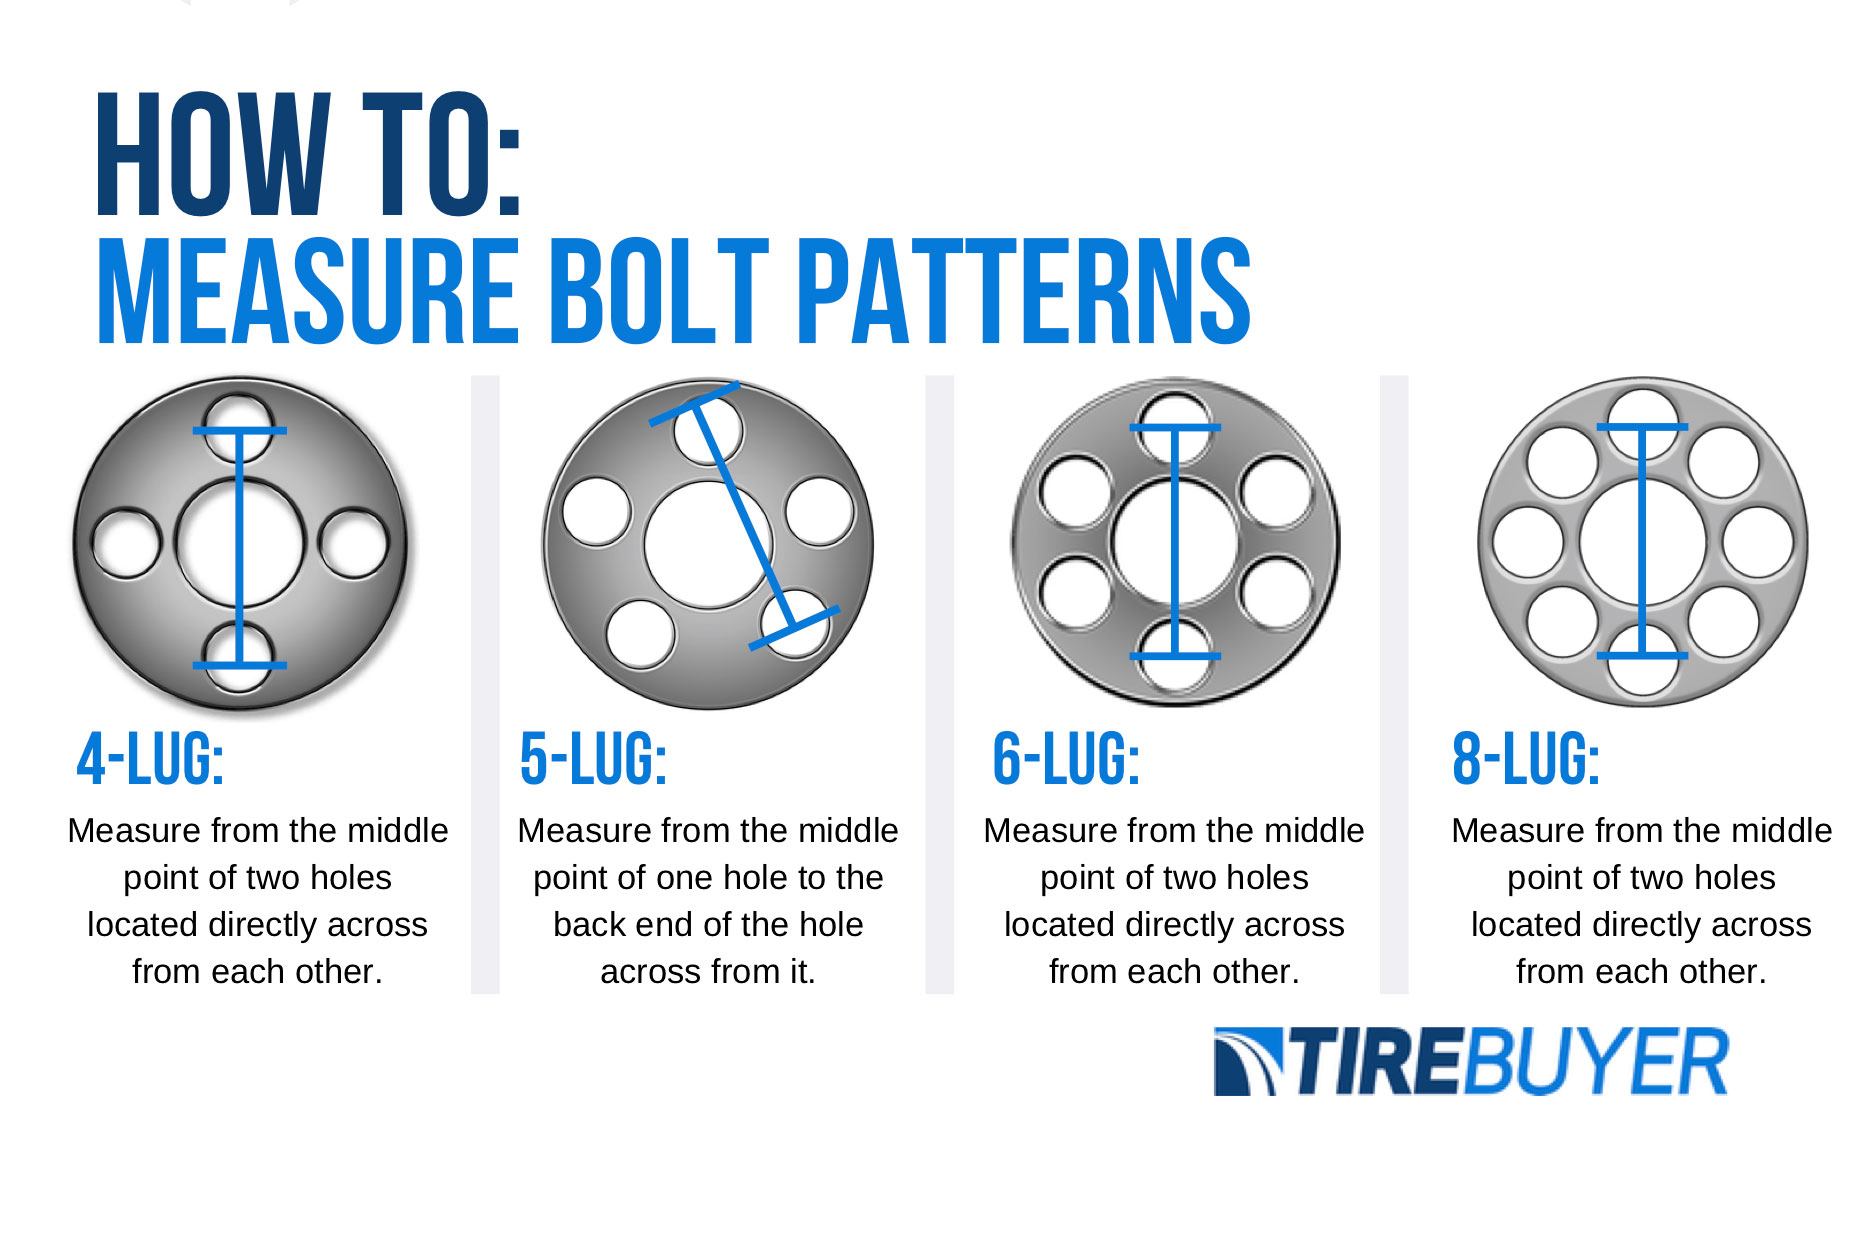
Identifying Bolt Patterns
Beyond diameter, rim fitment requires matching the bolt pattern, which describes the number of bolt holes and their arrangement. Most passenger vehicles use 5-bolt patterns, though 4, 6, and 8-bolt configurations exist. To determine your bolt pattern, count the bolt holes and measure the diameter of the imaginary circle passing through all bolt hole centers. This measurement, combined with hole count, creates a complete bolt pattern specification like 5×114.3 mm that ensures proper wheel mounting.
Tips for Accurate Measurements
Precision in tire measurement requires proper technique, suitable tools, and attention to environmental factors that can affect accuracy.
Recommended Tools and Equipment
Investing in quality measurement tools pays dividends through accuracy and reliability. A tread depth gauge provides the most precise tread measurements, while a stiff steel tape measure ensures accurate diameter and width readings. Keep these tools accessible for regular inspections, and consider a digital caliper for situations requiring extreme precision. Avoid flexible cloth tape measures for critical measurements, as their tendency to bend introduces measurement errors.
When to Measure and Frequency
Establish a regular inspection schedule, checking tread depth monthly and before long trips. Temperature fluctuations, driving habits, and road conditions all affect tire wear rates, so more frequent inspections during extreme weather or after driving on rough roads catch problems early. Document measurements to track wear trends and predict replacement timing accurately.
Common Measurement Mistakes
Several errors commonly compromise measurement accuracy. Measuring only one location on the tire ignores uneven wear patterns, so check multiple grooves around the entire circumference. Using worn or damaged measuring tools produces consistently inaccurate results, so inspect and replace gauges showing signs of wear. Assuming all tires on a vehicle wear equally ignores alignment issues, suspension problems, and weight distribution effects that create uneven wear rates across positions.
Regular tire measurements protect your safety, ensure legal compliance, and help you maximize tire investment. By mastering these fundamental techniques and incorporating them into routine vehicle maintenance, you’ll enjoy better handling, improved fuel efficiency, and peace of mind knowing your tires are in optimal condition. Remember that how to measure a tire properly is a skill that directly impacts your safety on the road—take the time to learn these methods and make them part of your regular vehicle care routine.


