
Your tires are the only connection between your vehicle and the road, yet millions of drivers ignore the silent danger of worn tread. When rain hits the pavement, tires with insufficient tread depth can’t channel water effectively, causing dangerous hydroplaning where your vehicle loses all traction. Knowing exactly how to measure tire tread wear isn’t just maintenance—it’s a vital safety skill that could prevent a catastrophic accident. In this guide, you’ll discover five field-tested measurement techniques, learn to spot hidden wear patterns, and understand the exact tread depth thresholds that separate safe driving from road hazards. Stop guessing about your tire safety—master these proven methods today.
Why Your Tire Tread Depth Directly Controls Stopping Distance
Tread depth determines your tire’s ability to maintain contact with the road surface, especially in wet conditions. As tread wears down, the grooves that channel water away become shallower, increasing the risk of hydroplaning where your vehicle skims on a water layer instead of gripping the pavement. At just 4/32 inch tread depth, stopping distance in wet conditions doubles compared to new tires. Most drivers don’t realize that legal minimums (2/32 inch in most states) represent dangerously worn tires—safety experts recommend replacement at 4/32 inch for reliable wet-weather performance. Ignoring tread wear doesn’t just risk fines; it compromises your ability to brake, steer, and maintain control when seconds count.
The Penny Test: Emergency Check With Household Coin
Insert a penny upside down into your tire’s deepest groove with Lincoln’s head pointing toward the tire. If you can see the top of Lincoln’s head above the tread surface, your tires have less than 2/32 inch depth and require immediate replacement. This method works in a pinch but has limitations—it only detects critically worn tires and misses early-stage wear that still compromises safety. For accurate assessment, always check multiple points across the tread width and all four tires, as uneven wear often occurs before overall depth becomes critical.
When the Penny Test Gives False Security
Many drivers mistakenly believe passing the penny test means their tires are safe, but this test only identifies dangerously worn tires. At 4/32 inch depth—which still passes the penny test—wet braking distance increases by 89 feet compared to new tires. Perform the quarter test for better safety margins: insert a quarter with Washington’s head down. If the top of his head is visible, your tread is below 4/32 inch—time to schedule replacement even if you’re passing the penny test. This simple adjustment could prevent hydroplaning during your next downpour.
Tread Depth Gauge Measurements: Professional Accuracy at Home

Digital and analog tread depth gauges cost under $10 and provide precise measurements in 32nds of an inch or millimeters. Unlike coin tests, gauges detect gradual wear progression so you can track degradation between rotations. Professional mechanics require at least three measurements per tire across the inner, center, and outer tread bands to identify uneven wear patterns that indicate alignment or inflation issues. Always clean debris from grooves before inserting the probe perpendicularly to the tread surface for accurate readings.
Step-by-Step Gauge Measurement Protocol
- Clean tread grooves thoroughly with a stiff brush to remove stones and packed debris
- Insert gauge probe vertically into the deepest part of the groove until base plate contacts the tread
- Read measurement at the indicator line (digital displays show instantly; analog requires visual alignment)
- Record depths at 6-8 points across each tire’s tread pattern
- Compare inner, center, and outer measurements—differences exceeding 2/32 inch indicate alignment problems
Interpreting Your Gauge Results
New tires typically start with 10/32 to 11/32 inch depth. Replace tires when any measurement reaches 4/32 inch for optimal wet-weather safety. Measurements below 2/32 inch violate legal requirements in most states and dramatically increase accident risk. If your outer edges measure significantly lower than center tread, you likely have underinflation; higher outer measurements suggest overinflation. Consistent low readings across all points indicate normal wear, while diagonal wear patterns point to improper wheel alignment.
Built-In Tread Wear Indicators: Your Tires’ Built-In Warning System
Modern tires feature raised rubber bars spanning the tread grooves at 2/32 inch depth—these wear indicators become flush with the tread surface when replacement is legally required. Locate them by examining tread blocks for small rectangular platforms molded between grooves. When these platforms create continuous lines across the tire width, your tread has reached the 2/32 inch minimum. While helpful for legal compliance checks, wear indicators don’t address the 4/32 inch safety threshold recommended by safety organizations.
Why Wear Indicators Mislead Drivers About Safety
Wear indicators only activate at dangerously low tread depths, creating a false sense of security between 4/32 and 2/32 inch. At 3/32 inch—when wear indicators remain hidden—stopping distance in heavy rain increases by 40% compared to new tires. Regular gauge measurements between oil changes are essential because wear indicators don’t warn you when tires enter the high-risk zone. Check indicators during every fuel fill-up by running your finger across the tread surface to feel for raised platforms that signal immediate replacement necessity.
Diagnosing Uneven Tire Wear Patterns That Skew Measurements
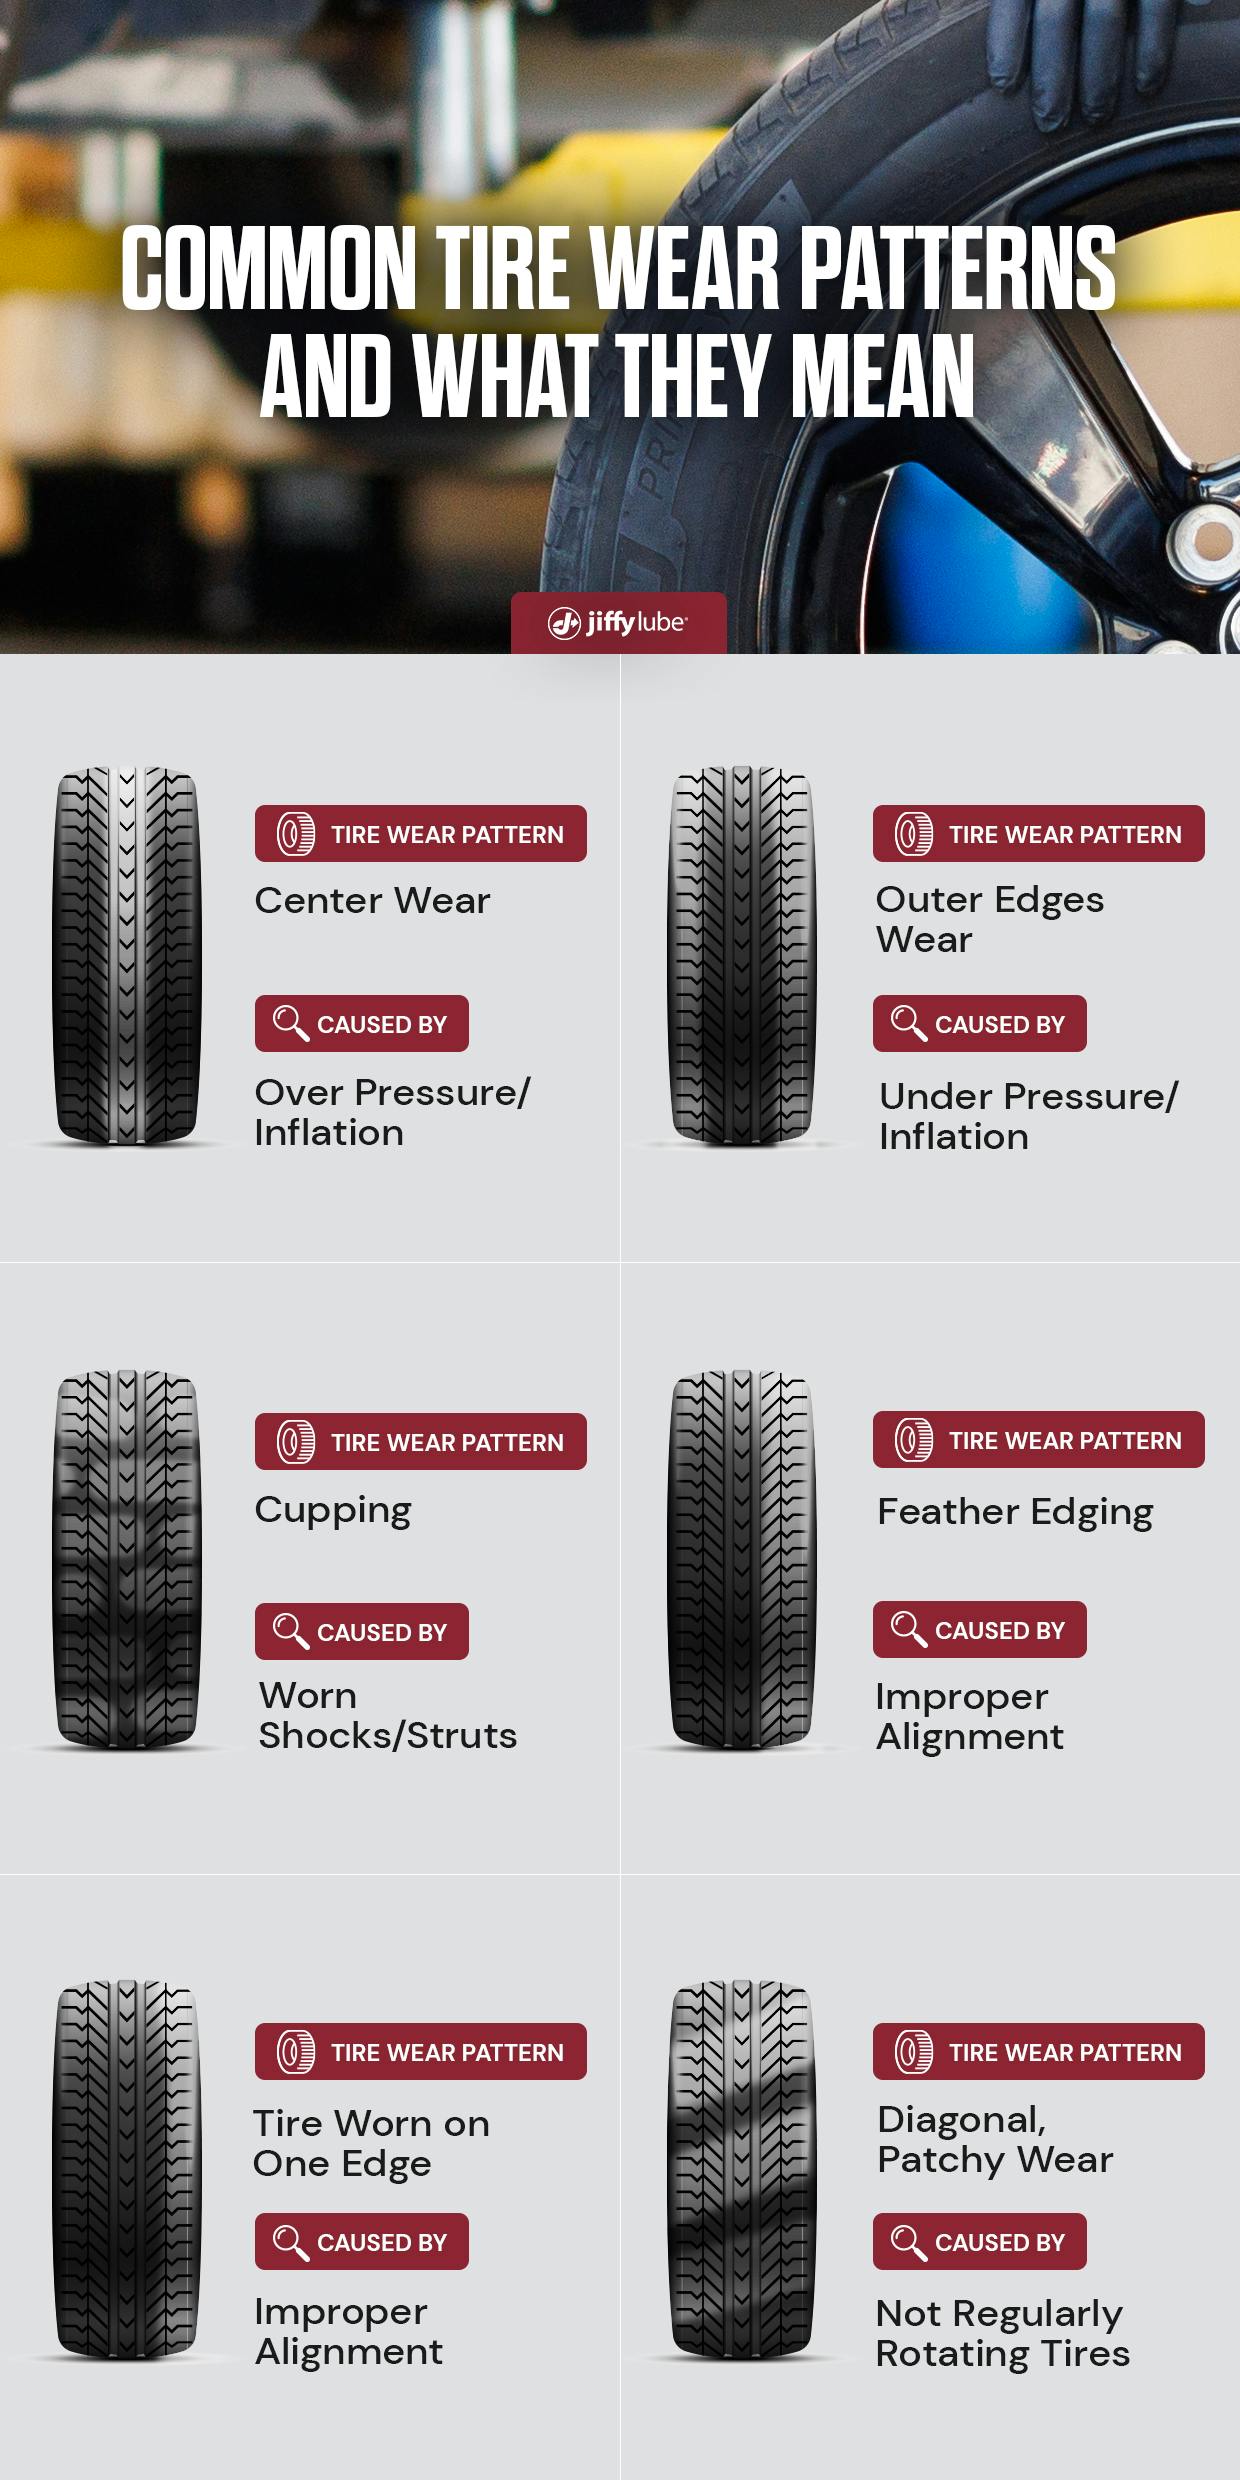
Uneven wear creates deceptive measurement results where some tread areas appear adequate while others are dangerously worn. The “dime test” (inserting a dime with Roosevelt facing down) helps identify localized wear: if you see the top of his head in specific spots but not others, you have irregular wear requiring professional diagnosis. Common patterns include:
- Center wear: Tread worn more in center than edges (overinflation)
- Shoulder wear: Outer edges worn faster than center (underinflation)
- Cupping: Scalloped dips around tire circumference (suspension issues)
- Feathering: Tread blocks smooth on one side, sharp on the other (misalignment)
Critical Measurement Adjustment for Uneven Wear
When uneven wear patterns exist, base replacement decisions on the lowest measurement point, not average depth. A tire measuring 6/32 inch at center but 2/32 inch at edges must be replaced immediately—the worn edges create hydroplaning risk during cornering. Always measure within 1 inch of the outer and inner sidewalls where wear typically accelerates. Rotate tires every 5,000-7,000 miles to promote even wear and extend usable life.
Monthly Tread Measurement Schedule Every Driver Should Follow
Check tread depth monthly using a gauge and before any road trip exceeding 200 miles. Critical measurement opportunities include: after hitting potholes or curbs, when noticing vibration through the steering wheel, or if tires are over 3 years old regardless of mileage. Rainy season demands extra vigilance—measure depth when temperatures consistently drop below 70°F as cold weather accelerates rubber hardening. Commercial drivers and frequent highway travelers should check weekly due to accelerated wear from constant high-speed operation.
Time-Saving Measurement Routine
Complete a full tire inspection in under 5 minutes with this sequence:
1. Walk around vehicle with flashlight checking for embedded objects and wear indicators
2. Perform quick penny test on front tires while refueling
3. Use gauge on rear tires during monthly maintenance routine
4. Record measurements in phone notes to track wear progression
5. Set replacement reminder when any tire hits 5/32 inch depth
Immediate Action Steps When Tread Depth Falls Below 4/32 Inch
Tires at 4/32 inch depth require replacement within 2,000 miles for safe wet-weather operation. Do not delay replacement if you frequently drive on highways, in rainy climates, or with heavy passenger loads. When replacing, install new tires in pairs on the same axle—never mix tread depths across an axle as this creates dangerous handling imbalances. Always verify replacement tire specifications match your vehicle’s requirements; incorrect sizes invalidate tread wear warranties and compromise safety measurements.
Legal and Safety Thresholds by Driving Condition
| Tread Depth | Dry Conditions | Wet Conditions | Replacement Urgency |
|---|---|---|---|
| 6/32+ inch | Safe | Safe | Monitor monthly |
| 5/32 inch | Safe | Reduced grip | Schedule replacement |
| 4/32 inch | Acceptable | High hydroplaning risk | Replace within 2,000 miles |
| 3/32 inch | Reduced grip | Dangerous | Replace immediately |
| 2/32 inch | Unsafe | Extreme risk | Do not drive |
Preventing Premature Wear Through Proactive Maintenance

Maintain optimal tread life by checking tire pressure monthly with a calibrated gauge—underinflation by just 6 PSI increases tread wear by 25%. Rotate tires every 5,000 miles in the pattern specified in your owner’s manual (front-to-back for same-size tires, X-pattern for directional treads). Schedule wheel alignments annually or after any suspension work, as misalignment causes rapid, uneven wear that skews tread measurements. Avoid hard braking and acceleration which creates “cupping” wear patterns that compromise measurement accuracy.
Seasonal Tread Protection Strategies
Winter demands special attention as cold temperatures harden rubber, accelerating wear. Install winter tires at 8/32 inch depth for optimal snow traction—they wear faster than all-seasons but provide critical grip. In summer, avoid driving on hot pavement immediately after cold storage as temperature shock causes micro-tearing. Park in shade when possible to reduce UV degradation that dries and cracks tread surfaces, making measurements unreliable.
Regular tread measurement is the most overlooked yet critical safety habit for drivers. By implementing these five measurement techniques and acting on the results, you’ll maintain optimal road contact, prevent hydroplaning incidents, and maximize tire lifespan. Don’t wait for wear indicators to activate—track your tread depth proactively starting today. Your stopping distance in the next downpour depends on it. Check your tires now; your family’s safety rides on the rubber meeting the road.


