
Measuring your tire lug pattern correctly is the difference between wheels that fit perfectly and wheels that could become a serious safety hazard. When you’re shopping for new rims or verifying compatibility for aftermarket wheels, an inaccurate measurement means wasted time, money, and potential danger on the road. This guide gives you the exact methods professionals use to measure any lug pattern with confidence—whether you drive a compact car with a 4-lug setup or a heavy-duty truck with 8 lugs. You’ll discover how to get precise measurements with basic tools, avoid costly mistakes, and verify your results before making any wheel purchases.
Why Your Vehicle’s Lug Pattern Matters for Safety
A mismatched lug pattern isn’t just an inconvenience—it creates dangerous driving conditions. When wheel lug holes don’t align perfectly with your vehicle’s hub, the wheel can’t seat properly against the mounting surface. This causes uneven stress on the remaining lugs during driving, leading to potential loosening, wobbling, or complete wheel detachment at high speeds. The National Highway Traffic Safety Administration reports that improper wheel installation contributes to thousands of preventable accidents annually.
Your vehicle’s lug pattern directly impacts how evenly the wheel distributes weight and handles road forces. Modern vehicles are engineered with specific lug patterns that match the wheel’s structural design. Using a wheel with even a slightly different pattern creates microscopic flexing that compounds with each rotation, eventually fatiguing metal components. This is why a pattern like 5×114.3 won’t work with 5×115—those 0.7mm create enough play to compromise safety over time.
How Lug Patterns Affect Wheel Installation Process
When installing wheels with mismatched patterns, you’ll notice immediate resistance as you try to mount the wheel. The lug nuts may start threading but won’t tighten completely, or you’ll feel the wheel wobble as you torque them. Some drivers mistakenly force the issue by over-tightening, which strips threads or distorts the wheel hub. Properly matched patterns allow wheels to slide smoothly onto the hub with minimal resistance before securing with lug nuts.
Recognizing When Lug Pattern Mismatch Becomes Dangerous
Warning signs include persistent vibration at highway speeds, uneven tire wear patterns, and visible movement when checking wheel tightness. If you’ve recently changed wheels and notice these symptoms, stop driving immediately. Continuing to drive with mismatched patterns risks shearing off lug bolts or causing complete wheel separation—a scenario that often results in catastrophic accidents.
Essential Tools for Precise Lug Pattern Measurement
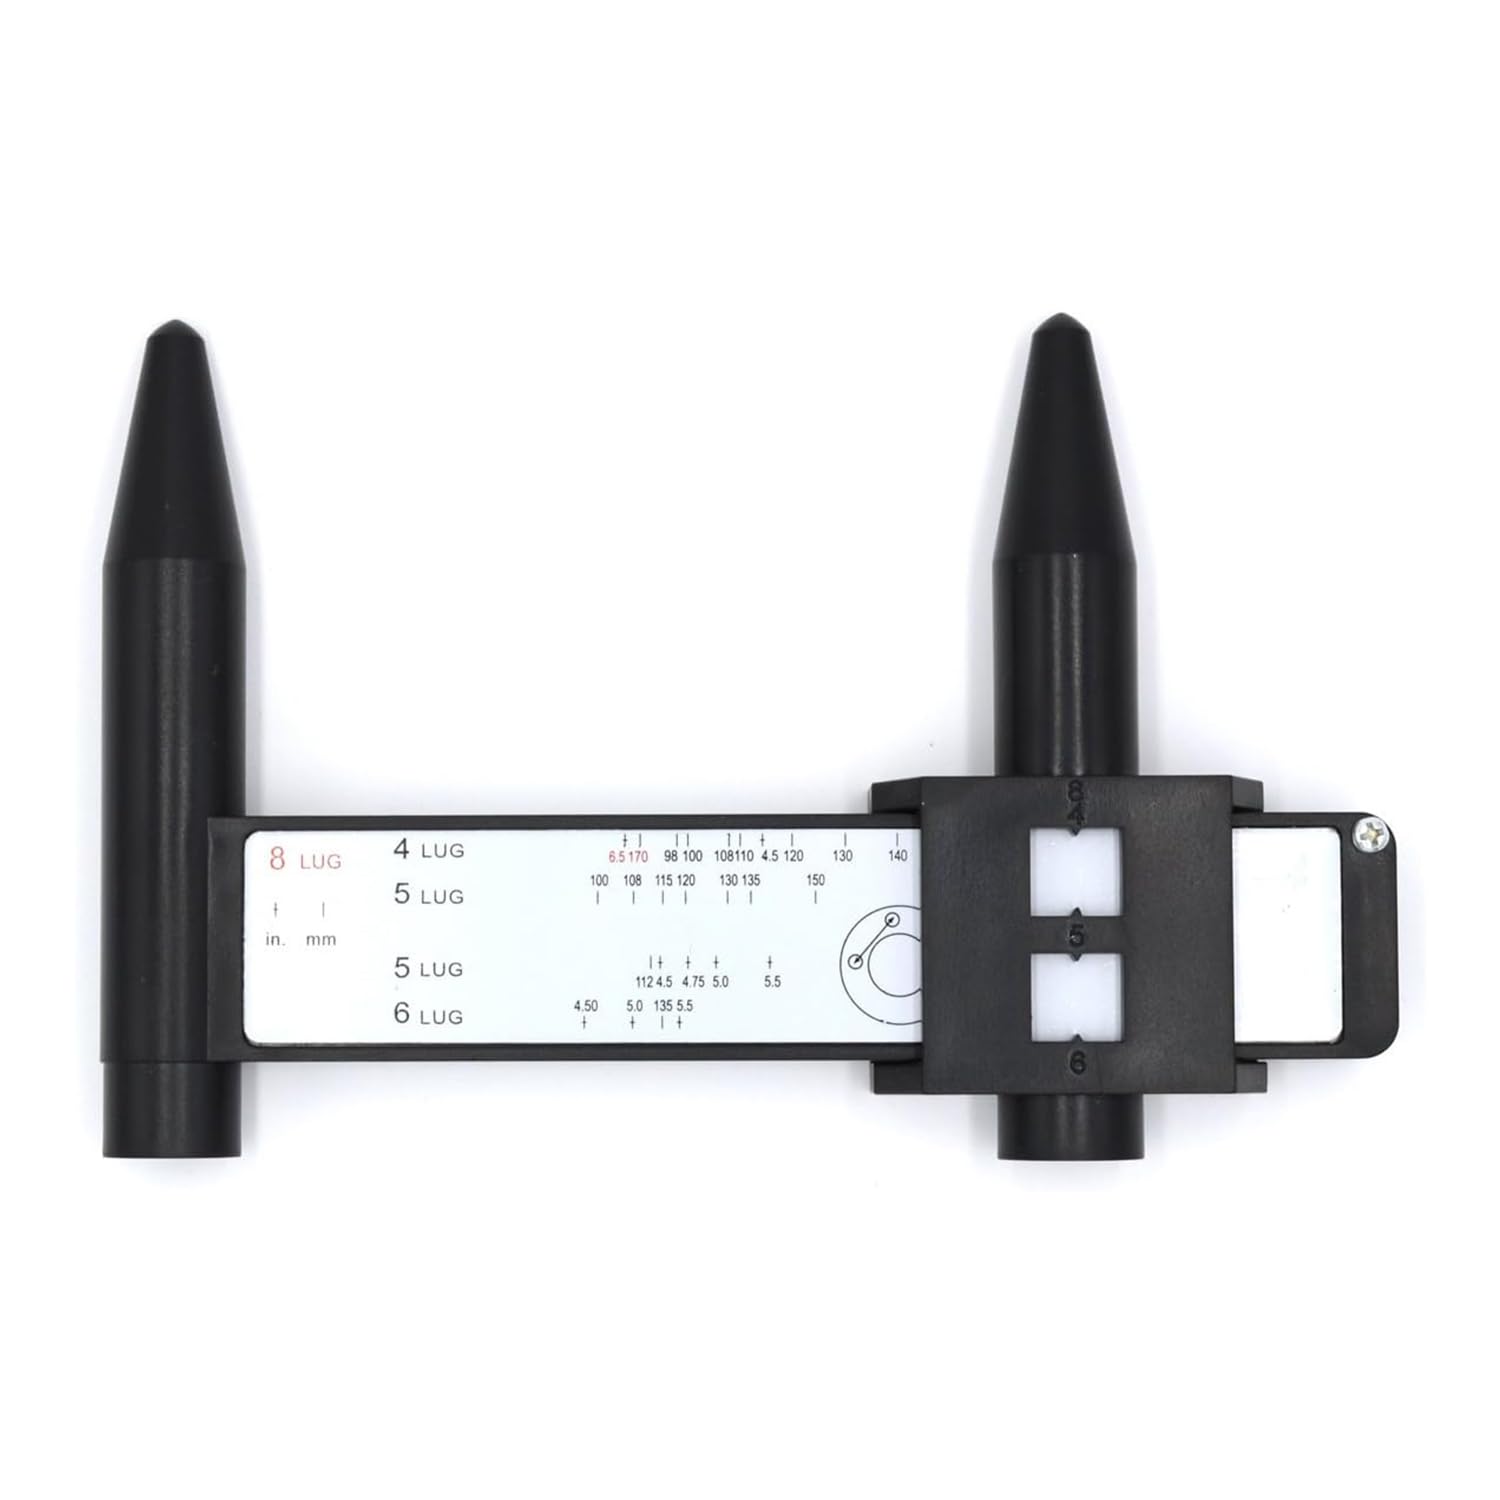
Skip the guesswork by using the right tools for accurate measurements. While a standard tape measure works in a pinch, it lacks the precision needed for millimeter-specific automotive standards. Invest in a digital caliper that measures in both millimeters and inches—this pays for itself by preventing costly wheel mismatches. Look for one with a resolution of at least 0.01mm and a measuring range of 150mm to cover most passenger vehicles.
Professional-Grade Measurement Kit Components
- Digital caliper (0-150mm range for most vehicles)
- Straight metal ruler (for five-lug “acorn method”)
- Bolt pattern gauge template (optional but helpful)
- Small mirror (to see hard-to-reach lug holes)
- Flashlight (for clear visibility in wheel wells)
- Notepad and pen (record measurements immediately)
Many auto parts stores loan these tools for free with a deposit—ask at the service counter before purchasing. If you’re measuring multiple vehicles, consider a bolt pattern identification wheel that overlays common patterns for quick verification.
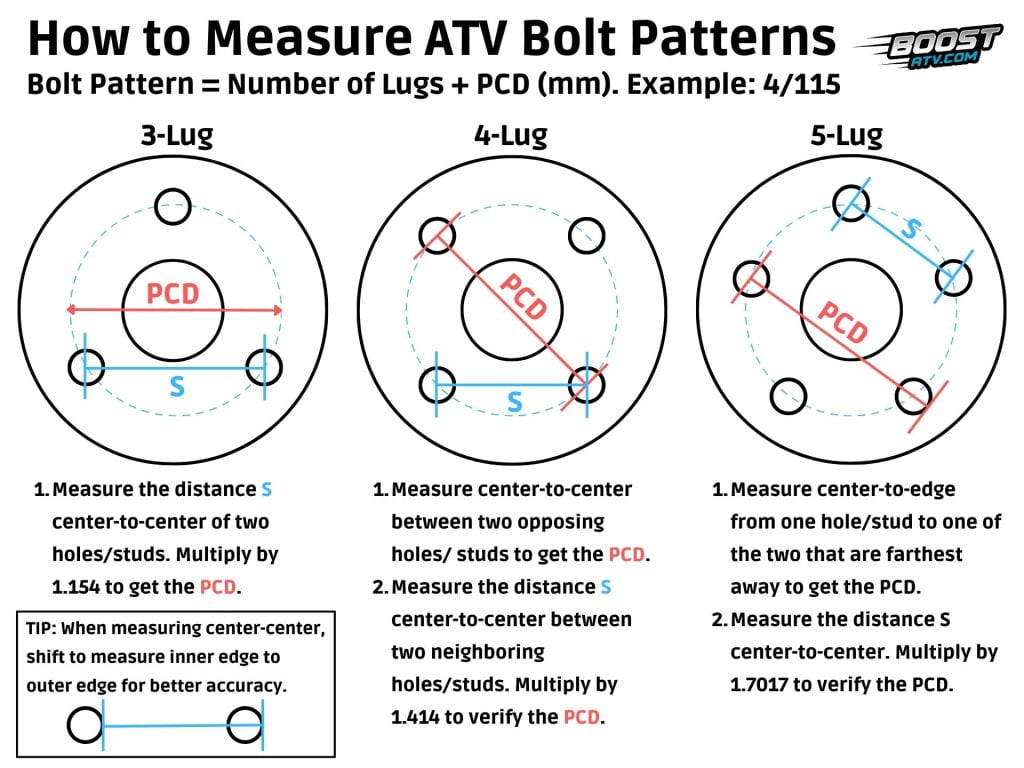
Measuring 4-Lug and 6-Lug Patterns: The Direct Method
Four-lug patterns (common on compact cars) and six-lug patterns (found on many trucks) use the simplest measurement technique because opposite lug holes create a straight line through the hub center. Position your caliper so one jaw touches the inner edge of one lug hole while the other jaw touches the inner edge of the directly opposite hole. Subtract the lug hole diameter from this measurement to get the true bolt circle diameter.
Step-by-Step Measurement Process
- Clean debris from lug holes using a wire brush
- Place caliper jaws against the innermost points of opposite holes
- Record measurement in millimeters (e.g., 100mm)
- Measure the diameter of a single lug hole (typically 14-17mm)
- Subtract lug hole diameter from step 3 measurement (100mm – 15mm = 85mm)
- Verify by measuring two different pairs of opposite holes
For six-lug patterns on trucks like Ford F-150s, measurements typically range from 135mm to 145mm. Always measure at least three different hole pairs and average the results—manufacturing tolerances sometimes create slight variations.
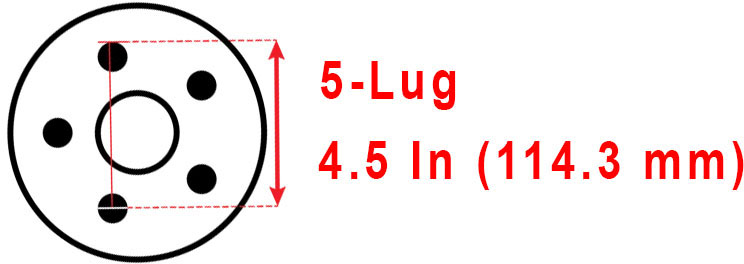
Five-Lug Pattern Measurement: The Critical Acorn Method
Five-lug wheels (standard on most SUVs and performance cars) require special technique since no holes sit directly opposite each other. The acorn method gets its name from the geometric shape created by connecting every other lug hole. Measure from the center of one lug hole to the center of the hole two positions away (skipping one hole between them), then multiply by 1.051 to calculate the true bolt circle diameter.
Why This Method Works Mathematically
This calculation accounts for the 72-degree angle between lug holes in a five-point circle. The multiplier 1.051 comes from the trigonometric relationship: 1/sin(36°) = 1.701, then 1.701/1.618 (golden ratio) = 1.051. While you don’t need to understand the math, using this precise multiplier prevents the common 4-5% error that occurs when people guess at five-lug measurements.
Pro Tip: Mark your starting hole with chalk before measuring to avoid confusion. Measure both clockwise and counterclockwise (skipping one hole each way) and average the results for maximum accuracy.
Understanding Bolt Pattern Notation: Decoding the Numbers
When you see “5×114.3” on a wheel specification sheet, the first number (5) indicates lug count while the second (114.3) represents the bolt circle diameter in millimeters. This standardized notation appears on wheel hubs, manufacturer documentation, and aftermarket product listings. Many American vehicles list patterns in inches (like 5×4.5), which equals 114.3mm—always verify the unit of measurement.
Common Pattern Conversions You Should Know
- 4×100 = 4×3.94 inches (common on Honda, Toyota)
- 5×114.3 = 5×4.5 inches (most American and Asian vehicles)
- 5×120 = 5×4.72 inches (BMW, Mercedes)
- 6×139.7 = 6×5.5 inches (many trucks)
Never round measurements when purchasing wheels—114mm differs significantly from 114.3mm in precision engineering. A wheel designed for 114.3mm won’t properly seat on a 114mm hub, creating dangerous vibration.
Critical Measurement Mistakes That Cause Costly Errors
Over 60% of wheel fitment issues stem from simple measurement errors anyone can make. The most common mistake involves measuring from the outer edges of lug holes instead of center-to-center. This adds the diameter of two lug holes to your measurement, creating a reading that’s 28-34mm too large—enough to select completely incompatible wheels.
Metric vs. Imperial Unit Confusion
Many DIYers mix millimeters and inches when measuring. A pattern listed as 5×4.5 inches equals 114.3mm, but if you measure 114mm and assume it’s 4.5 inches, you’re actually 0.3mm (0.012 inches) off—enough to prevent proper wheel seating. Always convert your measurement to both units and compare against known standards.
Warning: Never rely on wheel store staff to measure for you—they often use templates that approximate rather than precisely measure. Verify their results with your own measurements before purchasing.
Verifying Measurements Against Manufacturer Specifications
After taking your measurements, cross-reference them with your vehicle’s official specifications. Find this information in three reliable places: your owner’s manual (typically in the wheel/tire section), a metal tag on the driver’s side door jamb, or through your VIN at the dealership parts department.
Creating a Measurement Verification Checklist
- Measure lug pattern using proper technique
- Record measurement in both mm and inches
- Check owner’s manual for specified pattern
- Verify with dealership using your VIN
- Compare against online databases (Wheel-Size.com)
- Test-fit wheels before final purchase
If your measurements don’t match the manufacturer’s specs, double-check your technique before assuming your vehicle has been modified. Rarely, previous owners may have changed hubs, but this is uncommon on modern vehicles.
When to Consult a Professional Wheel Specialist
Certain situations warrant professional measurement assistance. If you drive a European performance vehicle (like Porsche or Audi), have a modified suspension, or own a classic car with non-standard patterns, seek expert verification. Specialty shops have precision templates covering hundreds of patterns and can measure within 0.1mm accuracy.
Cost-Benefit Analysis of Professional Measurement
Most tire shops provide free lug pattern verification—a five-minute service that prevents hundreds in wasted expenses. For $20-$50, specialty wheel shops offer comprehensive fitment analysis including center bore, offset, and clearance checks. Considering that mismatched wheels can cost $800+ to replace and create safety risks, professional verification represents smart investment.
Accurate lug pattern measurement protects your vehicle’s performance and your safety. By following these precise methods, you’ll confidently select wheels that fit perfectly, drive smoothly, and keep you secure on the road. Always measure twice, verify with manufacturer specs, and when in doubt, consult a professional before making your wheel purchase.


