
Your tires are the only point of contact between your car and the road. When tread depth drops below 4/32 of an inch, stopping distance on wet roads doubles compared to new tires. Yet 1 in 4 vehicles on U.S. roads has dangerously worn tires according to the Rubber Manufacturers Association. If your tires can’t channel water effectively, you risk hydroplaning at just 35 mph. This guide shows you exactly how to measure tread depth using tools you likely already have at home – no mechanic visit required. You’ll learn when to replace tires, avoid legal penalties, and keep your family safe in all weather conditions.
Why Accurate Tread Measurement Prevents Roadside Emergencies
How Tread Depth Directly Impacts Stopping Distance
Tread grooves act like miniature rivers directing water away from your tire’s contact patch. At 2/32 inch depth – the legal minimum in most states – tires lose 70% of wet-weather traction. A vehicle traveling 60 mph needs 188 additional feet to stop on wet pavement compared to tires with 4/32 inch tread. That’s longer than a basketball court. Measuring accurately reveals hidden dangers before they cause accidents.
Legal Consequences of Neglecting Tread Checks
Driving on worn tires isn’t just dangerous – it’s illegal. Most states mandate minimum tread depths of 2/32 inch, but California and Colorado require 4/32 inch for front tires. Getting caught with illegal tread can mean:
– $100-$500 fines per tire
– Vehicle inspection failure
– Liability doubling in accident claims
– Insurance coverage denial
Penny Test: The Emergency Tread Check Method
Step-by-Step Penny Measurement Process
- Grab a Lincoln penny – Heads side facing you
- Insert upside down into tread groove with Lincoln’s head pointing down
- Check visibility of Lincoln’s crown:
– Crown fully visible = Tread dangerously low (≤ 2/32″)
– Crown partially covered = Tread marginal (2/32″ – 4/32″)
– Crown completely covered = Adequate tread (>4/32″)
Critical Penny Test Mistakes That Skew Results
- Using worn pennies: Thin coins give false “safe” readings – replace if Lincoln’s outline is smooth
- Measuring only one spot: Check all 4 tire quadrants and multiple grooves – uneven wear hides danger
- Ignoring sidewall damage: Bulges or cracks require immediate replacement regardless of tread depth
- Testing on dry pavement: Moisture swells rubber – measure on clean, dry tires
Pro Tip: Pennies measure down to 2/32″, but safety experts recommend replacement at 4/32″. For winter tires, use quarters instead (see next section).
Quarter Test: Winter Tire Safety Threshold
Why Quarters Are Essential for Cold-Climate Drivers
Lincoln’s head on quarters extends deeper than pennies, measuring 4/32″ – the critical threshold for winter tires. When Washington State Department of Transportation tested tires at 4/32″ vs 6/32″ tread in slush:
– Stopping distance increased 25% at 4/32″
– Hydroplaning began 15 mph lower speeds
– Cornering grip dropped 30%
Performing the Quarter Safety Check
- Use Washington quarter with eagle side facing you
- Insert upside down into deepest tread groove
- If Washington’s head is visible:
– ≥4/32″ tread = Safe for summer
– <4/32″ = Replace immediately for winter driving
– <2/32″ = Illegal for all conditions
Warning: Never rely solely on quarter test for front tires in all-season climates – use tread depth gauge for precision.
Tread Depth Gauge: Professional Accuracy at Home

Choosing the Right Measurement Tool
| Gauge Type | Cost | Accuracy | Best For |
|---|---|---|---|
| Stick Gauge | $5-$10 | ±1/32″ | Quick checks |
| Digital Gauge | $15-$25 | ±0.1mm | Precision tracking |
| Tread Depth Ruler | $3 | ±2/32″ | Budget option |
Correct Gauge Measurement Technique
- Clean tread grooves with stiff brush to remove debris
- Insert probe into deepest part of groove until base touches tread
- Read measurement where probe stops:
– New tire: 10/32″ – 11/32″
– Replace immediately: ≤2/32″
– Winter replacement: ≤4/32″ - Measure 6+ points per tire – inner, center, outer tread
Expert Note: Digital gauges show measurements in millimeters (1.6mm = 2/32″). Record readings monthly to track wear rate.
Identifying Wear Indicators Without Tools
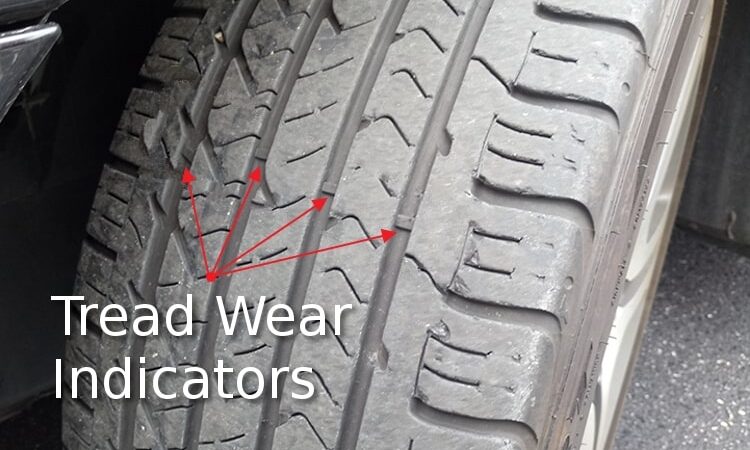
Finding Built-In Tread Wear Bars
Modern tires have 6-8 raised rubber bars spanning tread grooves at 2/32″ depth. Inspect tires for:
– Raised sections connecting tread blocks
– Smooth rubber strips across grooves
– “TWI” markings on sidewall indicating bar locations
Danger Signs Beyond Tread Depth
Replace tires immediately if you see:
– Cupping or scalloping: Uneven wear from suspension issues
– Center wear: Overinflation damage
– Shoulder wear: Underinflation or aggressive cornering
– Cracks deeper than 1/16″: Dry rot requiring replacement
When to Replace Tires Based on Measurements

Tread Depth Replacement Guidelines
| Depth | Condition | Action |
|---|---|---|
| 8/32″+ | Like new | Ideal for wet weather |
| 6/32″ | Moderate wear | Monitor monthly |
| 4/32″ | Critical threshold | Replace winter tires |
| 3/32″ | High risk | Avoid highway driving |
| 2/32″ | Illegal | Replace within 1,000 miles |
Seasonal Tread Requirements
- Summer tires: Minimum 4/32″ for safe rain performance
- All-season tires: 5/32″ for light snow
- Dedicated winter tires: 6/32″ minimum (4/32″ = end of life)
- Commercial vehicles: 4/32″ front tires, 2/32″ rear (federal mandate)
Preventing Uneven Tread Wear Through Maintenance
Critical Maintenance Schedule
- Rotate tires every 5,000-7,500 miles
- Check alignment after hitting potholes
- Verify inflation monthly (use doorjamb PSI spec)
- Inspect suspension if wear exceeds 2/32″ difference between inner/outer tread
Pro Tip: Place business cards in tread grooves after new tire installation. When cards become visible, you’ve lost 4/32″ of tread.
Final Tread Measurement Checklist
Before every road trip:
1. Perform penny test in 3+ locations per tire
2. Check for exposed wear bars
3. Verify no bulges/cracks on sidewalls
4. Compare tread depth between axle pairs (difference >2/32″ requires service)
When measurements show:
– 4/32″ or less: Schedule replacement within 2 weeks
– 2/32″ or less: Do not drive in rain – replace immediately
– Uneven wear: Get alignment check before new tires
Tire tread depth is your primary defense against wet-weather accidents. By measuring monthly using these methods, you’ll avoid costly fines, prevent dangerous blowouts, and maintain critical traction. Remember: When the penny test shows Lincoln’s full head, you’re driving on legally bald tires. Don’t wait for the wear bars to appear – replace tires at 4/32″ for optimal safety. Your stopping distance could mean the difference between a close call and a collision. Keep a tread depth gauge in your glove compartment and check tires during every fuel stop for year-round road safety.


