

Building a tire drag properly transforms discarded rubber into one of the most versatile training tools and land management implements you can own. Whether you’re an athlete seeking low-impact conditioning or a farmer needing pasture maintenance equipment, learning how to make a tire drag requires minimal tools, basic materials, and just 20 minutes of work for simple configurations. This guide reveals exactly how to construct a durable tire drag that outperforms commercial alternatives costing hundreds more—all while repurposing materials that would otherwise end up in landfills.
The beauty of this project lies in its remarkable cost-effectiveness and simplicity. Most components come from materials you can obtain for free, primarily old tires that tire shops regularly discard. With just a few dollars in hardware, you’ll create a functional implement that serves multiple purposes—from building serious strength and stamina to smoothing fields and spreading manure. By the end of this guide, you’ll know precisely how to build a tire drag that meets your specific needs, whether for athletic training or agricultural applications.
Select the Perfect Tire for Your Drag

Your tire choice dramatically impacts both construction difficulty and final performance, so selecting wisely pays off throughout the building process and during use.
For athletic training, a tire designed for a 16-inch wheel provides optimal dimensions—large enough for meaningful resistance but small enough for convenient handling during workouts. If you plan to add weight plates for progressive overload, choose 20-21 inch diameter tires that can be modified to accept plate loading. These sizes offer the sweet spot between manageability and resistance for fitness applications.
Agricultural applications demand larger, heavier tires. Road-grader tires around 24 inches in diameter create excellent dragging surfaces due to their substantial mass. Tractor tires from the 22.5-inch category provide robust construction suitable for smoothing disked fields and spreading manure. For serious land management work where maximum weight matters, earth mover tires approximately 5 feet across with 5-inch thick sidewalls deliver exceptional performance, though they’re challenging to transport and handle.
Cutting Considerations That Save Time and Effort
Bias-ply tires cut significantly easier than radial tires, making them preferable when your design requires modification. The reinforcement patterns in radial tires create greater challenges during cutting operations. When selecting tires for a project requiring cutting, prioritize bias-ply construction to simplify your work. Most tire shops can identify tire types if you’re unsure—simply explain you need tires that are easier to cut for a DIY project.
Gather Essential Tools and Hardware

Before starting construction, collect these critical components to ensure a smooth building process:
Must-Have Tools
- Drill with appropriate bits (cobalt brad point bits work best for tire material)
- Utility knife or box cutter for tire modification
- Wrenches for tightening nuts securely
- Optional: Heated metal rod (1/2-inch rebar ground to a point) for difficult cuts
Critical Hardware Components
- 3-inch steel eye bolts with large washers and nuts (1/2-inch diameter recommended)
- 1/2-inch grade 5 bolts with washers and nuts for multi-tire configurations
- Carabiners or snap links for quick towing connections
- Heavy chain or tow straps for pulling equipment
- Heavy pipe or cedar pole for pull bar in multi-tire arrangements
Tire shops regularly discard customer tires and often welcome the opportunity to offload these materials without disposal fees. Visit local shops with a pickup truck, explain you’re building a tire drag for training or farming, and you’ll likely leave with more options than you can use—all for free.
Build a Single Tire Drag in 20 Minutes
The simplest tire drag configuration requires minimal tools and provides immediate functionality for training or small-scale land work.
Create the Perfect Attachment Hole
Drill between the tread blocks, approximately midway between the bead and outer tread surface. For difficult tires, heat a 1/2-inch rebar piece red hot and push it through the sidewall—this method works especially well for creating clean holes without specialized equipment. Let the drill (or heated rod) do the work; applying excessive force increases the risk of irregular holes that compromise strength.
Install the Eye Bolt Correctly
Insert the eye bolt through your created hole with the washer positioned inside the tire. Thread the nut onto the bolt and tighten securely—this washer is critical as it distributes load across the tire material to prevent pull-through during use. Without proper washer placement, the nut will eventually tear through the tire, creating a dangerous failure point.
Connect Your Towing Equipment
Attach a carabiner to the eye bolt, then connect your chain, cable, or tow strap. For training applications, use a water knot or double overhand knot loop at each end of your tow strap to create secure connection points that withstand repeated use. This single-tire configuration provides an immediate training tool suitable for strength development and conditioning work.
Construct Multi-Tire Drags for Maximum Coverage
For ground preparation requiring wider coverage, multi-tire arrangements increase working width while maintaining flexible ground-contouring ability.
Cutting Tires for Optimal Performance
Cutting tires in half around the circumference creates two “doughnuts” from each tire, producing a stiffer casing that creates effective scrubbing action as the unit moves forward. Use multiple passes with a sharp utility knife for tread cutting—this process takes time but produces superior results compared to rushing with dull blades.
Proven Arrangement Patterns
- Pyramid Pattern: One tire in front with three tires behind creates stable, consistent ground contact
- Offset Rows: Five tires in front row with four tires in rear row (offset by half tire width) maximizes coverage
- Chain-Wrap Method: Wrap chain around each tire and connect with links—this flexible approach allows tires to contour to uneven ground
Secure Connection Techniques
Place large flat washers directly beside the bead when connecting multiple tires—this prevents pull-through during use as tire material can tear under load without proper reinforcement. For the pull bar, position heavy pipe at the front of your tire arrangement with chains connecting the tires to the bar. Some users report cedar poles bored to accept eye bolts provide effective, long-lasting pull bars.
Create Bulletproof Attachment Points
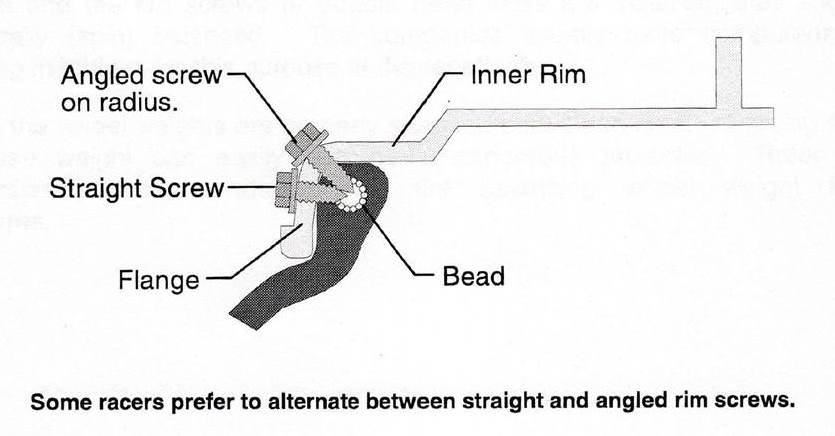
The most challenging aspect of tire drag construction involves creating reliable attachment points that won’t fail under load.
Three Proven Hole Creation Methods
- Drilling Method: Drill a couple sizes larger than your bolt diameter and let the drill work incrementally for cleaner results
- Heated Rod Method: Heat 1/2-inch rebar red hot and push through tire material (requires significant force)
- Hole Saw Method: Produces the cleanest results for larger openings needed for eye bolts
Position attachment points thoughtfully based on intended use—forward-facing eye bolts allow efficient force transfer during pulling. For interconnection between tires, align eye bolts with your chosen connection method to maintain structural integrity during use.
Avoid Costly Construction Mistakes
Understanding potential pitfalls helps you build a tire drag that lasts for years rather than failing prematurely.
Dirt Accumulation Issues
Dirt naturally accumulates inside tractor tires during dragging operations as flexible tire sides scoop soil into the interior space. Anticipate this additional weight when designing your towing capacity. While this extra mass improves dragging effectiveness in some applications, periodically clearing accumulated material maintains predictable handling.
Ground Surface Considerations
Gravel-free, smooth surfaces allow maximum speed and efficiency, while rough or debris-strewn ground increases resistance and equipment wear. Identify appropriate surfaces for regular training to extend equipment life and maintain consistent training stimulus.
Flexibility vs. Rigidity Balance
Highly flexible configurations adapt well to uneven ground but may produce a “wave effect” during use. More rigid configurations provide consistent ground contact but may not address extreme contours. The optimal balance depends on your specific application—some flexibility proves essential, but excessive flexibility reduces effectiveness for tasks like seedbed preparation.
Save Money with Budget Construction Options
The tire drag represents one of the most economical implements you can build, with basic training configurations requiring only $15-25 in hardware materials when tires are obtained free.
Commercial chain harrows may cost $1,200 or more, while tire drags achieving equivalent or superior performance require only a fraction of that investment. Budget-friendly alternatives include using rebar heated with a torch instead of purchasing specialized hole-cutting tools and employing scavenged hardware from other projects.
Your completed tire drag provides years of reliable service with minimal maintenance. Periodic inspection of hardware connections, clearing accumulated debris from tire interiors, and storing under cover when not in use significantly extend service life. The simple, robust design with few moving parts means fewer failure points compared to complex commercial implements, making your DIY tire drag a lasting investment in your training capability or land management equipment.


