

Your tires are the only part of your vehicle touching the road, and maintaining proper air pressure is critical for safety, fuel efficiency, and tire longevity. But what happens when you’re miles from the nearest gas station and don’t have a pressure gauge? Whether you’re stranded roadside, preparing for a trip, or simply want to perform a quick check before driving, knowing how to identify which tire needs air without specialized equipment is an essential skill every driver should master. This guide reveals proven techniques you can use with just your senses to detect underinflated tires—methods mechanics and experienced drivers rely on when gauges aren’t available. By learning these approaches, you’ll never be caught off guard by a low tire, even when proper measuring tools are nowhere to be found.
Perform the Visual Shape Inspection
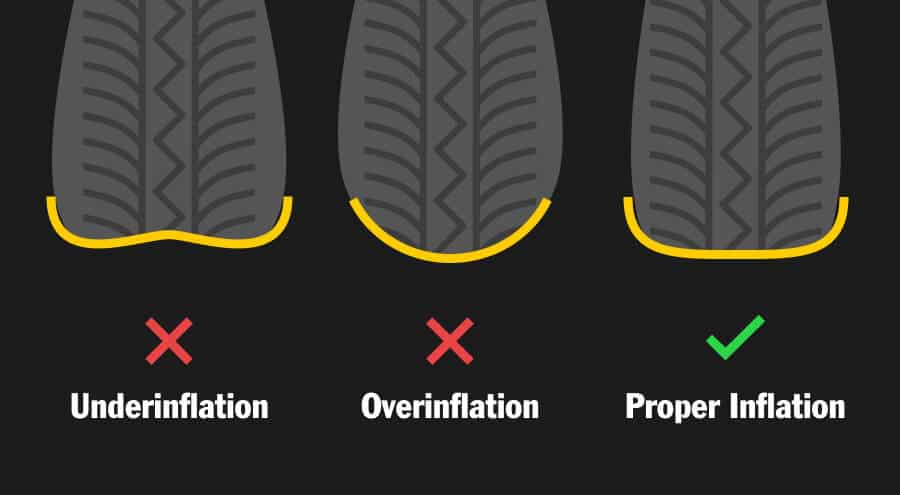
The most immediate way to identify which tire needs air is through careful visual examination. Underinflated tires display distinct physical changes that differ from properly inflated ones. Stand back from your vehicle and study each tire from multiple angles, comparing them to spot inconsistencies that signal pressure problems.
When a tire loses air, its structural integrity changes, causing the sidewalls to bow outward and the tread area to flatten against the road surface. A properly inflated tire maintains a consistent, slightly rounded shape where it contacts the pavement, while an underinflated tire will show significantly more of its sidewall making contact with the ground. Crouch down to eye level with the tires to spot these subtle differences—you should see only the tread pattern touching the road, not excessive rubber from the sidewall.
Compare all four tires side by side, as this comparison reveals issues more clearly than examining a single tire alone. If one tire looks noticeably “squattier” or more deformed than the others, that’s the one needing air. Focus particularly on the tread depth and pattern—an underinflated tire often shows more of the tread block edges, making the grooves appear shallower. This visual method works best when you’re familiar with how your properly inflated tires normally look, so take mental notes after your next proper pressure check.
Pro tip: Check tires when they’re cold (after sitting for at least three hours) for the most accurate visual assessment, as heat from driving temporarily increases pressure and alters tire shape.
Try the Knuckle Test
The knuckle test is a time-tested method mechanics have used for decades to estimate tire pressure without instruments. This technique relies on the physical properties of properly inflated tires—they should feel firm and resistant when pressed, while underinflated tires yield more easily under pressure.
To perform this test correctly:
1. Make a fist with your hand and use your knuckles to press firmly on the center of each tire’s tread area
2. Apply consistent pressure to all four tires for fair comparison
3. Note how deeply your knuckles sink into the rubber
A properly inflated tire will feel very firm, almost like pressing on a hard rubber ball, with minimal flex in the tread area. The tire should spring back immediately when you release pressure. An underinflated tire, however, will feel noticeably softer—you’ll press deeper into the tread, and the rubber may feel “mushy” rather than responsive. Focus on the center of the tread where the tire makes primary contact with the road, as this area shows the most dramatic pressure-related changes.
Warning: Don’t confuse cold tire firmness with proper inflation—tires checked in the morning after sitting overnight will feel firmer than driven tires but may still be underinflated. Always compare tires at similar temperatures.
Listen for Road Noise Changes
Your vehicle communicates through sound, and changes in tire pressure often produce distinct audible clues. An underinflated tire generates different road noises than properly inflated ones, providing valuable diagnostic information even without visual inspection.
Underinflated tires produce a louder, more pronounced humming or booming sound as they roll. This happens because the increased contact patch creates more friction against the road surface. The sound often manifests as a low-pitched “whomp-whomp-whomp” rhythm that corresponds to the tire’s rotation. Drive at consistent speeds on a smooth road and listen carefully to the noise coming from each corner of the vehicle. If one corner produces noticeably louder or different noise than the others, that tire likely needs air.
You can enhance this test by driving over the same stretch of road at different speeds. Underinflated tires often produce their characteristic noise at lower speeds than properly inflated tires, and the sound may change as speed increases. Some drivers describe underinflated tires as creating a “roaring” sound similar to driving on grooved pavement, even when the road surface is smooth. Trust your ears—if something sounds off, investigate further with another method.
Feel for Vibration Differences
Your hands on the steering wheel provide valuable feedback about tire pressure issues. An underinflated tire creates distinct vibration patterns transmitted through the suspension and steering system, often revealing itself before other symptoms become apparent.
Drive with your hands lightly on the steering wheel at 9 and 3 o’clock positions, feeling for unusual vibration or pulsing. A properly inflated tire produces relatively smooth steering with minimal feedback. An underinflated tire, however, often causes a subtle but noticeable vibration in the wheel, particularly at speeds above 40 miles per hour. This vibration typically has a rhythmic quality matching the tire’s rotation and may be accompanied by a “pulling” sensation to one side.
Determine where the vibration originates: steering wheel vibration suggests front tire issues, while vibration felt through the seat or floor indicates rear tire problems. Test this by driving slowly over a smooth parking lot and gently steering left and right while concentrating on the feedback. An underinflated tire often creates inconsistent steering response or a “loose” feeling in the wheel.
Do the Tread Depth Comparison
Comparing tread wear across all four tires reveals pressure-related problems that might otherwise go unnoticed. Tires operating at incorrect pressures wear unevenly, and these patterns become diagnostic tools for identifying which tire needs attention.
Examine the tread depth on each tire, looking for consistent wear patterns. All four tires should show similar wear if properly inflated. If one tire shows significantly more wear on the inner or outer edge than the others, that tire has likely been underinflated, as low pressure causes tires to roll more on their sidewalls. Run your hand across the tread surface feeling for irregularities or “feathering”—an underinflated tire often develops more wear on the outer edges than the center.
Common mistake: Don’t confuse normal wear with pressure-related wear. Pressure issues create distinct patterns across the entire tire circumference, while normal wear affects all tires similarly.
Check for Physical Deformities

Severe underinflation produces unmistakable physical deformities. Walk around your vehicle examining each tire’s sidewall carefully for bulges, wrinkles, or unusual protrusions. An underinflated tire often develops visible bulges where the sidewall buckles under the vehicle’s weight, appearing as irregular swelling in the rubber.
Pay special attention to the bead area—the edge where the tire seals against the wheel rim—for any visible gaps or signs the tire is pulling away from the rim. Underinflated tires can develop “bead leaks” where air escapes between the tire and wheel, often producing visible signs at the tire-rim interface. Look for dark lines or gaps where rubber meets metal, and check whether the tire appears to sit unevenly on the rim. These physical signs indicate serious underinflation requiring immediate attention.
The Thump Test Explained
The thump test uses sound to detect underinflation when visual inspection isn’t possible. Strike each tire firmly on the tread area near the center using your hand, a small rubber mallet, or a cloth-wrapped rock.
Listen carefully to the resulting sound—a properly inflated tire produces a sharp, crisp “thunk” or “ping” indicating the rubber is under tension. An underinflated tire creates a dull, flat “thud” because the loose rubber doesn’t resonate properly. Strike each tire in the same location for valid comparison. While this method works best on passenger car tires and detects significant pressure loss rather than slight underinflation, it’s invaluable when you can’t see or press on the tires.
When to Use a Proper Gauge
While these no-gauge methods effectively identify which tire needs air, they can’t replace precise measurement. Once you’ve identified a suspect tire using these techniques, verify with an actual gauge and inflate to manufacturer specifications. These methods excel at problem detection and roadside triage but don’t provide the quantitative measurements needed for accurate maintenance.
Keep a quality gauge in your vehicle and check tire pressure monthly, including the spare. The recommended pressure for your vehicle appears on a sticker inside the driver’s door jamb or in the owner’s manual—never use the number printed on the tire sidewall, as that indicates maximum pressure rather than recommended pressure. Check tires when cold for the most accurate readings.
Prevent Future Pressure Problems
Maintain proper tire pressure through ongoing vigilance. Most tires naturally lose about one PSI per month through normal permeation, making regular checks essential. Inspect valve stems and cores regularly, as these small components cause many slow leaks. Replace missing or damaged valve caps, which keep dirt and moisture from compromising the valve stem.
When a tire loses pressure faster than normal, have it professionally inspected. Sometimes the fix is as simple as replacing a faulty valve core; other times, you may need tire replacement due to punctures or sidewall damage. Consider a portable air compressor for your vehicle to address minor pressure loss immediately. By combining these preventive habits with the no-gauge detection methods you’ve learned, you’ll enjoy better fuel economy, extended tire life, and improved safety on every drive.


