
Slipping wheels on snow-covered driveways or muddy pastures can turn your routine gardening tasks into exhausting battles. Without proper traction, your garden tractor spins its wheels uselessly while you struggle to complete essential winter maintenance or seasonal chores. Installing tire chains transforms your equipment’s capabilities, giving you the grip needed to tackle snow, ice, and mud with confidence. This step-by-step guide shows exactly how to install garden tractor tire chains properly—ensuring safety, maximum traction, and avoiding common installation mistakes that could damage your equipment.
Prepare Your Work Area for Chain Installation
Before touching your tire chains, create the ideal installation environment to avoid frustration and ensure proper fit. Park your garden tractor on a hard, level surface like concrete or packed gravel—never on snow, mud, or uneven ground that could shift during installation. Engage the parking brake firmly and shut off the engine completely to eliminate any risk of accidental movement while you work.
Clear all debris from around your tires, including packed snow, mud clumps, or accumulated grass. This cleaning reveals the full tread pattern and wheel well clearance, allowing you to position chains accurately. Pay special attention to the inner wheel wells where chains might rub against suspension components during operation. A clear workspace prevents you from missing critical alignment issues that could cause damage later.
Inspect Chains Before Installation
Laying out your chains properly prevents installation headaches and safety hazards. Unpack both sets and spread them flat on the ground behind your parked tractor. Untangle every link carefully while checking for damaged, broken, or excessively worn sections that compromise safety. Damaged chains can snap during operation, sending metal fragments flying or causing sudden loss of traction.
Examine all tensioning hardware, bungee cords, and connectors for signs of corrosion or deformation. Pay particular attention to the hook mechanisms—bent hooks won’t secure properly and create dangerous loose ends. Position each chain with side fasteners facing outward and hook mechanisms pointing toward the tire’s interior. This orientation prevents snagging on suspension parts when you drive forward.
Drive Tractor Over Chains Properly

With chains laid out correctly, slowly position your garden tractor over them. Turn off the engine completely—never drive over chains with the engine running, as accidental movement could cause serious injury. Have helpers push the tractor forward while you steer until each tire centers directly above its respective chain.
Check that both sides of each chain extend equally beyond the tire’s width. Uneven chain positioning creates unbalanced traction that strains your tractor’s transmission and causes premature chain wear. For wider tires, you may need to adjust chain position slightly inward to ensure proper coverage across the entire tread surface.
Pull Chains Over Tires Without Twisting
Begin with the front half of each chain, pulling the material up and over the top of each tire. Work the links carefully into the tread grooves, maintaining even spacing between each link across the entire tire surface. Take your time—rushed installation often results in twisted chains that wear unevenly and create dangerous vibration during operation.
Ensure the chain’s center connectors face the tire’s interior, aligning with the tread pattern’s centerline. The chain should sit snugly in the tread valleys without forcing links into unnatural positions. If you struggle to position the chain properly, slightly deflate the tire to make installation easier, then reinflate to proper pressure afterward.
Connect and Tighten Fasteners Correctly
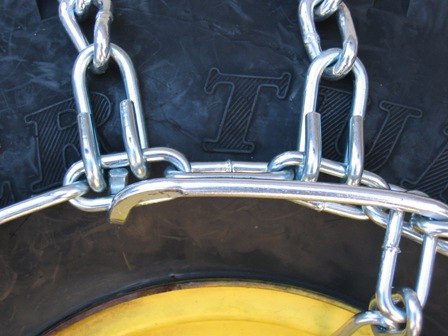
While supporting the rear chain section with one hand, thread the hook through the appropriate link to create your initial connection point. Pull both chain ends toward each other across the tire’s back side, gradually eliminating excess slack while maintaining even tension on both sides.
The ideal tension allows about one inch of give when pressing firmly on the chain at the tire’s widest point. Too loose causes chains to slap and wear rapidly; too tight restricts tire flex and stresses components. Secure all connections firmly, listening for the distinctive “click” that most tensioning hardware provides when properly engaged. Double-check that all hooks are fully seated in their receiving links.
Secure Excess Chain Length Effectively
Most tire chains include extra length to accommodate different tire sizes, but this excess must be secured properly. Attach spider bungees across the outside chains, weaving them through multiple chain links to create secure holds. Position loose segments away from moving components and ground contact—chains dragging on terrain catch on obstacles and cause sudden chain failure.
For optimal wear distribution, arrange excess chain material in a symmetrical pattern rather than letting it hang loosely in one area. This arrangement prevents specific links from experiencing disproportionate stress that leads to premature breakage during operation.
Verify Tension and Alignment Before Use
After installation, manually rotate each tire through a full revolution to check for proper chain behavior. Watch for rubbing against fenders, wheel wells, or suspension components—any contact indicates misalignment that requires immediate correction. Pay special attention to the inner wheel well area where clearance is typically tightest.
Check tension at multiple points around the tire circumference, ensuring slack distributes evenly rather than concentrating in specific areas. Adjust tensioning hardware incrementally until you achieve consistent tightness throughout the chain’s rotation. Properly aligned chains run smoothly without jumping or vibrating during rotation.
Test Chains Before Heavy Use
Never skip the critical testing phase before relying on your chains. Drive slowly in reverse for 10-15 feet in a safe, open area, then stop and inspect the chains thoroughly. Reverse movement creates different stress patterns that reveal installation issues static inspection might miss.
After reversing, recheck all connections for tightness and verify chain position hasn’t shifted. Make any necessary tension adjustments before proceeding to actual work. This brief test prevents costly damage that could occur from undetected installation problems during extended operation.
Follow Critical Speed Restrictions
Never exceed 25 miles per hour with garden tractor tire chains installed—most manufacturers specify this maximum for good reason. Higher speeds generate centrifugal forces that cause link failure, connector separation, or complete chain breakage. At just 30 mph, the stress on chains increases exponentially, creating dangerous projectile hazards.
Reduced speed also provides better control when encountering unexpected obstacles. Remember that chains improve traction but don’t shorten stopping distance significantly—maintain conservative speeds to compensate for altered handling characteristics.
Avoid Pavement with Chains Installed
Remove tire chains immediately when transitioning to paved surfaces. Driving on pavement with chains causes rapid deterioration of both chains and road surface, creating hazardous grooves that affect other vehicles. The metal links designed for soft surfaces act like cutting tools on hard pavement, wearing down quickly while damaging the road.
For unavoidable brief pavement crossings, proceed at walking speed and remove chains as soon as possible. Never use chains on dry pavement for extended periods—this practice quickly ruins both your chains and the road surface.
Inspect Chains Before Every Use
Develop a pre-use inspection routine that checks all critical components systematically. Examine every link for cracks or excessive wear, paying special attention to high-stress connection points near tensioning hardware. Test bungee cords for elasticity loss—they should snap back firmly when stretched.
Check for proper tension by pressing on multiple points around the tire circumference. Chains naturally loosen during operation, so expect to retighten after the first 15-20 minutes of use. Replace any damaged components immediately rather than risking failure during operation.
Store Chains Properly After Use
After each use, remove chains and clean thoroughly with a stiff brush to eliminate mud, salt, and debris that cause corrosion. Dry completely before storage—trapped moisture accelerates rust formation on metal components. Conduct a final inspection during cleaning, noting any damage that occurred during use.
Store chains in a dry location away from temperature extremes, preferably in their original packaging or dedicated storage container. Properly maintained chains provide multiple seasons of reliable service, making small storage investments worthwhile.
Fix Chain Rubbing Issues Immediately
If chains rub against fender components during rotation, address the problem before operating further. First verify you’re using the correct chain size for your specific tire dimensions—chains designed for larger tires inevitably cause clearance problems on smaller tires.
When chain size is correct, revisit installation to ensure proper centering and balanced tension. Minor clearance issues sometimes resolve by adjusting wheel well liners, but avoid cutting or modifying protective components unless absolutely necessary for safe operation.
Correct Uneven Wear Patterns Early
Uneven chain wear indicates improper tension distribution during installation. If one section shows significantly more wear after use, the chain isn’t sitting evenly on the tire surface. Remove and reinstall, paying careful attention to maintaining even link spacing and balanced tension on both sides.
Rotating chain position by offsetting connection points can sometimes compensate for minor alignment issues, though this serves as a temporary solution rather than a permanent fix for installation errors. Persistent uneven wear typically indicates underlying installation problems that require correction.
Choose the Right Chain Type for Your Needs

Standard ladder pattern chains feature transverse bars connected by longitudinal side chains, creating excellent traction for straight-line applications like snow removal. This common pattern performs reliably in winter conditions while offering easier installation and lower cost—ideal for most residential users.
Diamond pattern chains arrange links in continuous diamond-shaped mesh, providing multidirectional traction for superior handling on slopes and during turns. Though more expensive, diamond patterns wear more evenly and often last longer due to distributed stress across the mesh structure—worth considering for hilly properties.
Maintain Chains for Maximum Longevity
Regular cleaning and proper storage extend tire chain service life significantly. After each use, remove accumulated debris and allow chains to dry completely before storage. Apply light machine oil to metal components before long-term storage to prevent rust formation.
Address minor issues immediately—tightening loose connections, replacing worn bungees, and realigning shifted chains keeps your equipment performing reliably season after season. The small investment in maintenance pays dividends through extended chain life and consistent traction when challenging conditions arise.


