
That persistent TPMS warning light on your dashboard isn’t just annoying—it’s a critical safety alert that shouldn’t be ignored. When your tire pressure monitoring system fails to reset after proper inflation, you’re likely facing a dead sensor that needs replacement. Knowing how to install a tire pressure sensor yourself saves $100+ in labor costs while giving you valuable control over your vehicle’s safety systems. This guide delivers the exact steps you need to replace your TPMS sensor successfully, whether you’re dealing with a valve-stem-mounted unit or an internal sensor requiring tire removal.
Most drivers can complete this repair with basic tools and careful attention to torque specifications, though the complexity varies based on your sensor type. Valve-stem sensors can often be replaced without removing the tire from the wheel, while band-mounted sensors inside the tire require professional equipment. Either way, understanding the installation process helps you decide whether to proceed DIY or seek professional help. Let’s break down everything you need to know to get your TPMS system functioning properly again.
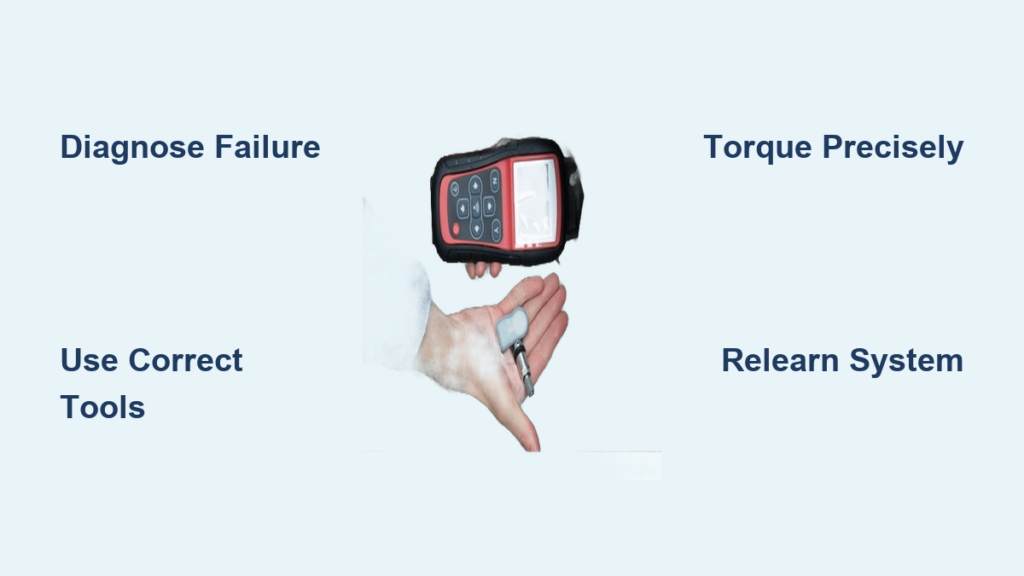
Diagnose Your TPMS Sensor Failure First
Before attempting installation, confirm your sensor actually needs replacement rather than addressing simple low tire pressure. A TPMS light that stays illuminated after verifying all tires at proper pressure (check your door jamb sticker) indicates a likely sensor failure. Pay attention to warning light behavior—a solid light means current pressure issues, while a light that blinks 60-90 seconds before staying solid typically signals a dead sensor battery.
Check your vehicle’s display for individual tire pressures if available. Inaccurate readings that don’t match your manual gauge measurements confirm sensor problems. Some vehicles allow diagnostic scanning to identify exactly which sensor has failed. Take 5 minutes to verify actual tire pressure in all four tires before assuming sensor replacement is necessary—sometimes the solution is simply adding air to an underinflated tire.
Collect Your Essential Installation Tools
Completing a successful TPMS sensor installation requires specific tools beyond basic mechanics equipment. Start with fundamental safety gear: a car jack rated for your vehicle, jack stands (never work under a vehicle supported only by a jack), and wheel chocks. You’ll need a lug wrench or socket set (typically 17mm or 19mm) to remove wheel nuts.
For the sensor work itself, gather these specialized items:
– Valve stem core removal tool (deflates tire safely)
– Inch-pound torque wrench (critical for sensor mounting at 35-80 inch-pounds)
– Foot-pound torque wrench (for wheel lug nuts at 80-100 foot-pounds)
– New valve core (replaces old one during installation)
If your sensor mounts inside the tire rather than on the valve stem, you’ll need access to a tire bead breaker or tire changing machine—many local tire shops rent machine time for $10-20 if you don’t have professional equipment. Never attempt to break tire beads without proper tools; you risk damaging expensive wheels.
Select the Correct Replacement Sensor
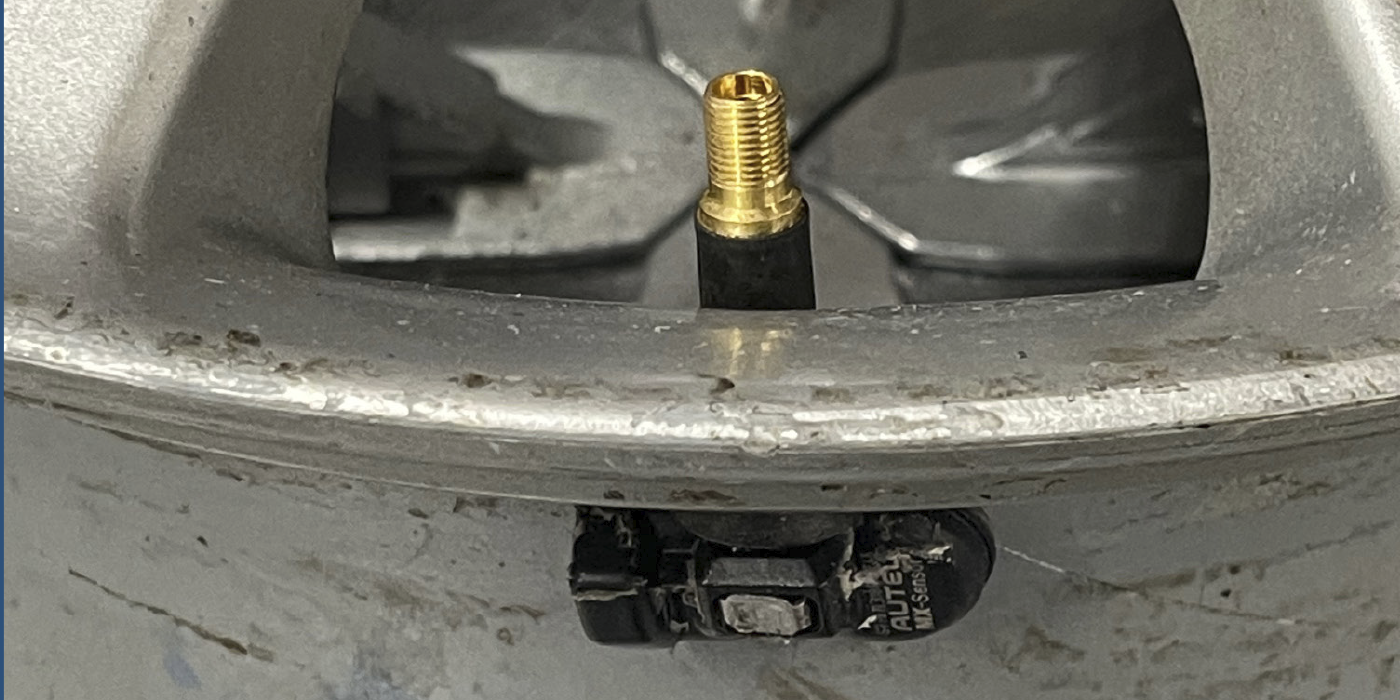
Choosing the right TPMS sensor prevents installation headaches and system malfunctions. Direct TPMS sensors (most common) come in two primary mounting styles: valve-stem-mounted units that screw onto the valve stem, and band-mounted sensors that attach inside the wheel with metal straps. Check your old sensor or consult your vehicle manual to determine which type you need.
Critical compatibility factors:
– Radio frequency (315 MHz for most Asian vehicles, 433 MHz for American/European)
– Vehicle-specific protocols (varies by manufacturer)
– Mounting style (valve stem vs. band mount)
Original equipment sensors from dealers cost $40-100 each but guarantee compatibility. Quality aftermarket sensors ($20-50 each) work well for most DIYers. Universal programmable sensors offer flexibility but require a scan tool for programming—typically not cost-effective for single replacements. Always verify sensor compatibility before purchasing to avoid return hassles.
Safely Prepare Your Vehicle for Work
Proper preparation prevents accidents and streamlines your installation process. Park on level ground, engage the parking brake fully, and position wheel chocks behind the tires remaining on the ground. Loosen lug nuts on the target wheel while the vehicle is still on the ground—this prevents wheel spinning during removal once elevated.
Before lifting, double-check that your replacement sensor matches your vehicle specifications and that all tools are within easy reach. Breaking lug nuts loose while the vehicle is stationary is much easier than struggling with a spinning wheel once elevated. Verify jack points in your owner’s manual to avoid damaging frame components—many vehicles have reinforced lift points near the wheel wells.
Remove the Wheel Assembly Carefully
With the vehicle properly supported on jack stands, completely remove lug nuts and carefully detach the wheel. Place it flat on a clean work surface with the valve stem facing up. For valve-stem-mounted sensors, you can often complete the replacement without removing the tire from the wheel. However, if your sensor mounts inside the tire, this is where most DIYers opt for professional help unless you have access to tire changing equipment.
Inspect the wheel for damage or corrosion that might affect the new sensor’s seal. Take note of valve stem condition—if it’s cracked or corroded, replace it during installation. Damaged valve stems cause air leaks that compromise sensor accuracy and tire pressure maintenance.
Replace the Old Sensor Correctly

For valve-stem-mounted sensors, start by removing the valve core with your core tool to completely deflate the tire. Once deflated, unscrew the retaining nut holding the sensor to the valve stem. This nut typically requires 35-80 inch-pounds of torque—use your inch-pound torque wrench for precision.
Pull the old sensor away from the valve stem, inspecting the mounting surface for debris or damage. Clean the area thoroughly before installing the new sensor. If replacing an internal band-mounted sensor, you’ll need to break the tire bead and remove the tire from the wheel—a task requiring professional equipment for most DIYers.
Install and Torque the New Sensor Precisely
Position the new TPMS sensor against the valve stem, ensuring proper alignment with any orientation marks. Hand-tighten the retaining nut first to establish proper thread engagement, then apply the manufacturer’s specified torque using your inch-pound torque wrench. This step is critical—over-tightening cracks sensor bodies while under-tightening causes air leaks.
Common torque mistakes to avoid:
– Using a foot-pound wrench instead of inch-pound (too coarse for precision)
– Guessing torque rather than measuring (leads to sensor damage)
– Using impact tools (almost always damages sensors)
For band-mounted sensors, secure the metal strap according to manufacturer instructions, ensuring no twists that could cause damage during rotation. The sensor should sit flush against the wheel interior without movement.
Reinstall Wheel and Complete Torque Sequence
Carefully remount the tire (if removed) and reinstall the wheel onto the hub, aligning holes with hub studs. Hand-tighten lug nuts in a star pattern to prevent wheel wobble, then lower the vehicle slightly before applying final torque. Use your foot-pound torque wrench to tighten lug nuts to 80-100 foot-pounds in the star pattern for even load distribution.
Reinflate the tire to the pressure specified on your door jamb sticker, then reinstall the valve core. Double-check that the TPMS warning light behavior has changed—it should illuminate briefly when starting the car then turn off if the system recognizes the new sensor.
Complete the Critical Relearn Procedure
After physical installation, your vehicle’s TPMS system must recognize the new sensor through a relearn procedure. This varies significantly by manufacturer:
- Automatic relearn: Drive above 30 mph for 10 minutes (common on newer vehicles)
- Manual relearn: Press TPMS reset button until light blinks (typically under dash)
- Scan tool relearn: Required for some vehicles using OBD-II diagnostic tools
Consult your owner’s manual for the exact procedure. For GM vehicles, turn ignition to “on” without starting, press reset button until TPMS light blinks twice, then drive until horn sounds confirming registration. If the warning light remains on after relearning, verify sensor compatibility and torque specifications.
Verify Your Installation Success
Confirm proper system operation through three verification methods:
1. TPMS warning light should illuminate briefly at startup then extinguish
2. Dashboard pressure readings should match your manual gauge measurements
3. Individual tire pressures should display consistently across all four wheels
If readings are inaccurate or the warning light persists, check for these common issues:
– Incorrect sensor frequency (315 vs. 433 MHz)
– Improper torque on sensor retaining nut
– Failed relearn procedure requiring restart
– Additional sensor failures elsewhere in the system
Maximize Your New Sensor’s Lifespan
Protect your investment with these simple maintenance practices:
– Always keep valve stem caps installed (prevents debris entry)
– Use only TPMS-safe tire sealants (regular sealants clog sensors)
– Check sensor torque during tire rotations (prevents loosening)
– Avoid impact with curbs and potholes (physical damage is common failure cause)
Most TPMS sensors last 5-10 years before battery depletion, but proper care extends their functional life. Incorporate sensor inspection into your routine maintenance schedule—during oil changes, verify TPMS warning light behavior; during tire rotations, check sensor mounting security.
Know When to Call a Professional
While valve-stem sensor replacement is DIY-friendly, seek professional help when:
– You need to replace band-mounted sensors inside the tire
– Your vehicle requires specialized programming tools
– You lack proper torque wrenches for precise installation
– Multiple sensors need replacement (economical for tool investment)
Professional installation costs $25-75 per sensor but provides peace of mind with proper equipment and expertise. Many tire shops include basic TPMS service with new tire purchases, potentially reducing or eliminating labor charges.
A properly installed tire pressure sensor keeps you informed about critical pressure changes that affect safety, fuel economy, and tire wear. By following these precise installation steps and paying attention to torque specifications and relearn procedures, you can confidently complete this essential vehicle maintenance task. Your tires—and your wallet—will thank you for the attention to this often-overlooked safety system that prevents blowouts and saves lives on the road.


