
Struggling to access your spare tire on a Ford Transit van? You’re not alone. Many Transit owners face frustration when trying to lower that stubborn spare tire mounted underneath their vehicle. Whether you’re preparing for a road trip, inspecting your emergency equipment, or dealing with a flat tire right now, knowing exactly how to get spare tire off Ford Transit models is critical knowledge. This guide delivers the step-by-step process you need, with specific instructions for different Transit configurations and solutions to common problems that can turn a simple task into a roadside nightmare.
Unlike passenger cars where spares are often in the trunk, Ford Transit vans typically mount the spare tire underneath the vehicle—creating unique challenges for removal. The cable and winch system that holds the spare in place can freeze up from rust, especially if it hasn’t been used in months or years. By the end of this guide, you’ll know exactly how to access, lower, and remove your spare tire safely and efficiently, regardless of your Transit model year or configuration.
Locate Your Ford Transit’s Spare Tire Mechanism
The first critical step in getting your spare tire off a Ford Transit is finding exactly where the mechanism is located. Don’t waste time searching blindly—Transit models vary significantly based on wheelbase and roof height. For most standard and medium roof Transits with short or medium wheelbases, the spare tire mounts beneath the rear cargo area, just forward of the rear bumper. Longer wheelbase models often position the spare tire underneath near the front of the cargo area, sometimes almost under the driver’s seat.
Look for the access point inside your cargo area—typically a small plastic cover measuring about 4×6 inches. On newer Transit models (2015-2023), this cover usually sits in the center of the rear cargo floor, while older models may have it positioned closer to the driver’s side. Some high-roof models position the access point near the sliding door threshold. If you’re struggling to find it, run your hand across the cargo floor near the rear doors; the access panel will feel slightly different from the surrounding floor material.
Before proceeding, verify your specific model’s configuration. Check your owner’s manual if available, or look for Ford part numbers near the access panel that can help identify your exact mounting system. This prevents wasted effort trying to access the mechanism from the wrong location—a common mistake that delays getting your spare tire when you need it most.
Gather the Correct Tools for Ford Transit Spare Removal
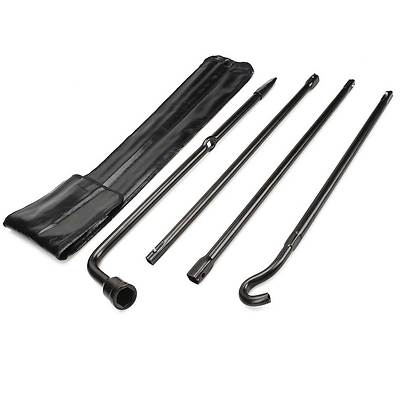
Having the proper tools ready makes the difference between a 5-minute job and an hour of frustration. The Ford Transit requires one specific tool you likely already have but may not know where it is: the spare tire lowering rod. This specialized tool typically measures 18-24 inches long with a square or hexagonal drive end that fits the winch mechanism.
Most Transits store this rod mounted to the interior wall behind the front seats, clipped to the side panel near the rear doors, or sometimes under a seat. If you can’t find it, don’t improvise yet—check these common storage locations first:
- Mounted vertically on the driver’s side rear wall
- Secured horizontally near the rear door latch mechanism
- Stored under the passenger seat with other emergency equipment
- Sometimes attached to the jack storage location
If the factory rod is missing, you can substitute with a ½-inch drive breaker bar or ratchet with a 15-inch extension. Never use excessive force with improvised tools—that’s how winch mechanisms get damaged. Also gather these essentials:
- Penetrating oil (like PB Blaster) for frozen components
- Work gloves to protect hands from sharp edges
- Flashlight to see the mechanism clearly
- Floor jack and stands if you’ll be working underneath
Pro tip: Keep these tools together in a dedicated “spare tire kit” stored in your Transit. This ensures you’ll always have what you need when the time comes.
Access and Prepare the Winch Mechanism Properly
With tools in hand, it’s time to access the winch mechanism without damaging interior components. Begin by clearing the cargo area around the access panel—remove mats, cargo, or loose items that might interfere. Locate the plastic access cover and examine how it’s secured. Most Transit models use snap-in plastic fasteners around the perimeter.
Use a plastic trim removal tool (or carefully use a flathead screwdriver wrapped in cloth) to gently pry up the edges of the cover. Work slowly around the perimeter, releasing each clip individually. For models with screws, remove them completely and place them somewhere safe—they’re small and easy to lose. Once removed, set the cover aside where it won’t get damaged.
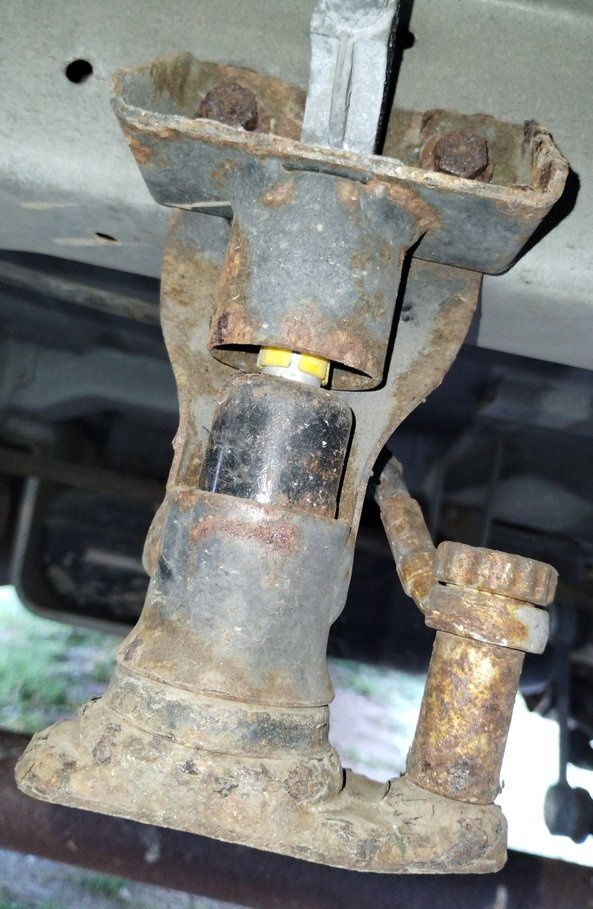
Before operating the winch, inspect what you see. The winch mechanism should appear as a circular drum with a central hole for your lowering rod. Check for visible rust on the cable or winch body—this indicates potential problems. If the cable looks frayed or the winch appears damaged, address these issues before proceeding. Apply penetrating oil to any rusted areas and let it soak for 5-10 minutes before attempting to turn the winch.
Lower Your Ford Transit Spare Tire Without Damage
Now comes the critical step: lowering the spare tire correctly. Insert your lowering rod into the winch mechanism, ensuring it seats fully—partial engagement can strip the drive mechanism. Most Ford Transit models require counterclockwise rotation to lower the tire, but verify this by checking for directional markings near the winch.
Begin turning slowly with both hands, maintaining steady pressure. The initial rotation often requires the most force, especially if the mechanism hasn’t been used in months. If it won’t budge, stop immediately—forcing it causes damage. Apply more penetrating oil, wait 10 minutes, then try again with gentle, increasing pressure.
As the tire lowers, watch its movement carefully. Most Transits lower the tire approximately 18-24 inches before it reaches its lowest position. Continue cranking until the tire hangs freely or nearly touches the ground—this provides enough slack for safe removal. Never stand directly under the lowering tire, and keep hands clear of the cable path.
If the tire stops lowering midway, it may have caught on a mounting bracket or frame component. Stop cranking and inspect from outside the vehicle to identify the obstruction before proceeding.
Remove the Spare Tire from the Cable System
With the tire lowered to an accessible position, you’re ready for the final removal step. Locate where the cable attaches to the spare tire—this connection point is typically at the center of the wheel. Most Ford Transit models use a metal bracket bolted to the wheel with a retaining clip that secures the cable end.
Reach underneath the lowered tire to find the attachment point. You’ll see either a spring-loaded clip or a simple cotter pin securing the cable hook to the bracket. Use needle-nose pliers to carefully remove the retaining clip—if it’s stuck from rust, apply penetrating oil and tap gently with a small hammer.
Once the clip is removed, slide the cable end out of the bracket. Support the tire’s weight as you do this—Transit spare tires typically weigh 35-50 pounds. Carefully lower the tire to the ground or move it to your work area. If the tire seems stuck to the bracket, gently tap the bracket with a rubber mallet while supporting the tire’s weight.
Troubleshoot Common Ford Transit Spare Tire Problems
Even with proper technique, several issues commonly prevent successful spare tire removal from Ford Transit vans. Frozen winch mechanisms top the list—often caused by road salt and moisture leading to internal rust. If your winch won’t turn after applying penetrating oil, try these solutions:
- Apply heat with a hair dryer to expand metal components
- Use two people: one applying oil while the other gently works the winch
- Try tapping the winch housing with a rubber mallet while turning
Another frequent problem: the cable lowers but the tire doesn’t move. This usually means the tire has become fused to the mounting bracket from corrosion. In this case, you’ll need to access the bracket from underneath while someone inside carefully lowers the cable. Use a pry bar gently between the tire and bracket while applying penetrating oil.
If the cable appears damaged or frayed, don’t attempt to lower the tire further—this could cause the cable to snap. Instead, support the tire with a jack stand and consider professional assistance for safe removal.
Perform Critical Post-Removal Inspection

After successfully removing your spare tire, take 5 minutes for a thorough inspection—this could save you from future roadside emergencies. First, examine the spare tire itself: check for dry rot on the sidewalls, measure tread depth, and verify proper inflation (typically 60 PSI for compact spares).
Next, inspect the cable system while it’s exposed. Look for fraying, rust, or kinks along the entire cable length. Check the winch drum for smooth rotation and verify all mounting hardware is secure. If you notice significant corrosion, clean the cable with a wire brush and apply a light lubricant before reinstalling.
This is also the perfect time to test your spare tire’s condition. Inflate it to proper pressure and check for slow leaks. A spare tire that’s been sitting for years may have developed internal damage even if it looks fine on the surface.
Properly Reinstall or Replace Your Spare Tire
When reinstalling your spare tire, reverse the removal process but with extra attention to security. First, reconnect the cable to the wheel bracket, ensuring the retaining clip is fully engaged—you should hear or feel it click into place. Have someone inside the vehicle begin raising the tire while you guide it from underneath.
As the tire rises, position it so it sits flat against the mounting surface—don’t let it hang at an angle. Continue cranking until the tire is snug against the underbody with no visible cable slack. This prevents the tire from bouncing while driving, which can damage surrounding components.
If your inspection revealed the spare needs replacement, choose a tire matching your vehicle’s specifications exactly. Check your owner’s manual for correct size and load rating. When installing a new spare, consider replacing any corroded mounting hardware to ensure secure attachment.
Maintain Your Ford Transit Spare System Proactively
Prevent future removal problems with simple maintenance. Every six months, lower and raise your spare tire to keep the mechanism lubricated and functional. This regular exercise prevents the rust and corrosion that cause most removal difficulties.
After each cycle, apply a light coating of silicone-based lubricant to the cable—avoid petroleum-based products that attract dirt. Store the lowering rod in an easily accessible location, preferably with your other emergency equipment.
Check your spare tire’s pressure quarterly, as tires naturally lose air over time. A properly inflated spare could mean the difference between reaching safety and being stranded. Consider replacing decade-old spare tires even if they appear serviceable—rubber degrades with age regardless of use.
Knowing exactly how to get spare tire off Ford Transit models transforms a potentially stressful situation into a manageable task. By understanding your specific vehicle’s mechanism, having the right tools ready, and addressing common problems before they escalate, you’ll maintain reliable access to this critical safety component. Remember to perform regular maintenance on your spare tire system—it’s not just about removal when you need it, but ensuring the spare remains serviceable for when that moment arrives. With these steps, you’ll keep your Transit fully prepared for whatever the road brings your way.


