
That annoying TPMS warning light on your dashboard isn’t just a nuisance—it’s your vehicle’s way of telling you something’s wrong with your tire pressure monitoring system. When your tire pressure sensor fails, you lose a critical safety feature designed to prevent accidents caused by underinflated tires. Knowing how to change tire sensor components yourself puts you in control of this essential maintenance task, saving you $75-$150 per sensor in shop fees while getting you back on the road faster. Whether you’re dealing with a dead battery in your sensor or damage from road hazards, this guide gives you the precise steps to replace your TPMS sensor with confidence.
Most drivers don’t realize their tire pressure sensors have limited lifespans—typically 5-10 years—before the internal battery dies permanently. Unlike your car battery, TPMS batteries can’t be replaced separately, meaning the entire sensor unit must be swapped out when power runs low. If you’ve noticed inconsistent pressure readings between tires or a warning light that won’t turn off despite proper inflation, you’re likely facing a sensor failure that requires immediate attention. This guide walks you through every step of the replacement process, so you can maintain your vehicle’s safety systems without relying on expensive dealership services.
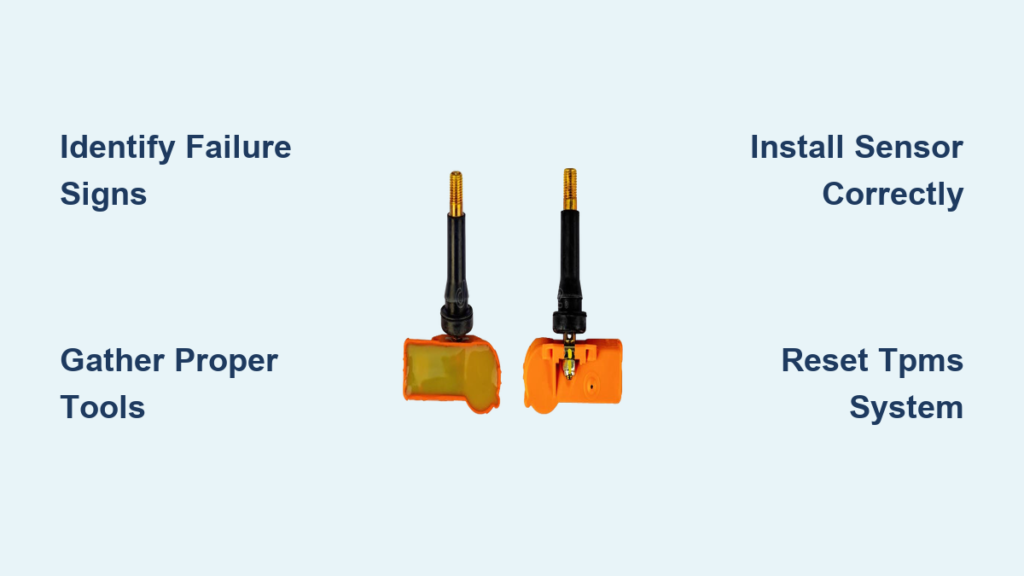
Identify Your Specific Sensor Failure
Your vehicle communicates TPMS problems through several distinct dashboard indicators you shouldn’t ignore. A solid TPMS warning light (the symbol resembling an exclamation point inside a U-shaped tire outline) means one or more tires have low pressure. But if that light flashes for 60-90 seconds after startup before staying illuminated, your system has detected an actual sensor malfunction—not just low pressure.
Inconsistent readings across your tires provide the clearest evidence of individual sensor failure. When three tires show normal pressure but one displays wildly fluctuating numbers or “N/A” readings, that specific sensor needs replacement. Vehicles with digital driver information centers make diagnosis straightforward, but if yours lacks this feature, you’ll need to manually check each tire with your own pressure gauge to pinpoint the faulty sensor.
Complete sensor failure happens when your system stops detecting pressure changes entirely—a dangerous situation that leaves you unaware of slow leaks. This often occurs when the sensor’s internal battery finally dies after years of service. Since most TPMS sensors contain non-replaceable batteries designed to last the sensor’s functional lifespan, battery failure means complete sensor replacement is necessary. Don’t wait for total failure—address inconsistent readings immediately to maintain your safety system’s reliability.
Gather the Right Tools for Sensor Replacement

Proper preparation prevents frustration during your tire sensor replacement project. You’ll need a digital tire pressure gauge for accurate pre- and post-replacement verification—don’t rely on gas station gauges that are often miscalibrated. A precision torque wrench is essential for valve stem installation, typically set between 35-50 inch-pounds depending on your vehicle’s specifications.
For the actual sensor work, collect these must-have items:
– Valve core removal tool (to safely release tire air)
– Snap ring pliers (for certain sensor retention systems)
– Lug wrench or impact gun (for wheel removal)
– Soapy water solution in a spray bottle (for leak detection)
– Replacement valve stems (always replace these with new sensors)
When purchasing your replacement sensor, choose carefully between OEM (Original Equipment Manufacturer) and quality aftermarket options. OEM sensors guarantee perfect compatibility but cost 20-30% more. Aftermarket sensors work well but may require additional programming steps—some come pre-programmed for specific makes, while others need synchronization with your vehicle’s computer. Never install a universal sensor without verifying compatibility—mismatched sensors cause persistent warning lights and inaccurate readings.
Remove the Faulty Sensor Without Damage
Before attempting sensor removal, completely deflate the tire using your valve core tool. Unscrew the valve core and allow all air to escape—working on an inflated tire risks sudden bead separation and injury. For valve stem-mounted sensors (the most common type), you must break the tire bead to access the sensor body inside the wheel.
Use a flat-blade screwdriver to carefully work the tire bead away from the wheel rim, starting opposite the valve stem. Apply gradual pressure while rotating the wheel, working your way around both inner and outer beads. Never use excessive force—this can crack aluminum wheels or damage tire sidewalls. Once the bead is loose enough, reach inside to locate the sensor housing attached to the valve stem base.
For strap-mounted internal sensors, you’ll need to cut the retaining strap using wire cutters—take note of its routing pattern for replication with the new strap. Carefully disconnect any wiring harnesses if present, noting their orientation for correct reinstallation. Remove any corrosion or debris from the mounting surface with a clean cloth before installing your new sensor—residual dirt creates improper seals and potential leaks.
Install Your New Sensor with Precision
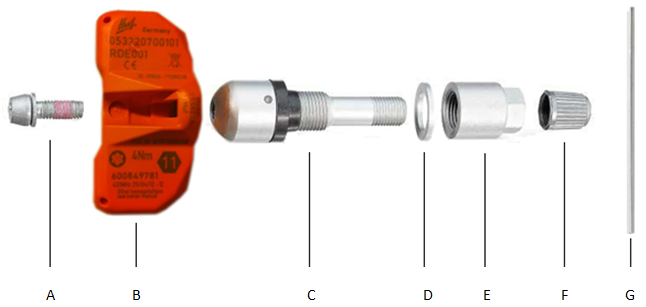
Position your replacement sensor exactly as the original was mounted, paying close attention to orientation. For valve stem sensors, ensure the rubber sealing washer sits flat against the wheel’s interior surface with no twists or folds. The valve stem should extend through the wheel hole perpendicular to the surface—any angle creates stress points that lead to future leaks.
Secure the sensor using the appropriate retention method for your design:
– Clip-type retainers require firm pressure until you hear a distinct “click”
– Strap-mounted sensors need careful routing through mounting slots before clipping
– Valve stem nuts must be torqued precisely to manufacturer specifications
Over-tightening is the #1 cause of DIY sensor installation failures—excessive force cracks sensor housings or distorts valve stems. After securing the sensor, reinstall the valve core and add just enough air (about 10 PSI) to help seat the tire beads properly before full inflation.
Reset Your TPMS System Successfully
Modern vehicles require sensor relearning after replacement—a critical step many DIYers overlook. Without proper relearning, your car’s computer won’t recognize the new sensor’s unique identification code, leaving your TPMS system non-functional. The reset procedure varies significantly between manufacturers, so consult your owner’s manual first.
Most vehicles use one of three relearning methods:
– Automatic relearn: Drive 10-20 minutes above 15 mph for system detection
– Button activation: Specific sequences on dashboard or steering wheel controls
– Scan tool required: Professional equipment connecting to OBD-II port
If your vehicle requires a scan tool and you don’t own one, many tire shops (including national chains like Firestone and Discount Tire) offer free relearning services when you purchase sensors from them. Never skip this step—an unprogrammed sensor renders your entire TPMS system useless despite perfect mechanical installation.
Verify Your Repair with Professional Testing
After installation and relearning, thorough testing confirms your repair’s success. Inflate all tires to the manufacturer-specified pressure (found on the driver’s door jamb sticker), then verify each with your own gauge—don’t trust the vehicle display until accuracy is confirmed.
Start your vehicle and watch the dashboard: the TPMS light should illuminate briefly during startup then extinguish within 60 seconds. Persistent or flashing lights indicate failed relearning or installation issues. Drive several miles at varying speeds while monitoring pressure readings—they should remain stable across all tires with minimal fluctuation.
Perform the final critical test by spraying soapy water around the valve stem and sensor mounting area. Bubbles reveal hidden leaks requiring immediate attention. Small leaks around the valve core often fix themselves after driving as the sealant compound inside the core activates, but significant bubbling means you must reseal or replace components.
When Professional Help Makes Sense
Some tire sensor replacements require professional expertise worth the investment. If your sensor is bonded with adhesive, integrated into run-flat tire assemblies, or requires complex tire removal beyond your comfort level, a professional mechanic saves time and prevents costly mistakes. Tire shops have specialized mounting equipment that breaks beads safely without risking wheel damage.
Professional installation typically costs $50-$150 per sensor including parts and labor. For multiple sensor replacements, ask about package pricing—many shops discount 10-15% for replacing all four sensors simultaneously. Consider professional help if you lack torque wrenches or scan tools—improperly torqued valve stems cause slow leaks, and unprogrammed sensors leave your safety system inactive.
Extend Your New Sensor’s Lifespan with Proper Care
Protect your investment with simple maintenance practices that maximize sensor longevity. Always hand-tighten valve caps—overtightening with tools damages internal components. Replace valve stems whenever you replace sensors, as their rubber components degrade over time from ozone exposure and temperature fluctuations.
Never use tire sealants near TPMS sensors—most contain chemicals that corrode electronics or clog pressure sensing elements. If you must use a temporary sealant after a puncture, plan for immediate sensor replacement afterward. Schedule TPMS checks during regular tire rotations—mechanics can spot early corrosion or physical damage before complete failure occurs.
Replace all TPMS sensors in pairs or sets when possible. Vehicles compare pressure readings between tires—if one sensor fails prematurely while others approach end-of-life, you’ll face repeated service visits. Planning replacements during scheduled tire service minimizes downtime and ensures your safety system remains fully operational when you need it most.


