
That sinking feeling when your Toyota Highlander shudders on the highway is all too familiar. A flat tire strikes when you’re least prepared—whether you’re rushing to a critical meeting or navigating mountain roads with family in tow. One Colorado father discovered this truth during a 4th of July road trip through Glenwood Canyon when a 4-inch steel shard punctured his rear tire while pulling a trailer. His 12-year-old daughter’s dismissive attitude about tire-changing skills vanished when she realized how stranded they’d be without this knowledge. The good news? Toyota designed the Highlander’s spare system to be user-friendly even for beginners. With proper preparation and this guide, you’ll handle flat tires confidently instead of waiting hours for roadside help. This comprehensive walkthrough covers every detail—from locating your spare to securing it safely—plus insider tips from experienced owners who’ve faced real emergencies.
Locate Your Spare Tire and Critical Tools First

Toyota mounts the spare tire under the rear cargo area on Highlanders, suspended by a cable winch system. Before any emergency, verify you can access it by checking two key locations: either beneath the cargo floor mat or behind a panel in the rear bumper (varies by model year). The specialized lowering tool typically nests with your jack handle in the rear cargo compartment—often hidden under the floor panel or secured in side storage. Grab this hexagonal tool first; it’s your lifeline to release the spare. Insert it through the access hole near the rear bumper until it clicks into the winch mechanism. Turn counterclockwise slowly—rushing risks dropping the spare unexpectedly. Stop lowering when the tire hangs 3-4 inches above ground; this prevents it from swinging wildly when you disconnect it from the mounting bracket. One owner learned this the hard way: he and his son spent five frustrating minutes on their driveway figuring out how to detach the spare after lowering it completely. Imagine that confusion on a dark highway!
Critical Pre-Check: Spare Tire Pressure and Condition
Don’t assume your spare is ready when needed. Check its air pressure quarterly using a gauge—most Highlander spares require 60 PSI. A neglected spare often leaks slowly, leaving you with two flat tires. Also inspect for dry rot (cracks in the sidewall) or embedded debris from storage. If your spare shows damage or hasn’t been replaced in 7+ years, visit a tire shop immediately. Remember: spares are temporary! Most manufacturers limit them to 50 mph and 50 miles. One forum member stressed that after his wife’s car switched to “repair kits” instead of spares, he bought her a full-size spare tire assembly specifically because Fix-a-Flat alternatives can corrode wheels and ruin TPMS sensors long-term.
Gather Essential Supplies Before Starting
Your Highlander comes with basic tools, but real-world experience shows you need more. Alongside the factory jack and lug wrench, keep these in your cargo area:
– Rubber gloves ($4 at Walmart): Prevent grimy hands when handling the dirt-encrusted spare
– Knee pads: Save your clothes and joints on rough pavement
– Flashlight: Critical for nighttime changes (integrate with phone light for dual illumination)
– Wheel chocks: Use heavy rocks or bricks if none available
Position these items before jacking up. One owner changed a tire during a business trip—gloves saved his suit from black grease stains. Never skip wheel chocks! Place them against the tires opposite your flat (front tires if rear flat, rear if front flat). On slopes, double them for safety. Engage parking brake firmly and shift to “Park.” If changing a rear tire, leave the vehicle in neutral briefly while lowering the spare to prevent drivetrain strain—this trick avoids unnecessary stress on AWD systems.
Safety Setup Checklist for Roadside Emergencies
Pull completely off the road onto level, firm ground—never soft shoulder dirt where jacks sink. Activate hazard lights immediately and place emergency triangles/flares 50+ feet behind you. If on a highway with no shoulder, stay inside with doors locked until help arrives; tire changes here are dangerously reckless. One Colorado traveler avoided disaster by waiting for AAA after his wife’s car had no spare—her vehicle only included Fix-a-Flat, which experts warn can permanently damage alloy wheels through chemical corrosion. If you must change a tire roadside, face traffic while working and keep children/passengers away from the vehicle. Visibility matters: wear bright clothing and use reflective vests if stored in your cargo area.
Jack Highlander at Correct Points Only
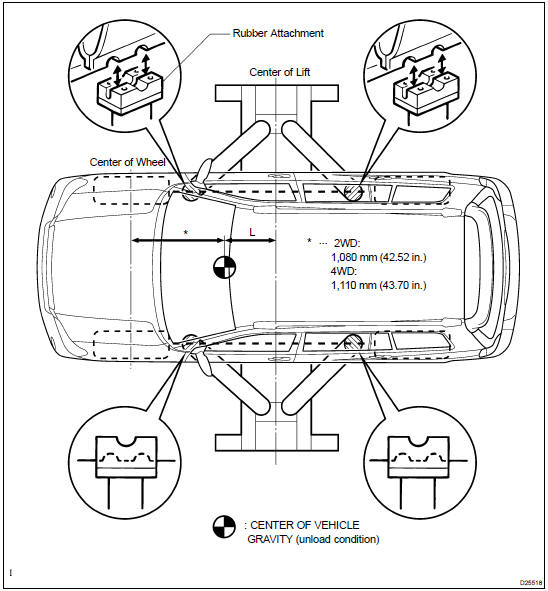
Toyota reinforces specific jack points along the rocker panels—never improvise! Locate the small notches behind front wheels and ahead of rear wheels (consult your manual for exact spots). Position the jack’s saddle centered on these pinch welds. A common mistake: placing the jack too far forward/backward, risking frame damage. Pump the handle smoothly while watching for wobble—stop immediately if the jack tilts. Raise the vehicle just 3-4 inches; higher increases instability risk. Crucial safety step: slide your removed flat tire under the frame rail as a backup support. If the jack fails, this catches the Highlander. Never crawl under a jacked vehicle! One owner’s near-accident occurred when he leaned into the wheel well—maintain full-body clearance at all times.
Avoid These Two Dangerous Jacking Mistakes
- Ignoring ground conditions: Jacking on gravel or mud causes sinking—place a 2×12 board under the jack base for stability
- Over-tightening lug nuts prematurely: Hand-tighten only while the tire is suspended; final torque happens after lowering
Work efficiently but deliberately. Tire changes average 15-20 minutes; rushing causes dropped lug nuts or misaligned spares. If nuts are frozen, spray penetrating oil and wait 5 minutes before attempting removal. Keep children occupied inside the vehicle during this phase—distractions cause serious injuries.
Remove Flat Tire and Mount Spare Properly
Loosen lug nuts before lifting—turn counterclockwise ¼ turn with your lug wrench. This prevents wheel spin when the tire’s off-ground. Remove nuts in star pattern (skip adjacent nuts) to avoid warping the rotor. If the tire sticks, kick the sidewall firmly or tap the hub with a rubber mallet. Clean rust/debris from the hub with a wire brush before mounting the spare—this ensures a flush fit critical for safety. Align the spare’s valve stem at 12 o’clock for easier future access. Hand-tighten lug nuts in star pattern until snug, but don’t fully torque yet. A frequent oversight: forgetting decorative lug caps. Store them in your console to prevent loss.
The Clutch Mechanism Secret for Secure Spare Mounting
When reinstalling the flat tire as your spare, this pro technique prevents roadside disasters. Tighten the winch nut clockwise until you feel a distinct “snap”—this engages the internal clutch. Then rotate freely another 30 degrees (about 1/12th of a full turn). As sweeneyp noted from forum experience, this ensures proper torque without over-tightening. If you don’t feel the snap, the spare isn’t secured. Test by shaking the tire—it should show zero movement. One owner’s spare fell during highway driving because he skipped this step, causing $2,000 in undercarriage damage.
Final Tightening and Post-Change Protocol

Lower the Highlander completely before final lug nut tightening. Use your body weight (not feet!) on the wrench in star pattern to 80-100 ft-lbs—Toyota’s spec. Never drive off immediately! Drive slowly for 50-100 miles, then re-torque nuts; heat cycles can loosen them. At your destination, visit a tire shop to:
– Repair/replace the flat tire (most punctures in tread areas are fixable)
– Inspect brake components for debris damage
– Reset TPMS if sensors were disturbed
Crucially: never use Fix-a-Flat as a solution. As TrailDust warns from his tire-shop-owner friend’s experience, the chemicals corrode alloy wheels and destroy TPMS sensors, leading to $200+ sensor replacements. These sealants are absolute last resorts for desert emergencies with no alternatives.
Emergency Kit Must-Haves Beyond Basic Tools
Store these in your cargo area’s jack compartment:
– Mini air compressor ($30): Reinflate spares to 60 PSI after use
– Lug nut lock key: If your Highlander has anti-theft nuts
– Zip-top bags: Store dirty gloves/knee pads separately
– Printed instructions: Laminate the spare removal steps
Practice the full process annually in your driveway—involve teens as MikeInNH did with his kids. It builds muscle memory for high-stress situations. Remember Lee Eddie’s wisdom: “Call AAA if not in a hurry, but never rely solely on them.” One Colorado owner waited 8 hours for AAA during a blizzard; knowing how to change the tire himself would have saved his family from freezing.
Final Note: Changing your Highlander’s spare tire is a safety skill worth mastering. By preparing with the right tools, understanding Toyota’s clutch mechanism, and avoiding dangerous shortcuts, you transform roadside emergencies into manageable moments. Always prioritize safety over speed—when in doubt, call professionals. Keep this guide accessible digitally and physically, and empower every driver in your household with this knowledge. Your next flat tire might just become a proud teaching moment rather than a crisis.


