
Picture this: you’re driving your Range Rover Sport on a remote road when suddenly—thump, thump, thump. You’ve got a flat tire. Your heart sinks as you realize you’re miles from the nearest service center. While changing a tire might seem straightforward, luxury SUVs like the Range Rover Sport have specific requirements that make this task different from changing a tire on an ordinary sedan. Knowing exactly how to change a tire on a Range Rover Sport properly could mean the difference between getting back on the road safely or causing serious damage to your expensive vehicle.
Unlike standard vehicles, the Range Rover Sport’s sophisticated suspension system, unique wheel design, and substantial weight create special challenges during tire changes. Many Range Rover owners mistakenly use standard jack points or incorrect torque specifications, potentially compromising the vehicle’s structural integrity. This guide provides the precise steps you need to safely change a tire on your Range Rover Sport without damaging the vehicle or risking personal injury.
Essential Safety Preparations Before Changing Your Range Rover Sport Tire
Before attempting to change your tire, proper preparation is critical for your safety and your vehicle’s protection. The Range Rover Sport weighs significantly more than standard vehicles, making improper jacking extremely dangerous.
Selecting a Safe Location for Tire Replacement
Pull completely off the roadway onto a firm, level surface away from traffic. Avoid soft ground, slopes, or gravel that could cause the jack to slip. Engage your parking brake firmly and shift into “Park” (for automatic transmissions) or first gear (for manuals). Never attempt to change a tire on an incline with a Range Rover Sport—the vehicle’s weight makes it prone to rolling even with the parking brake engaged.
Required Tools and Equipment Specific to Range Rover Sport
Unlike regular vehicles, the Range Rover Sport requires specialized equipment:
- Land Rover-approved hydraulic jack (standard scissor jacks may fail under the vehicle’s weight)
- Extended-length torque wrench capable of reaching 140-165 lb-ft specifications
- Impact-resistant wheel wedges (regular bricks or rocks won’t suffice)
- Properly sized alloy wheel lug nut socket (standard sockets can damage expensive wheels)
- Wheel lock key (if your vehicle has anti-theft lug nuts)
- High-visibility safety vest (mandatory when working roadside)
Critical warning: Never use the factory jack provided in your Range Rover Sport’s toolkit for actual wheel changes—it’s designed only for temporary emergency use with strict time limitations. Using it improperly can cause catastrophic failure.
Correct Jack Points for Range Rover Sport Models
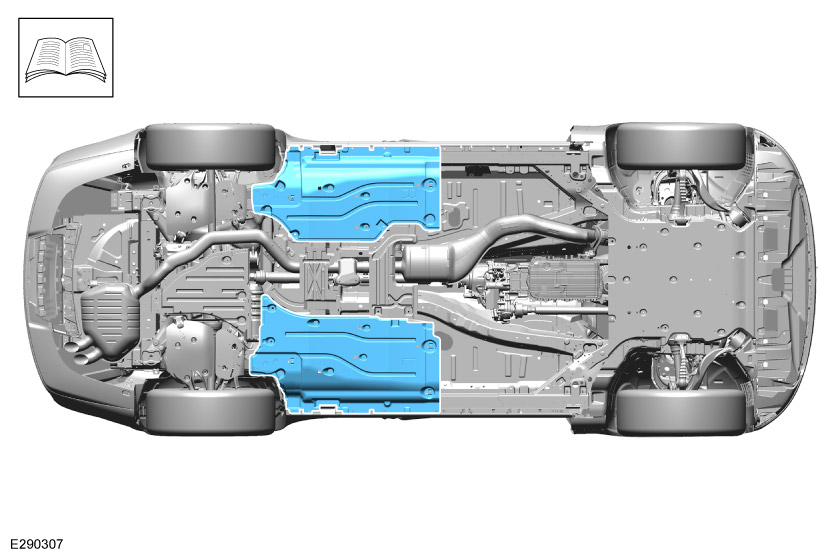
One of the most common mistakes Range Rover Sport owners make is jacking at incorrect points, which can permanently damage the vehicle’s unibody structure.
Identifying Proper Jacking Locations
Your Range Rover Sport has specifically reinforced jack points along the frame rails—never jack from the plastic underbody panels or suspension components. Look for small notches or dimples along the rocker panels just behind the front wheels and just ahead of the rear wheels. These marked points are engineered to support the vehicle’s weight during tire changes.
Visual cue: When properly positioned, the jack saddle should fit snugly into the dimple without contacting surrounding body panels. If you’re forcing the jack into position or it’s resting on painted surfaces, you’re in the wrong spot.
Step-by-Step Jacking Procedure for Range Rover Sport
- Position wheel wedges against the tires opposite the flat (front tires if rear is flat, rear tires if front is flat)
- Loosen lug nuts one-quarter turn while the vehicle is still on the ground (use star pattern)
- Position the hydraulic jack precisely under the designated jack point
- Raise the vehicle slowly in six-inch increments, checking stability each time
- Lift only high enough for the flat tire to clear the ground by 1-2 inches
- Place a sturdy jack stand under the reinforced chassis point before working
Pro tip: Keep your original Range Rover Sport jack in the vehicle but use it only to slightly lift the vehicle to position your proper hydraulic jack underneath—never rely on it to hold the vehicle’s full weight.
Proper Lug Nut Removal and Wheel Replacement Sequence
The Range Rover Sport’s aluminum alloy wheels require special handling to prevent damage during tire changes.
Correct Lug Nut Loosening Technique
Start by breaking the lug nuts loose while the vehicle is still on the ground—this prevents the wheel from spinning. Use a cheater bar if needed, but never an impact wrench at this stage. Loosen in a star pattern to avoid warping the brake rotor. For Range Rover Sport models, lug nuts are typically torqued to 140-165 lb-ft from the factory.
Wheel Removal Safety Protocol
Once lifted, fully remove the lug nuts and carefully pull the wheel straight toward you. Range Rover Sport wheels are heavy (typically 45-55 pounds)—use your legs, not your back, when lifting. Place the flat tire flat on the ground beneath the vehicle as an extra safety measure in case the jack fails.
Mounting the Spare Tire Properly
Range Rover Sport spare tires (if equipped) are smaller than standard tires and intended only for temporary use. When mounting:
- Clean any debris from the wheel hub and mating surface
- Hand-thread all lug nuts to avoid cross-threading
- Tighten lug nuts in star pattern just enough to hold the wheel
- Lower the vehicle slightly so the tire touches the ground but doesn’t bear full weight
- Final-tighten lug nuts to specification before fully lowering
Critical Torque Specifications for Range Rover Sport Wheels

Improperly torqued lug nuts are the leading cause of wheel-related incidents with luxury SUVs.
Why Torque Matters Specifically for Range Rover Sport
Aluminum alloy wheels expand and contract at different rates than steel lug nuts. Under-torquing can cause wheels to come loose; over-torquing can warp rotors or strip threads. Range Rover Sport models require precise torque in two stages:
- Initial torque: 80 lb-ft with vehicle slightly raised
- Final torque: 140-165 lb-ft (model year dependent) after full weight returns to wheel
Step-by-Step Torque Procedure
- Use a calibrated torque wrench (never guess or “feel” it)
- Tighten in star pattern to 80 lb-ft with tire lightly contacting ground
- Fully lower vehicle and remove jack
- Re-check torque in star pattern to final specification
- Re-check torque after driving first 25-50 miles
Expert note: Always use anti-seize compound on lug studs for aluminum wheels, but reduce torque specification by 10% when doing so—consult your owner’s manual for exact requirements.
Post-Replacement Safety Checks and Limitations

Your work isn’t complete once the tire is changed—specific Range Rover Sport systems require attention.
Resetting Tire Pressure Monitoring System
Most Range Rover Sport models require TPMS reset after tire changes. Locate the reset button (usually near the odometer) and follow the specific sequence for your model year. Failure to reset can cause inaccurate pressure readings and warning lights.
Temporary Spare Tire Restrictions
If using the compact spare:
- Never exceed 50 mph
- Limit driving distance to 50 miles
- Avoid aggressive acceleration or hard braking
- The vehicle’s stability control system may behave differently
Final Safety Verification
Before driving away:
- Ensure all tools and equipment are secured in the vehicle
- Verify spare tire is properly inflated (typically 60 PSI for compact spares)
- Check that no lug nuts are missing
- Take your first few miles slowly, checking for unusual vibrations
Range Rover Sport Tire Change Prevention Strategies
Avoiding flat tires is always better than dealing with them roadside.
Regular Maintenance Checks
- Inspect tires monthly for embedded objects and sidewall damage
- Check tire pressure weekly (Range Rover Sport requires specific cold inflation pressures)
- Rotate tires every 5,000 miles using proper sequence for AWD systems
- Replace tires in axle pairs to prevent drivetrain damage
Road Hazard Avoidance Techniques
- Maintain safe following distance to avoid debris kicked up by other vehicles
- Slow down significantly when approaching potholes or road debris
- Avoid curbs when parking—Range Rover Sport’s low-profile tires are vulnerable
- Consider upgrading to run-flat tires for certain model years
Final Note: Changing a tire on your Range Rover Sport requires specific knowledge and equipment due to the vehicle’s weight, construction, and sophisticated systems. Never compromise on proper tools or procedures—your safety and your vehicle’s integrity depend on it. After any tire change, visit a certified Land Rover technician to inspect your work and ensure no damage occurred during the process. Remember that temporary spares have severe limitations—get proper tire repair or replacement as soon as possible to maintain your Range Rover Sport’s performance and safety systems.


