
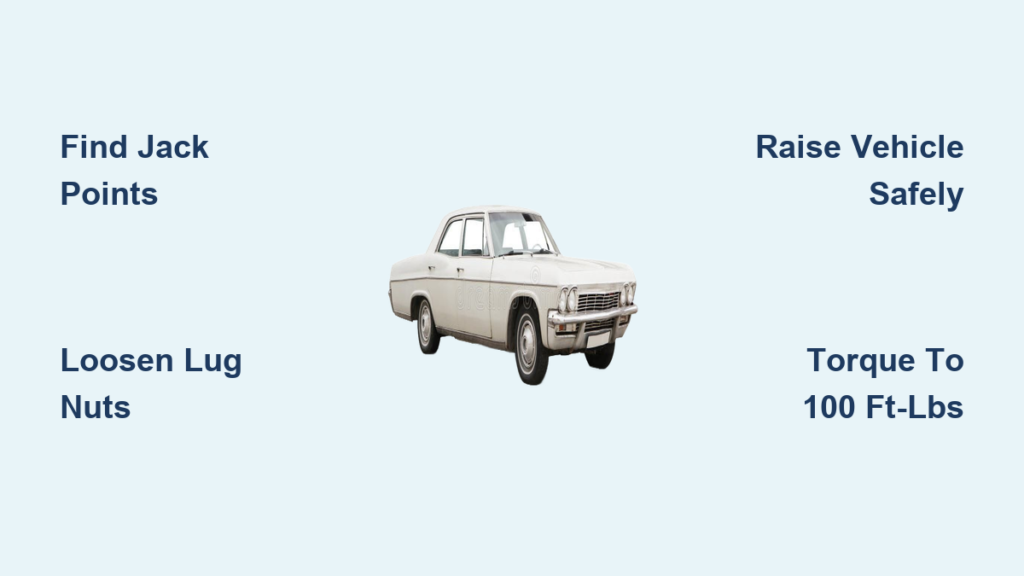
A flat tire can turn an ordinary commute into a frustrating roadside emergency. Knowing how to change a tire on your Chevy Impala empowers you to handle this common situation confidently and safely, without waiting for roadside assistance. Whether you’re facing a puncture on a busy highway or a slow leak in a grocery store parking lot, having the skills and knowledge to swap out a damaged wheel keeps you in control of your schedule and your safety. This comprehensive guide walks you through every step of the tire-changing process, from gathering the right tools to properly torquing your lug nuts for secure installation.
The process of changing a tire involves several critical steps that must be executed in the correct sequence for your safety and to prevent damage to your vehicle. Rushing through this procedure or skipping important safety precautions can result in injury or damage to your Impala’s wheel studs, brake components, or suspension system. By understanding each step thoroughly before you find yourself stranded, you’ll be prepared to handle this task efficiently and correctly.
Essential Tools and Equipment for Chevy Impala Tire Change
Before you need to change a tire, ensure your Chevy Impala carries all the necessary tools and equipment. Most new Impalas come equipped with a spare tire, jack, and lug wrench stored in the trunk compartment beneath the floor panel. However, these factory tools are often minimal quality and may not be optimal for all situations. Having a complete roadside emergency kit in your vehicle provides greater flexibility and safety.
The primary tools required include the vehicle’s jack, which raises the car off the ground, and a lug wrench designed to fit the lug nuts on your Impala’s wheels. The spare tire must be in good condition and properly inflated—check its pressure monthly to ensure it’s ready when needed. Wheel chocks, often called wheel blocks or wedges, prevent the vehicle from rolling during the tire change process. Additionally, a flashlight with fresh batteries proves invaluable if you need to change a tire after dark, and a pair of work gloves protects your hands and improves your grip on greasy or dirty components.
Consider adding a few supplemental tools to your emergency kit for enhanced capability. A breaker bar provides additional leverage for stubborn lug nuts that may have corroded or overtightened at the factory. A torque wrench ensures you tighten lug nuts to the manufacturer’s specifications, preventing both wheel damage and dangerous loose wheels. A tire pressure gauge allows you to verify the spare tire’s inflation before installation, and a rain poncho or small tarp keeps you somewhat protected from the elements while working.
Safety Precautions Before Starting Your Impala Tire Change
Proper safety preparation prevents accidents and injuries during the tire-changing process. Begin by moving your Impala to a flat, stable surface away from traffic if possible. If you must change a tire on a roadway, position your vehicle as far from moving lanes as safety permits, and activate your hazard lights to alert other drivers to your presence. Setting up warning triangles or flares at appropriate distances behind and ahead of your vehicle provides additional visibility, especially in low-light conditions.
Engage your parking brake completely before beginning any work on the vehicle. This prevents the car from rolling while jacked up, which could cause catastrophic injury or damage. Place the transmission in “Park” for automatic transmissions or in first gear for manual transmissions as an additional safeguard. Never rely solely on the parking brake when working beneath a vehicle or when any wheels are off the ground.
Use wheel chocks or sturdy objects to block the wheels that remain on the ground. Place them snugly against the tires on the opposite end of the vehicle from the wheel you’re removing. For example, if you’re changing a rear tire, chock both front wheels securely. Concrete blocks, large rocks, or wooden blocks serve as effective emergency chocks if factory wheel chocks are unavailable. These simple precautions take only moments but provide critical protection against vehicle movement.
Locate Proper Jack Points on Your Chevy Impala

The Chevy Impala features specific reinforced jack points designed to safely support the vehicle’s weight when raised. Using these designated points prevents damage to the vehicle’s frame, body panels, and suspension components. Attempting to jack the vehicle from inappropriate locations such as the rocker panels, pinch welds, or suspension components can cause serious damage and potentially create safety hazards.
For the Chevy Impala, the recommended jack points are located beneath the vehicle’s frame rails, positioned just behind the front wheels and just ahead of the rear wheels. These reinforced areas provide structural strength to handle the forces involved in lifting the vehicle. When standing beside your Impala, these points align approximately with the center of each wheel well. The vehicle’s service manual shows these points clearly, and many vehicles have small notches or reinforcements visible from beneath that identify the correct lifting locations.
The factory jack included with your Impala is designed specifically for these jack points and has limited lifting capacity. Position the jack directly beneath the designated jack point, ensuring the saddle (the lifting pad) contacts the frame or reinforcement plate fully. The jack should stand on a firm, level surface—if you’re on soft ground, place a sturdy board or flat stone beneath the jack base to prevent sinking. Before raising the vehicle, confirm the jack is stable and properly positioned by applying slight upward pressure to test its grip.
Loosen Lug Nuts Before Raising Your Impala
One of the most important steps in changing a tire involves loosening the lug nuts before you raise the vehicle off the ground. This task becomes significantly easier when the wheel is still on the ground, as the tire’s contact with the pavement provides resistance that helps prevent the lug nuts from spinning freely. Waiting until the wheel is suspended in the air often results in the wheel spinning when you apply force to the lug wrench, making loosening difficult or impossible.
Using your lug wrench, attach it to each lug nut in sequence, applying steady downward pressure to break the nuts free. The Chevy Impala typically uses five lug nuts per wheel, and following a star pattern when loosening and tightening helps distribute force evenly and prevents warping the brake rotor. Apply force gradually rather than attempting to break stubborn nuts loose with sudden, violent movements that could strip threads or round off the nut flats.
If a lug nut refuses to loosen despite your best efforts, several techniques may help. Applying penetrating oil to the stud and allowing it to work for several minutes can dissolve rust and corrosion that binds the nut. Applying heat with a small torch for 30-60 seconds expands the metal and can break the bond, though this requires caution near flammable components. As a last resort, a breaker bar provides significantly more leverage than the factory lug wrench, though excessive force can damage wheel studs. Never use your foot on the lug wrench or strike it with a hammer, as these methods can cause injury and damage components.
Raise the Vehicle Safely to Change Your Impala Tire
With the lug nuts loosened but still threaded onto the studs, position your jack beneath the appropriate jack point and begin raising the vehicle. Pump the jack handle smoothly and steadily, watching the vehicle rise to ensure it remains stable throughout the process. The jack should move freely without binding or wobbling—stop immediately if you notice any instability, as a falling vehicle causes severe injury and damage.
Raise the vehicle just enough to clear the flat tire and allow installation of the spare, typically four to six inches of clearance. The spare tire does not need to be completely off the ground, but there must be sufficient space to remove the flat tire and mount the spare without the rotating wheel contacting the ground. Avoid raising the vehicle higher than necessary, as a higher center of gravity increases the risk of tipping.
Never place any part of your body beneath a vehicle supported only by a jack. Even with properly tightened lug nuts, the vehicle could shift or the jack could fail, resulting in crushing injuries. If you need to work beneath the vehicle for any reason, additional support stands or blocks must be placed beneath the frame or suspension components to provide secondary support. The factory jack is intended only for raising and lowering the vehicle, not for supporting it during work.
Properly Mount the Spare Tire on Your Impala
Align the spare tire’s mounting holes with the wheel studs on the hub and slide it into place. The spare should fit flush against the hub flange with no gaps or misalignment. If the spare doesn’t seat fully, check that the lug nuts are properly threaded and that no debris is interfering with the installation. Forcing a wheel onto studs that aren’t aligned can strip threads or cause other damage.
Hand-tighten the lug nuts onto the studs, threading each one several turns by hand before using the lug wrench. This prevents cross-threading, which occurs when the nut angles incorrectly onto the stud and damages the threads. Cross-threaded lug nuts may appear to install normally but create stress points that can lead to stud failure. If you encounter resistance when threading a lug nut by hand, remove it and try again, ensuring the nut is perpendicular to the stud.
Once all lug nuts are hand-tightened, use your lug wrench to snug them in the star pattern. The goal at this stage is to pull the wheel securely against the hub flange, not to achieve final torque. Some mechanics recommend applying body weight to the lug wrench for this stage, but avoid excessive force that could deform the wheel or stress the studs unevenly. The wheel should rotate freely without wobble or binding once all lug nuts are snug.
Lower Vehicle and Torque Lug Nuts to 100 Foot-Pounds
With the spare tire mounted and lug nuts snugged, slowly lower the vehicle by operating the jack in reverse order. Continue lowering until the spare tire makes firm contact with the ground but the vehicle’s weight is not yet fully supported. At this point, return to each lug nut and apply final torque using your torque wrench set to the manufacturer’s specification.
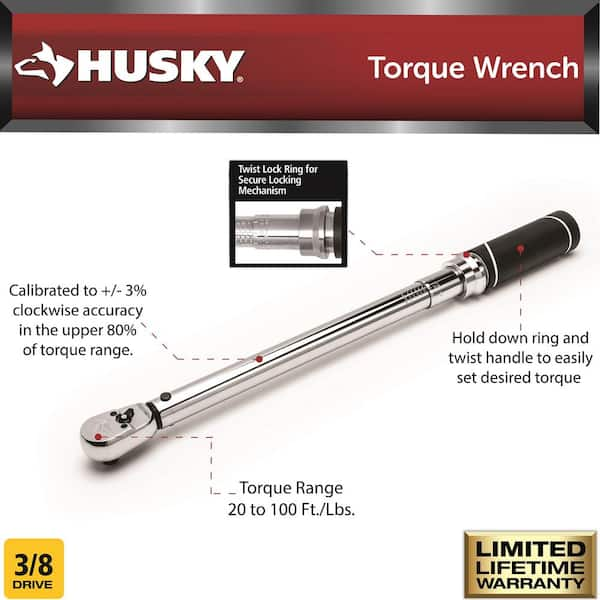
The Chevy Impala requires lug nuts to be tightened to approximately 100 foot-pounds of torque. This specification ensures the wheel is securely fastened without over-stressing the wheel studs or deforming the wheel flange. Over-tightened lug nuts can stretch the studs, eventually leading to stud failure, while under-tightened nuts can allow the wheel to loosen during driving, creating an extremely dangerous situation. A quality torque wrench with a 3/8-inch drive provides the accuracy needed for this critical step.
Recheck the lug nut torque after driving 25-50 miles, as the settling effect of the wheel against the hub flange can reduce clamp force. This post-drive inspection is especially important when using the compact spare tire, as these temporary wheels have different characteristics than full-size spare or run-flat tires. Mark each lug nut with a small dot of paint or a marker to quickly identify any that have loosened during driving.
Follow Compact Spare Tire Driving Restrictions
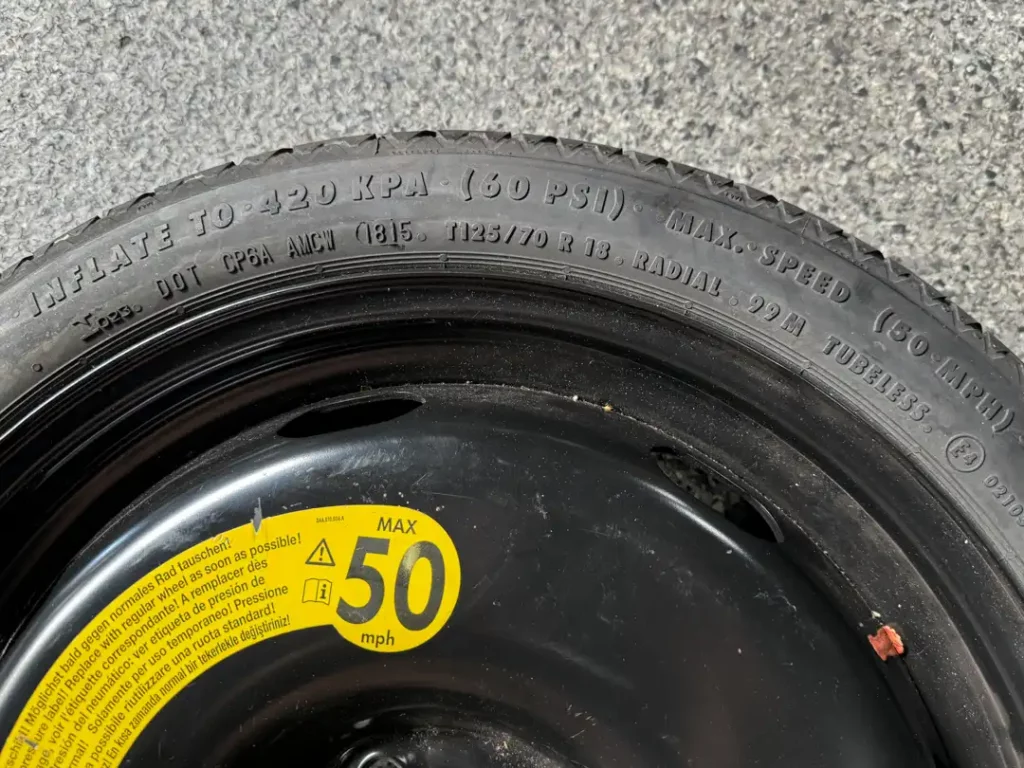
After successfully installing your spare tire, remember that compact spare tires are designed for temporary use only. These space-saver spares have smaller overall dimensions and significantly reduced load-carrying capacity compared to your regular tires. Operating a vehicle with a spare tire requires modified driving behavior and immediate attention to speed and distance limitations.
Most compact spare tires are rated for speeds up to 50 miles per hour and distances not exceeding 50-70 miles. Exceeding these limits generates excessive heat in the smaller spare tire and can lead to catastrophic tire failure. Additionally, driving on a spare affects your vehicle’s handling, braking distance, and stability, particularly in emergency maneuvers. Allow extra stopping distance and reduce your speed accordingly when operating with a spare tire.
Replace the compact spare with a full-size tire as soon as possible after repairing or replacing your flat tire. Your Impala’s handling characteristics are optimized for four matching tires of the same size, construction, and wear pattern. Operating with one tire of different size or construction can stress the transmission, differential, and stability control systems, potentially causing premature wear or component failure. Have the repaired or new tire installed and balanced by a qualified technician before long-distance driving.


