
Finding yourself stranded on the side of the road with a flat tire can feel overwhelming, especially if you’ve never changed one before. The good news? Changing a tire is a skill any woman can master with the right knowledge and a bit of practice. This guide walks you through every step of the process, from gathering your tools to safely getting back on the road. By the end, you’ll have the confidence to handle this common roadside emergency without relying on someone else.
Learning to change a tire puts you in control of your own safety and schedule. Rather than waiting hours for roadside assistance or depending on strangers, you can handle the situation yourself in about 15-30 minutes. Beyond the practical benefits, there’s a genuine sense of empowerment that comes from knowing you can tackle unexpected challenges independently. This isn’t about gender—it’s about practical knowledge that keeps you moving when life throws you a curveball.
Essential Tools You Must Have Before a Flat Tire Happens
Your vehicle’s emergency kit needs specific items to change a tire safely. Every car comes with a spare tire, but many newer models include tire repair kits instead of full-size spares, so verify what your vehicle has. The critical tools you’ll need include a properly inflated spare (or repair kit), a jack designed for your vehicle, and a lug wrench—typically stored in your trunk or under the cargo floor.
Don’t wait for an emergency to discover missing equipment. Check your trunk now for gloves to protect your hands from grease and sharp edges, a flashlight with fresh batteries for nighttime emergencies, and wheel wedges like bricks or heavy rocks to prevent rolling. If you drive a compact car with a “donut” spare, remember it has strict limitations: never exceed 50 mph and drive no more than 50-70 miles before getting a proper replacement.
Regularly inspect your spare tire’s air pressure—underinflated spares won’t support your vehicle properly. Many women forget to check this until they need it, only to find their spare is flat. Set phone reminders to check your spare with each seasonal change, just as you would rotate your regular tires.
Safe Vehicle Positioning When You Get a Flat Tire
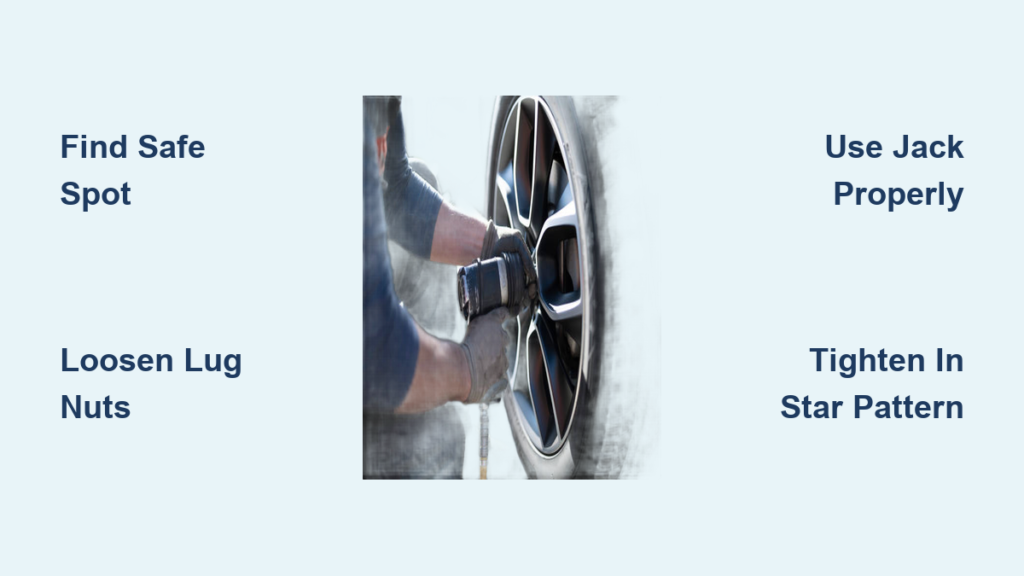
The moment you notice a tire problem—whether it’s a thumping sound, uneven handling, or visible damage—your first priority is finding a safe location. Gradually reduce speed while scanning for level ground away from traffic, like a parking lot or wide shoulder. Never stop on curves, hills, or soft surfaces that could compromise stability when jacking.
Once stopped, immediately activate your hazard lights to alert other drivers. Apply the parking brake before exiting your vehicle—this simple step prevents dangerous rolling while you work. If you have reflective triangles or flares, place them at least 50 feet behind your car, especially if visibility is poor or traffic is moving quickly.
Position wheel wedges against the tires opposite your flat tire. For example, if your front right tire is flat, place wedges against the rear left tire. This creates a critical safety backup in case your parking brake fails. Take these precautions even if you’re in a seemingly safe location—roadside emergencies become dangerous when vehicles aren’t properly secured.
Proper Technique for Removing Your Flat Tire Safely

Begin by loosening the lug nuts while the tire is still on the ground—this prevents the wheel from spinning freely. Use your lug wrench to turn each nut counterclockwise about a quarter turn, but don’t remove them completely yet. This initial loosening requires significantly less effort than trying to break resistance once the tire is off the ground.
Consult your owner’s manual to identify the correct jack points—these reinforced spots are designed to support your vehicle’s weight safely. Common locations include behind front tires and in front of rear tires along the rocker panels. Placing the jack elsewhere risks damaging your vehicle’s frame or causing a dangerous collapse.
Crank the jack slowly until the flat tire clears the ground by about six inches. Pause frequently to ensure the jack remains stable on solid ground. With the vehicle raised, finish removing all lug nuts completely and set them somewhere secure like a cup holder. Carefully pull the flat tire straight toward you—bend at your knees, not your waist, to avoid strain. If the tire feels too heavy, don’t hesitate to ask a passerby for help removing it.
Installing Your Spare Tire Without Common Mistakes
Slide the spare tire onto the wheel hub, aligning the holes with the lug nut posts. The spare should sit flush against the hub with no gaps. Hand-tighten all lug nuts as much as possible before using your wrench. The critical step many women miss is tightening in a star pattern—skip every other nut rather than going sequentially—to ensure even pressure distribution and prevent wheel misalignment.
Lower the vehicle gradually while periodically checking that the lug nuts remain tight. Once the car is fully on the ground, give each nut one final firm tightening with your wrench. Avoid overtightening, which can strip threads or damage studs. A good rule is to tighten until you feel firm resistance—your goal is security, not maximum force.
Double-check that all lug nuts are secure before driving away. Many roadside accidents happen when people forget this crucial step after lowering their vehicle. Take five extra seconds to verify each nut is properly tightened—it could prevent a dangerous situation down the road.
Immediate Actions After Completing Your Tire Change
Before driving away, ensure your flat tire and all tools are properly stowed in your trunk. Check the spare tire’s pressure within the first few miles of driving to confirm it hasn’t lost air during installation. Remember that temporary spares have serious limitations—never exceed 50 mph and minimize your driving distance to the nearest service station.
Drive cautiously to a tire shop for professional inspection. Many punctures can be repaired affordably if addressed promptly, but temporary spares shouldn’t be driven long distances. Have both your flat tire assessed for repair potential and your spare checked for proper inflation and condition.
Schedule a visit to a tire shop within a few days. If your flat tire can be repaired, you’ll want to restore your full emergency capability. If you used your spare, it needs proper inflation and storage to be ready for future emergencies. This follow-up step completes the tire-changing process and ensures you’re prepared for next time.
Knowing When to Call Roadside Assistance Instead
Some situations warrant professional help rather than DIY tire changing. If your vehicle has no spare tire (many newer models come with repair kits only), if you’re on a busy highway with no safe shoulder, or if you feel unsafe for any reason, calling roadside assistance is the smarter choice. Dual rear wheel vehicles also require special procedures that most drivers shouldn’t attempt alone.
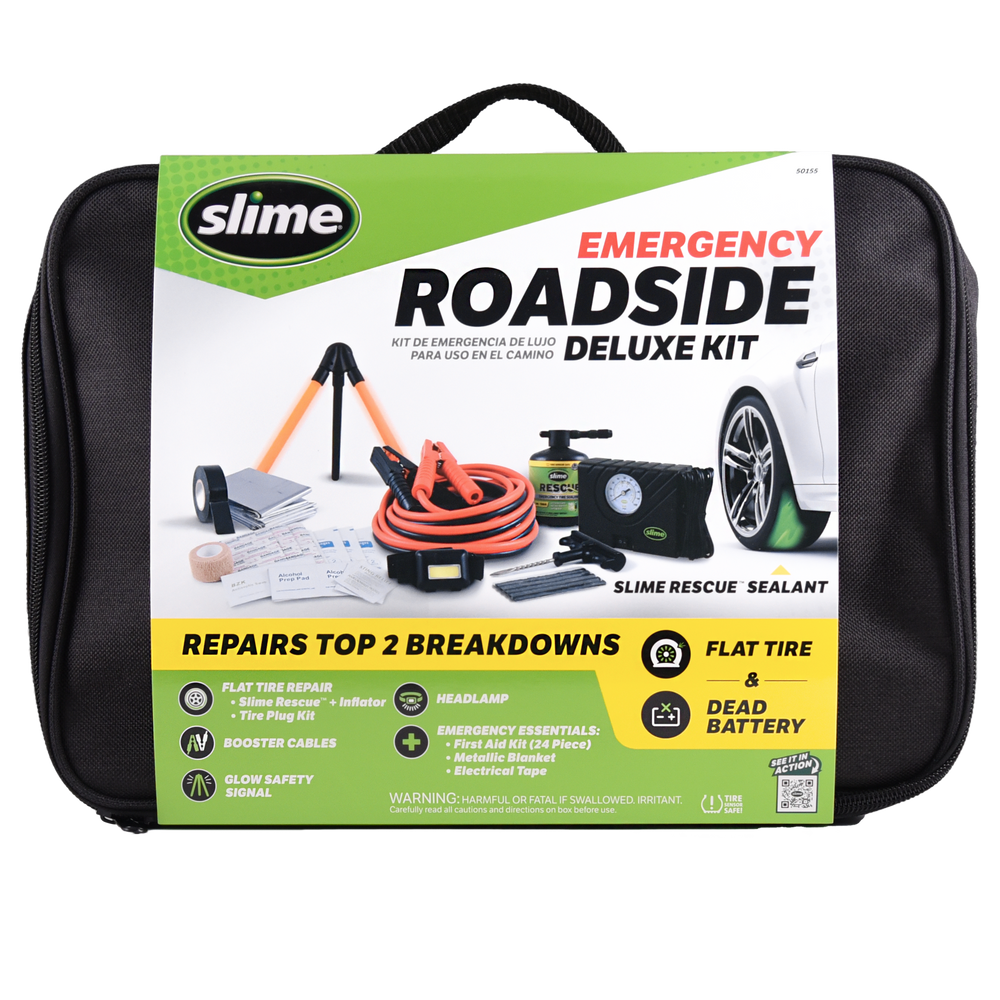
Many insurance policies, credit cards, and automobile clubs include roadside assistance benefits. Programs like AAA provide towing, jump-starts, and tire changes as part of their membership. Keep your roadside assistance number programmed into your phone and consider a portable charger to ensure your phone stays powered during emergencies.
Having roadside assistance doesn’t mean you’re less capable—it means you’re making smart safety decisions. The most empowered drivers know when to handle situations themselves and when to call for professional help. This discernment is just as important as the physical skill of changing a tire.
Building Tire-Changing Confidence Through Practice
Your first tire change might take 30-45 minutes, but practice significantly reduces this time. Schedule a dry run in your driveway or a quiet parking lot while conditions are calm. This builds muscle memory for locating jack points, operating your specific jack, and handling the weight of your tires.
Watch video demonstrations from trusted automotive sources to supplement hands-on practice. Different vehicles have unique requirements, and seeing the process in action clarifies confusing steps. Some community colleges and automotive shops offer hands-on workshops specifically designed for women learning basic car maintenance.
Consider inviting a friend to practice with you—having a partner makes the process safer and more enjoyable. Practice builds confidence that transforms a potentially stressful emergency into a manageable situation you can handle calmly and efficiently.
Preventing Future Flat Tires Through Smart Maintenance
Monthly tire pressure checks prevent many roadside emergencies. Check all tires (including your spare) against the manufacturer’s recommended PSI, found on a sticker inside your driver’s door jamb. Proper inflation extends tire life and reduces blowout risks.
Regularly inspect tires for visible damage, uneven wear patterns, or embedded objects like nails. Rotate tires every 5,000-7,500 miles to ensure even wear, and have your alignment checked annually if you notice pulling to one side. These simple habits alert you to problems before they strand you roadside.
Consider keeping an emergency tire inflator kit in your trunk for minor punctures. While not a replacement for a spare, these kits can temporarily seal small holes and reinflate tires enough to reach a service station. Prevention combined with preparedness keeps you confidently on the road.
Changing a tire is a practical skill that transforms roadside emergencies from stressful crises into manageable situations. Every woman can learn this process with clear instructions and a bit of practice. Keep the right tools in your vehicle, follow safety protocols carefully, and remember that calling for professional help when conditions warrant it is a sign of wisdom, not weakness. The confidence you gain from mastering this essential skill extends far beyond automotive maintenance—it’s about knowing you can handle whatever challenges come your way with competence and calm.


