You’re pumped and ready for your ride, but when you attach your pump, the gauge won’t budge—your bike tire valve not taking air has just ruined your plans. This common cycling frustration affects riders of all experience levels and bike types, from road warriors to casual commuters. When your valve refuses to accept air, it’s not just inconvenient; it can leave you stranded miles from home. The good news is that most valve inflation problems stem from simple, fixable issues you can address with basic tools and knowledge. Understanding why your bike tire valve not taking air is happening—and knowing exactly how to fix it—will get you back on the road in minutes rather than hours.
This comprehensive troubleshooting guide covers the three primary valve types found on bicycles, walks you through systematic diagnosis procedures, and provides clear solutions for every common scenario. Whether you ride a high-performance road bike with delicate Presta valves or a sturdy mountain bike with robust Schrader valves, you’ll find specific, actionable steps to resolve your inflation issues immediately and prevent them from recurring.
Identify Your Valve Type Before Troubleshooting
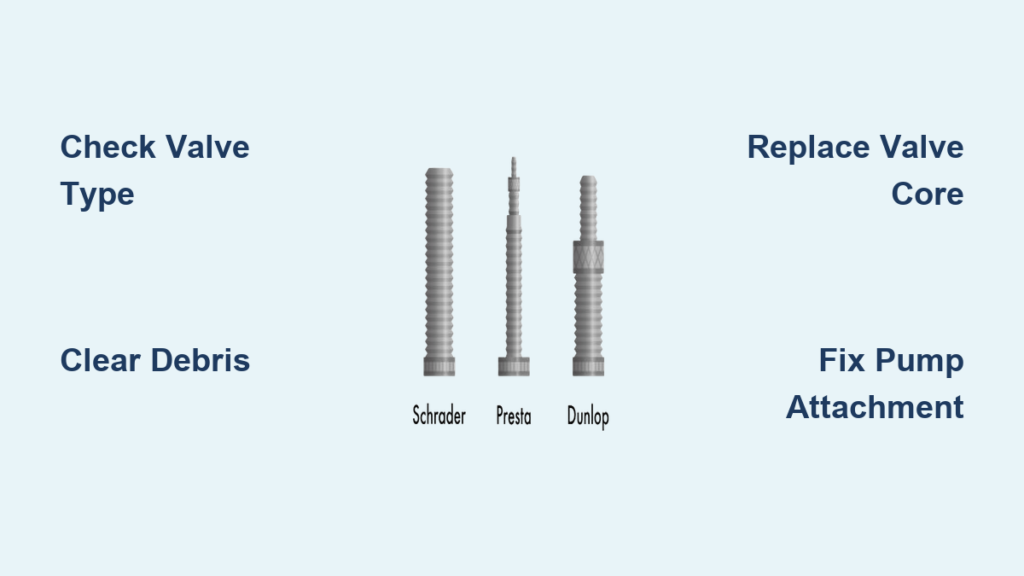
The first critical step when your bike tire valve not taking air is determining which valve system you’re working with—using the wrong technique on the wrong valve type won’t fix the problem and may cause damage.
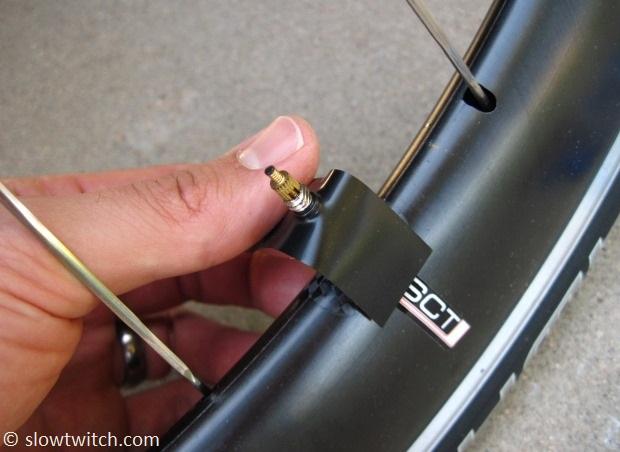
Presta valves (common on road bikes and performance hybrids) feature a narrow 6mm stem with a small knurled nut at the top that must be unscrewed to allow air entry. These precision components have delicate internal mechanisms that can become stuck or contaminated. When working with Presta valves, check if the small center pin moves freely when pressed—it should spring back immediately. Any resistance indicates internal problems.
Schrader valves (standard on most children’s bikes, budget hybrids, and car tires) have a wider 8mm stem with a spring-loaded pin in the center. These valves operate automatically when pressure is applied, requiring no manual adjustment. To check Schrader valve function, press the center pin with a small tool—you should feel consistent spring resistance and hear a slight “hiss” when releasing.
Woods/Dunlop valves (found on vintage bikes and some European models) combine features of both systems with a distinctive threaded collar near the top. These valves accept Schrader pump heads but require specific core tools for maintenance.
Identifying your valve type takes seconds but prevents critical mistakes. The stem diameter is your most reliable indicator—Presta measures approximately 6mm, Schrader 8mm, and Woods valves fall between these measurements.
Diagnose Why Your Valve Won’t Accept Air

When your bike tire valve not taking air, these five common issues account for 95% of problems—knowing which one you’re facing speeds up your repair.
Stuck or Jammed Valve Core
This is the #1 cause of Presta valve failures. The internal rubber seal becomes stiff from temperature changes, road grime, or natural degradation. Test for this by unscrewing the Presta nut completely and pressing the center pin with a pen—no movement means a stuck core. For Schrader valves, a corroded spring mechanism prevents proper opening.
Debris Blocking Valve Opening
Dust, sand, or dried tubeless sealant can lodge inside the valve mechanism. Mountain bikers encounter this frequently after muddy rides. Visible debris around the valve opening or inconsistent inflation (works sometimes but not others) indicates this problem.
Damaged Valve Seal
Cracked or flattened rubber seals cause air to escape immediately after disconnecting the pump. Check for this by inflating slightly, then listening for hissing sounds around the valve base. A damaged seal often creates intermittent problems that worsen over time.
Incorrect Pump Head Attachment
Presta valves require specific positioning in dual-head pumps. If your pump head isn’t fully locked or seated correctly, air escapes around the connection instead of entering the tire. This mistake accounts for more failed inflation attempts than actual valve damage.
Bent Valve Stem
Impact damage from crashes or improper tire mounting can bend the stem, misaligning internal components. A valve that only accepts air at certain angles indicates this issue. Don’t attempt to straighten bent stems—this usually causes more damage.
Immediate Fixes for Valve Inflation Failure
When your bike tire valve not taking air is preventing your ride, these field-tested solutions work in most situations.
Clear Obstructions Without Special Tools
For Presta valves: Unscrew the top nut completely, then press the center pin repeatedly with a pen or small screwdriver. This often dislodges debris blocking the mechanism. Blow gently into the valve opening to clear particles.
For Schrader valves: Use the tip of a small screwdriver to carefully clean around the center pin. Press the pin down firmly several times to clear any blockage. A quick blast of compressed air can help dislodge stubborn debris.
Proper Pump Attachment Technique
Presta-specific solution: After unscrewing the nut, insert the pump head fully before engaging the lever. The lever should move smoothly into position—if it resists, realign the head. Never force the lever closed.
Schrader-specific solution: Ensure the pump head’s internal seal contacts the valve fully. Some pumps require screwing the head onto the valve—don’t skip this step. Listen for air escaping around the connection as you pump.
Replace Valve Core in 3 Minutes
When cleaning doesn’t solve the bike tire valve not taking air problem, replacing the valve core is the most effective solution.
Presta Core Replacement
- Unscrew the top nut completely and remove it
- Insert a Presta core tool (available for $2-3 at bike shops) over the core
- Turn counterclockwise to remove the old core
- Clean the internal threads with a dry cloth
- Insert the new core and turn clockwise until snug (don’t overtighten)
- Reattach the nut and test inflation
Schrader Core Replacement
- Use needle-nose pliers or a Schrader core tool
- Grip the core firmly and turn clockwise to remove
- Clean the valve body interior
- Insert new core and turn counterclockwise until snug
- Test by pressing the center pin—it should spring back consistently
Pro tip: Carry spare valve cores in your repair kit—these tiny components cost less than $1 but can save your ride when problems strike.
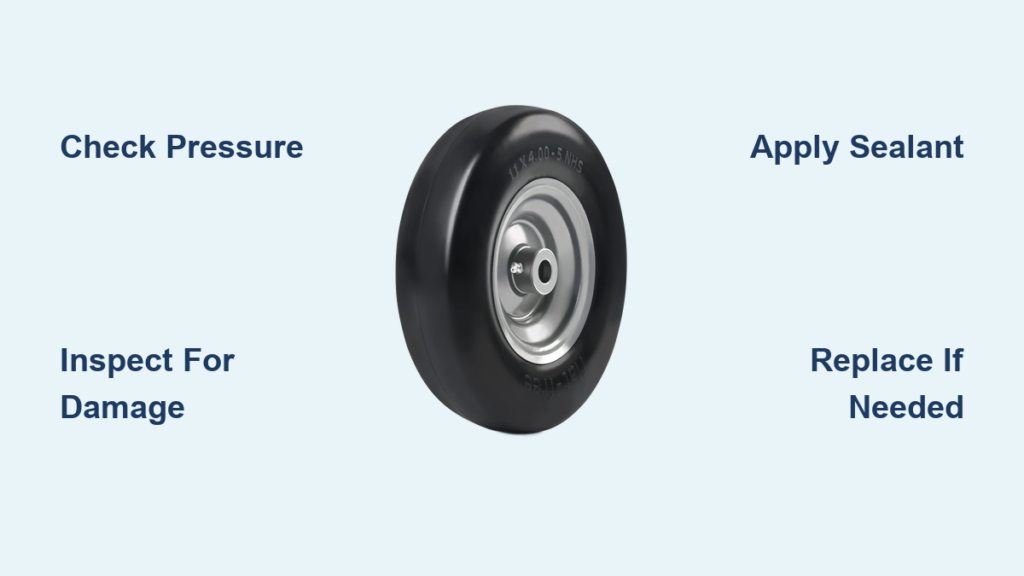
Prevent Future Valve Problems
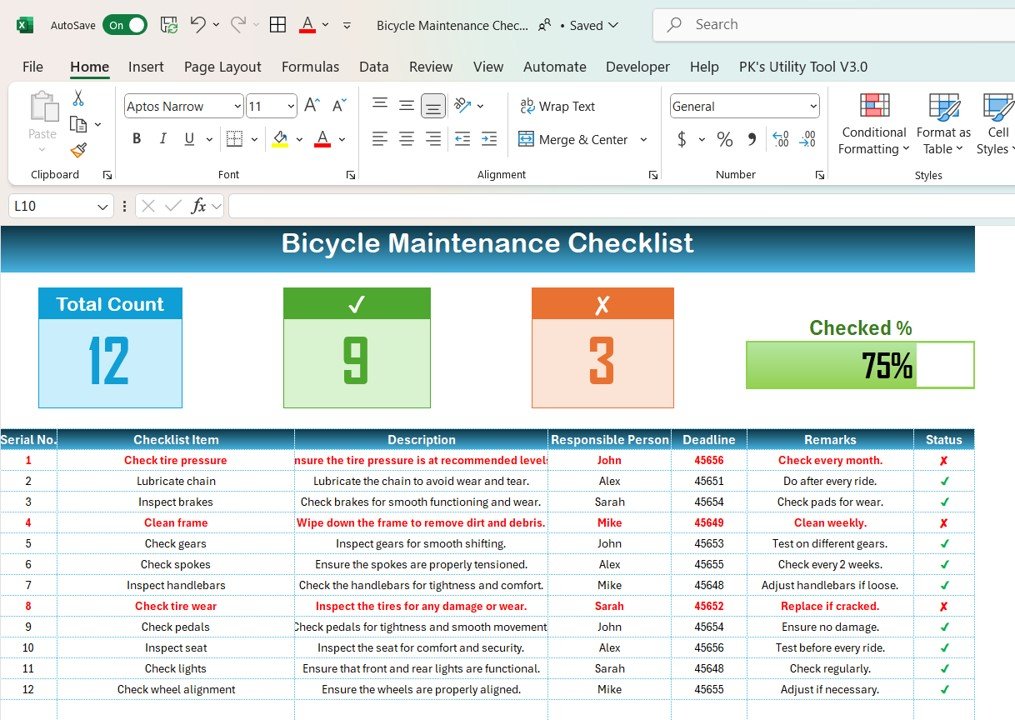
The best solution for bike tire valve not taking air is prevention through proper maintenance.
Essential Valve Care Routine
- Always replace valve caps after inflation—they protect against debris
- Clean valves monthly with a dry cloth, especially after muddy rides
- Lubricate Presta cores quarterly with valve-specific oil (not household oil)
- Check valve alignment during tire pressure checks
Quality Components Worth the Investment
Avoid cheap replacement cores—they often leak or fail quickly. Invest in brass-core Presta valves or nickel-plated Schrader cores for better durability. For frequent riders, consider upgrading to performance valve stems with improved seals.
Smart Pump Selection
Your pump matters as much as the valve. Choose a floor pump with:
– Clear valve type indicators
– Pressure-activated head seals
– Reliable locking mechanism
– Built-in pressure gauge
Avoid bargain-bin pumps—they often leak at the connection point, creating false “valve failure” symptoms.
Emergency Fixes When Stranded
When your bike tire valve not taking air happens miles from home, these temporary solutions get you moving.
Improvised Seal for Leaking Valves
For Presta valves: Wrap the stem with electrical tape just below the nut to create a temporary seal. Tighten the nut firmly over the tape.
For Schrader valves: Remove the core (if possible) and wrap the threads with plumber’s tape before reinstalling.
Alternative Inflation Methods
Use a CO2 inflator with an adapter if your pump fails. Many gas stations have Schrader-compatible air pumps—bring an adapter for Presta valves. As a last resort, carefully use an air compressor on its lowest setting with frequent pressure checks.
When to Replace the Entire Valve Stem
Some situations require complete valve replacement rather than core repair:
- Visible cracks in the stem
- Air escaping around the base where it meets the rim
- Repeated core replacements failing to solve the problem
- Bent stems that won’t straighten
Tubeless riders: When replacing a valve stem, clean the rim interface thoroughly and apply fresh sealant to ensure an airtight seal.
A bike tire valve not taking air is a common but easily solvable problem when you know the right approach. By identifying your valve type, diagnosing the specific failure mechanism, and applying the appropriate fix, you’ll restore functionality quickly and prevent future occurrences. Regular maintenance—cleaning valves, replacing worn cores, and using quality components—keeps these issues rare. The next time your valve refuses to accept air, you’ll have the knowledge to diagnose and fix the problem in minutes, getting you back on the road without frustration. Remember: the right tools, proper technique, and preventive care transform valve problems from ride-ending emergencies into minor speed bumps on your cycling journey.