
Finding yourself with a flat tire is never convenient, but knowing exactly how to remove the spare tire from your Mazda 3 can turn a stressful situation into a manageable one. The spare tire in your Mazda 3 is stored beneath the trunk floor, secured by a single hold-down bolt. While the process is straightforward once you know the steps, many Mazda 3 owners struggle to locate and access their spare tire during an emergency. This guide walks you through every step of the spare tire removal process, covers essential safety precautions, and explains the important limitations of your temporary spare tire so you can handle a flat tire situation with confidence.
Whether you’re preparing ahead of time or currently dealing with a flat tire on the side of the road, understanding your Mazda 3’s spare tire system will help you get back on the road safely and quickly.
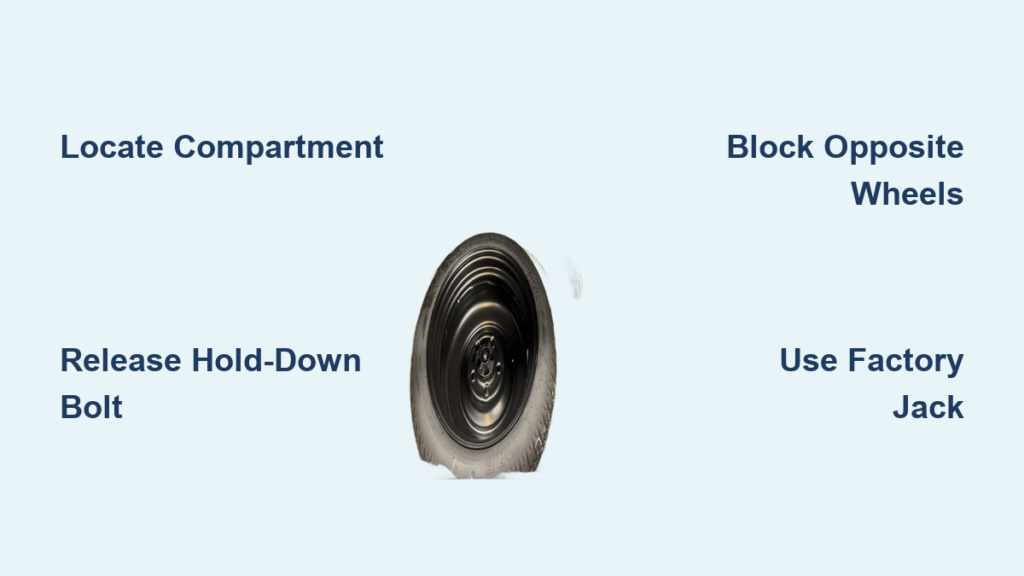
Locate Your Mazda 3’s Spare Tire Compartment Under the Trunk Floor
Before you can remove your spare tire, you need to find exactly where it’s stored in your Mazda 3. Unlike some vehicles that store spares externally, the Mazda 3 keeps its temporary spare tire hidden beneath the trunk floor mat. This storage location keeps everything you need for a tire change in one accessible place, but requires specific steps to access properly.
Begin by opening your trunk and lifting the luggage compartment floor mat. The mat is designed to lie flat over the spare tire compartment, and lifting it reveals the spare tire sitting in a dedicated well beneath. You may need to fold or roll the mat back depending on your model year and how much cargo space you need for the tire change process. Take a moment to familiarize yourself with this compartment before you actually need it during an emergency, as knowing the layout in advance will save valuable time when you’re stressed and roadside.
The spare tire compartment is specifically shaped to hold the temporary spare tire securely, preventing it from shifting around while you drive. This secure fit is important for both safety and to prevent annoying rattles in the trunk area.
Release the Mazda 3’s Spare Tire Hold-Down Bolt Counterclockwise

Once you’ve exposed the spare tire compartment, you’ll see that the spare tire is held in place by a single hold-down bolt in the center. This bolt threads into a mounting point on the floor of the compartment and prevents the spare tire from moving during driving. To release the spare tire, simply turn this bolt counterclockwise until it comes free.
The hold-down bolt typically has a large head that you can turn by hand, though some models may require the use of your wheel brace to loosen it initially. If the bolt seems stuck or difficult to turn, check that you’re rotating it in the correct counterclockwise direction. Never force it, as this could strip the threads or damage the mounting point. Once the bolt is fully released, lift the spare tire out of the compartment and set it aside in a clean, dry location where it won’t get dirty before you need to install it.
After removing the spare tire, take a moment to inspect it for any visible damage, dry rot, or excessive wear. A spare tire that has been stored for years without inspection may not be in usable condition when you need it most.
Gather Your Mazda 3’s Factory Jack and Wheel Brace Before Changing Tires
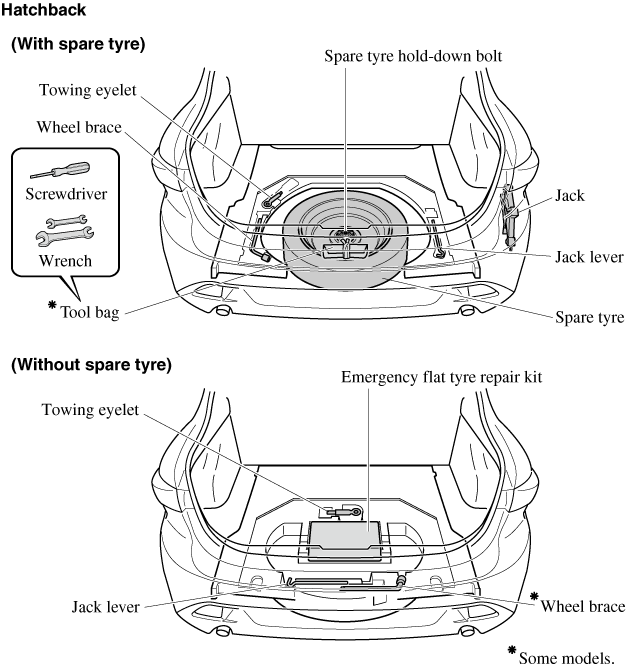
Before you can change a flat tire, you need to ensure you have all the necessary tools accessible. The Mazda 3 comes equipped with a jack and wheel brace (tire iron) specifically designed for your vehicle. These tools are stored in the same compartment as the spare tire, typically in their own designated clips or pouches to prevent them from rattling during driving.
The wheel brace is a socket-like tool that fits the lug nuts on your Mazda 3 wheels. It’s designed with the correct socket size and handle length to provide adequate leverage for loosening and tightening lug nuts. Using an aftermarket tire iron that doesn’t fit properly can round off your lug nuts or make the job much more difficult, so always use the original equipment tool when possible.
The jack provided with your Mazda 3 is designed to lift your specific vehicle safely. Only use this jack at the manufacturer’s designated jack points, which are typically indicated by small marks or triangles on the vehicle’s frame or in your owner’s manual. Using a jack at incorrect locations can damage your vehicle or cause the jack to slip, creating a serious safety hazard.
Prepare a Safe Work Area Before Removing Your Flat Mazda 3 Tire
If you’re dealing with an actual flat tire rather than just preparing ahead of time, your immediate priority is creating a safe working environment. Before attempting to change any tire, drive your Mazda 3 slowly to a level spot that is well off the road and out of the way of traffic. Choose a hard, level surface such as a parking lot or wide shoulder rather than soft grass or dirt, which can cause the jack to sink.
Once you’ve selected your safe location, put your vehicle in park (or reverse for manual transmission), firmly set the parking brake, and turn off the engine. Activate your hazard warning flasher to alert approaching drivers that your vehicle is disabled. All passengers should exit the vehicle and move to a safe distance away from both the vehicle and the flow of traffic. This is especially important if you’re on a busy road or highway.
Take a moment to assess your surroundings before proceeding. Make sure you have adequate visibility and that oncoming traffic can clearly see your disabled vehicle. If possible, position warning triangles or flares behind your vehicle to provide additional warning to approaching drivers.
Block Opposite Wheels Before Lifting Your Mazda 3 for Tire Change
Before you raise your vehicle with the jack, you must prevent it from rolling by blocking the wheels. This critical safety step ensures that even if the jack were to fail, your vehicle wouldn’t roll and cause damage or injury. Block the wheel that is diagonally opposite from the flat tire—for example, if the left rear tire is flat, block the right front wheel.
When blocking a wheel, place your wheel blocks both in front and behind the tire to prevent movement in either direction. If you don’t have dedicated wheel blocks, use large rocks, wood blocks, or even the flat tire itself (as long as it’s not under the vehicle) to create a solid barrier. The blocks should be large enough to hold the tire firmly in place if the vehicle were to shift.
This wheel blocking step is often skipped by people in a hurry, but it’s one of the most important safety precautions you can take. A vehicle that slips off a jack can cause devastating injuries, and taking an extra minute to block the wheels properly could prevent a serious accident.
Lift Your Mazda 3 Correctly Using the Factory Jack
With your wheels blocked, you can now position and operate the jack to lift your vehicle. Make sure the jack is well lubricated before use, as rust or debris in the jack mechanism can cause it to malfunction at the worst possible moment. Consult your owner’s manual to identify the correct jack points for your Mazda 3—these are usually marked on the vehicle’s frame or rocker panel area.
Position the jack at the designated jack point closest to the flat tire. The jack must sit on a firm, level surface; if you’re on asphalt that seems soft, place a sturdy board or piece of plywood beneath the jack base to distribute the weight. Begin raising the vehicle by pumping the jack handle up and down, ensuring the jack remains stable throughout the process.
Raise the vehicle only until the flat tire is just off the ground—typically just a few inches is sufficient. There’s no need to raise the vehicle higher than necessary, and raising it too high reduces stability and increases the risk of the vehicle falling off the jack. The goal is simply to create enough clearance to remove the flat wheel and install the spare tire.
Remove Your Flat Mazda 3 Tire Using the Star Pattern Technique
With your vehicle safely raised, you can now remove the flat tire. Start by using your wheel brace to remove the hubcap or wheel cover, which may be held on by clips or lug nuts depending on your model. Once the hubcap is removed, you’ll see the lug nuts that secure the wheel to the axle.
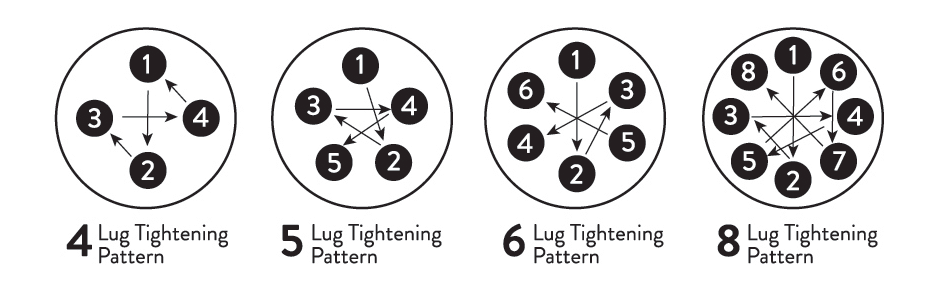
Use your wheel brace to loosen each lug nut by turning it counterclockwise. Loosen the lug nuts about a quarter to half turn each, working in a star pattern (alternating between lug nuts across from each other) to ensure even loosening. Don’t remove the lug nuts completely at this stage—just break them loose so you can finish removing them by hand once the wheel is free.
Once all lug nuts are loosened, finish removing them by hand and place them in a bag or pocket where they won’t roll away—losing lug nuts on a dark road is frustrating and can delay your repair. With all lug nuts removed, you can now lift the flat tire off the axle and set it aside. Be careful, as a flat tire with a damaged wheel can be heavy and awkward to handle.
Install Your Mazda 3’s Temporary Spare Tire with Proper Mounting
Before mounting the spare tire, take a moment to clean any visible dirt or debris from the mounting surfaces. Use a clean cloth to wipe the wheel hub and the mounting surface of the spare tire. Dirt or grime on these surfaces can prevent the wheel from seating properly and cause the lug nuts to loosen while driving—a dangerous condition that could allow the wheel to come off entirely.
Mount the spare tire onto the axle, aligning the wheel’s mounting holes with the wheel studs. The spare tire should sit flush against the hub surface with no visible gaps. Install the lug nuts by hand first, turning them clockwise until they’re snug but not tight. The lug nuts have a beveled edge that must face inward toward the wheel—installing them backwards will prevent proper seating and could cause them to loosen.
Do not apply oil or grease to the wheel studs or lug nuts, as this is specifically warned against by Mazda. Lubricated fasteners can loosen during driving and cause the wheel to separate from the vehicle. Similarly, do not over-tighten the lug nuts beyond the recommended specifications.
Tighten Mazda 3 Lug Nuts to 108-147 N·m Specification
After mounting the spare tire and hand-tightening the lug nuts, you need to properly torque them to the manufacturer’s specifications. For Mazda 3 vehicles, the correct tightening torque is 108-147 N·m (12-14 kgf·m, or 80-108 ft·lbf). If you don’t have a torque wrench, you should have the lug nuts inspected and tightened by a professional as soon as possible after changing the tire.
Use your wheel brace to tighten the lug nuts in a star pattern, working around the wheel and tightening opposite lug nuts alternately. This star pattern ensures even pressure across the wheel hub and prevents the wheel from being pulled off-center. Continue tightening until each lug nut meets the specified torque, or until they are as tight as you can reliably make them with the provided tool.
Once all lug nuts are properly tightened, lower the vehicle back to the ground by turning the jack handle counterclockwise. After the vehicle is on the ground, give each lug nut one final check to ensure none have loosened during the lowering process. It’s not uncommon for lug nuts to need a slight additional tightening after the vehicle’s weight settles on the tires.
Follow Critical Speed and Installation Rules for Mazda 3 Temporary Spare Tires
Your Mazda 3 is equipped with a temporary spare tire, which has important limitations you must understand for safe driving. Never install the temporary spare tire on the front wheels (the driving wheels), as this significantly affects your vehicle’s handling and could cause you to lose control, especially on wet or icy roads. If you must use the temporary spare tire, move a regular tire to the front wheel and install the temporary spare on the rear axle.
Speed limitations are mandatory when using the temporary spare tire. Do not exceed 80 km/h (50 mph) under any circumstances. Exceeding this speed can damage the tire or vehicle and significantly increases your risk of a blowout or accident. Additionally, you cannot use tire chains on the temporary spare tire, as it won’t accommodate them properly.
The temporary spare tire is smaller in diameter than a standard tire, which reduces your vehicle’s ground clearance when it’s installed. This reduced clearance means you must be extra careful when driving over speed bumps, parking curbs, or any other obstacles that your vehicle would normally clear easily.
Return All Mazda 3 Tools to Proper Storage Locations After Tire Change
After successfully changing your flat tire, you need to store the jack, wheel brace, and damaged tire properly before continuing to your destination. The damaged flat tire should be placed in your trunk or cargo area, where it can be transported to a tire shop for repair or replacement. Be careful when loading the damaged tire, as it may have sharp objects embedded in it from whatever caused the flat.
Return the jack and wheel brace to their designated storage compartment beneath the trunk floor. Secure them in their proper positions to prevent them from rattling or shifting during driving. Take a moment to verify that the spare tire hold-down bolt is properly secured in its mounting point when storing the spare tire after use. An improperly secured spare tire can create rattling noises and may become a projectile in the event of a collision.
Before driving away, check the inflation pressure of all four tires and your newly installed spare tire. Driving on tires with incorrect air pressure is dangerous because it affects vehicle handling and can lead to tire failure. Do not press the TPMS set switch after installing the spare tire—this switch is only meant to be pressed after installing a repaired flat tire or a full replacement tire. With these final checks complete, you’re ready to drive carefully to a facility where you can repair or replace your flat tire.


