
Nothing ruins your riding experience faster than a sluggish Razor scooter with underinflated tires. When your wheels feel heavy, your ride becomes bumpy, and your electric model’s battery drains quicker than normal, it’s almost always a tire pressure issue. Knowing exactly how to inflate Razor scooter tire properly ensures smooth, efficient rides while extending the life of your scooter’s components. This comprehensive guide walks you through the entire process—from identifying your specific valve type to maintaining optimal pressure—so you can keep your Razor performing at its best without unnecessary trips to the repair shop.
Identify Your Razor Scooter Valve Type Before Pumping
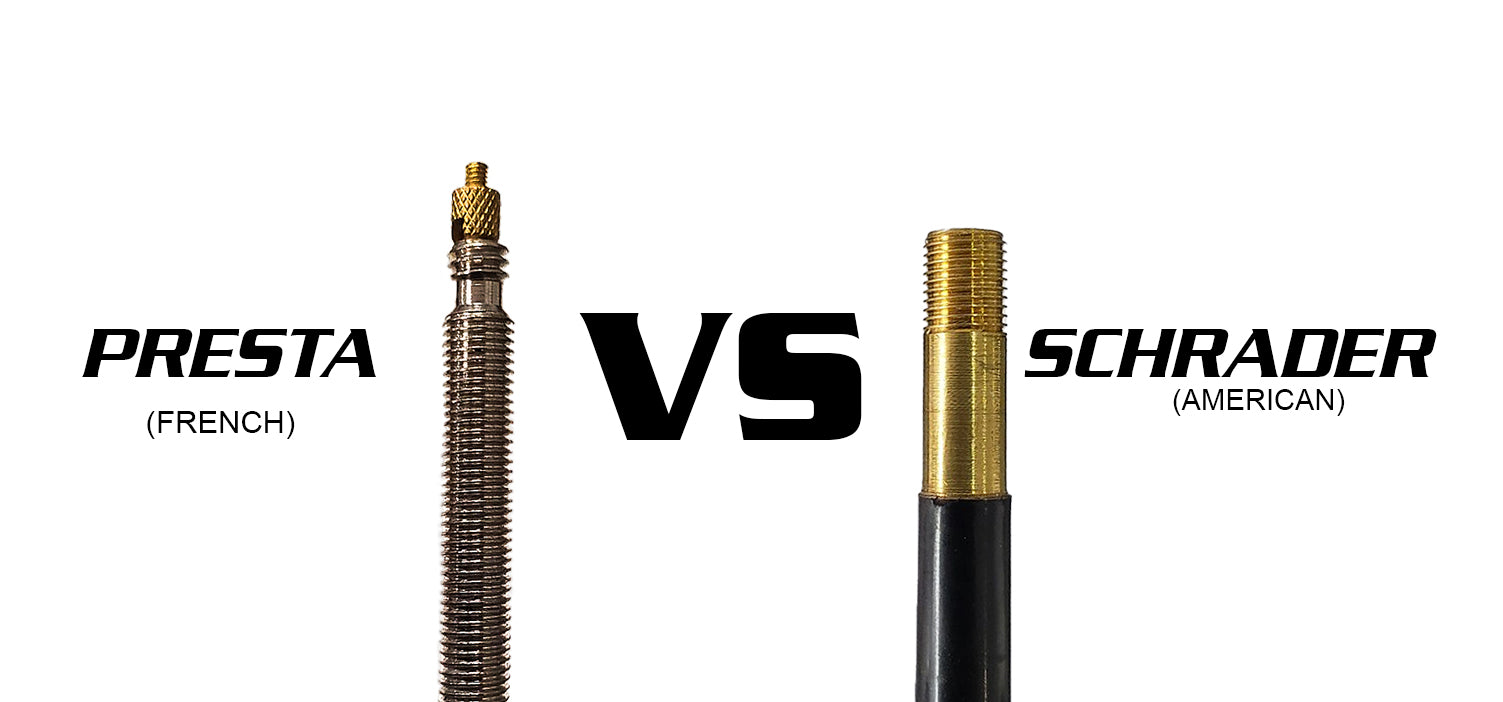
Before adding air to your Razor scooter, you must determine which valve system your model uses, as this dictates the pump equipment you’ll need. Most Razor scooters feature Schrader valves, identical to those on car tires, characterized by a short, threaded stem about 8-10mm in diameter with a small pin in the center. These valves work with standard air pumps found at gas stations or bicycle shops, making them the most user-friendly option for occasional maintenance.
Some premium Razor models, particularly newer electric variants, may use Presta valves instead. These are noticeably slimmer (around 6mm diameter) with a knurled top section that must be unscrewed before inflation. Presta valves require specific pump heads or adapters, so check your scooter’s valve carefully before purchasing equipment. If you’re unsure which type you have, bring your scooter to a local bike shop where staff can instantly identify the valve type and recommend appropriate inflation tools.
Check Current Tire Pressure Before Adding Air
Never inflate your scooter tires without first checking their current pressure—this simple step prevents dangerous over-inflation that can cause sudden blowouts or premature tire wear. Locate the valve stem on your tire and press a quality pressure gauge firmly onto the valve until you hear a brief hiss of air. Hold the gauge steady for 2-3 seconds to get an accurate reading, then compare it to the recommended range printed on your tire’s sidewall (typically 30-50 PSI for most Razor models).
If you don’t own a pressure gauge, perform a quick physical assessment by pressing your thumb firmly against the tire surface. Properly inflated tires should feel firm with only slight give—think of the consistency of a ripe avocado. If you can easily compress the tire with minimal pressure or notice significant sidewall bulging when standing on the scooter, your tires need air immediately. For electric Razor scooters, underinflated tires dramatically reduce battery range, so checking pressure before long rides is especially critical for maximizing your distance per charge.
Select the Right Pump for Your Razor Scooter Tires

Choosing appropriate inflation equipment makes the difference between a 2-minute maintenance task and a frustrating battle with incompatible fittings. For home use, invest in a quality floor pump with a built-in pressure gauge—these provide precise control and eliminate the guesswork of manual inflation. Look for models featuring dual-head compatibility that works with both Schrader and Presta valves, as this versatility serves you well if you ever upgrade your scooter.
Portable hand pumps offer convenience for on-the-go riders but require careful selection. Avoid tiny “mini pumps” designed for emergency bike repairs, as these often lack the capacity to reach proper scooter tire pressures. Instead, choose a compact bicycle pump with a pressure gauge and flexible hose, which gives you better leverage and reduces strain on the delicate valve stems. If you frequently ride electric Razor models with higher pressure requirements, consider a small 12V air compressor that plugs into your car’s cigarette lighter—these inflate tires in seconds but require constant monitoring to prevent over-pressurization.
Proper Inflation Technique for Razor Scooter Tires
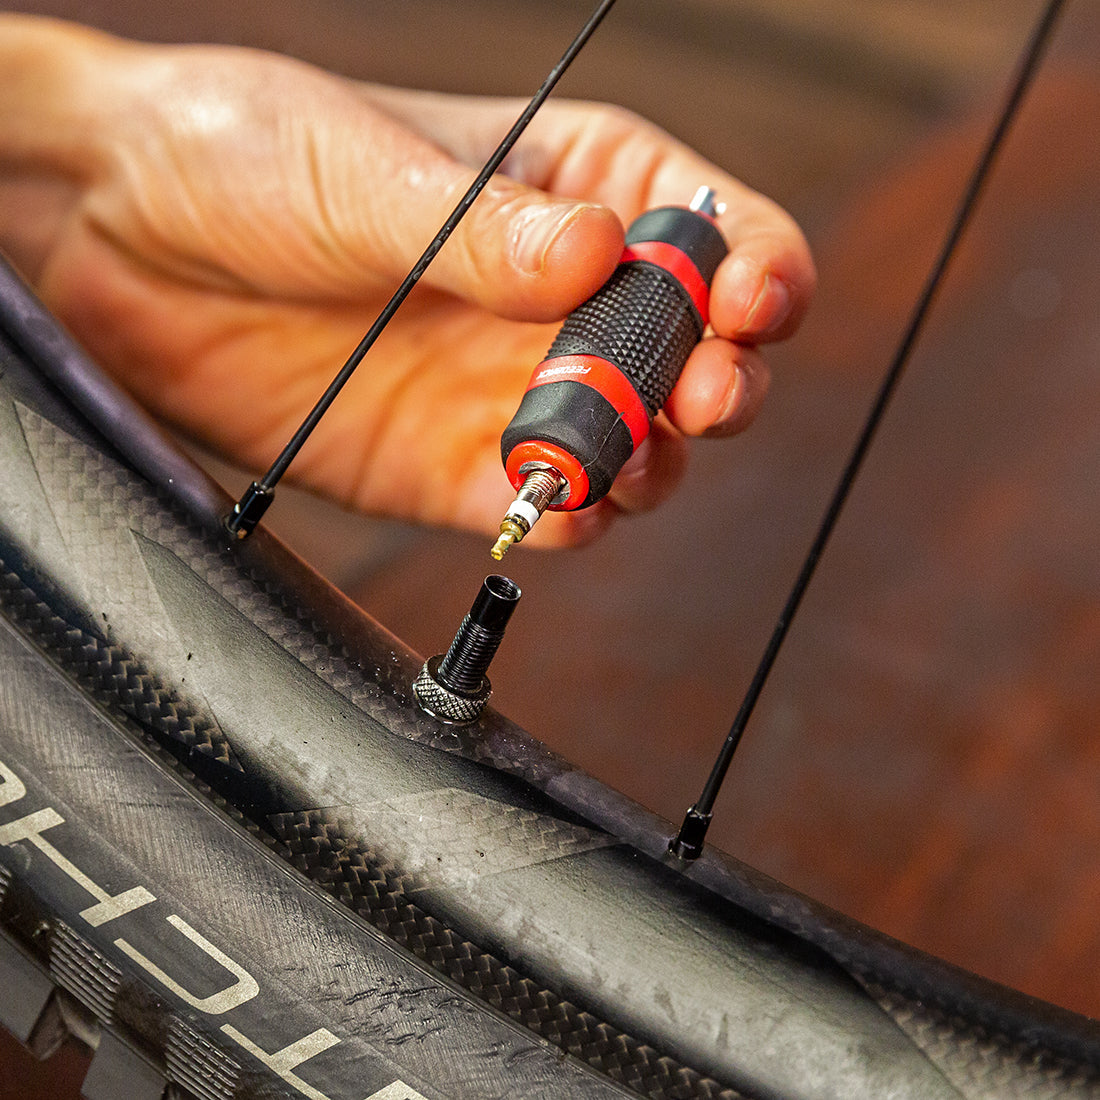
Follow these precise steps to inflate your Razor scooter tires safely and effectively without damaging the valve or rim. First, remove the valve cap and set it aside in a secure location—these tiny components disappear quickly if dropped on pavement. For Schrader valves, press the center pin briefly with a small tool to clear any debris from the valve mechanism, then attach your pump head firmly and lock it in place.
Begin inflation with short, controlled bursts of air rather than continuous pumping, checking pressure after every 5-10 seconds. Razor scooter tires have much smaller air volumes than bicycle tires, so they reach target pressure surprisingly quickly—typically within 20-30 pumps with a quality floor pump. As you approach the recommended PSI, reduce your pumping speed and check pressure more frequently, as overshooting by even 5-10 PSI can compromise ride quality and tire longevity.
When you reach the target pressure (found on the tire sidewall), release the pump head quickly to minimize air loss, then immediately replace the valve cap to prevent dust and moisture from entering the valve mechanism. Give the tire a final squeeze to confirm proper firmness before taking your scooter for a short test ride to ensure balanced handling.
Troubleshoot Common Razor Tire Inflation Problems
Even with proper technique, you may encounter issues that prevent successful inflation. If your pump connects but no air enters the tire, the valve core might be stuck—try depressing the center pin repeatedly with a paperclip to dislodge any debris. Persistent resistance indicates a damaged or seized valve core that requires replacement using a specialized valve core tool available at bike shops for under $5.
Tires that won’t hold pressure after inflation typically have either a slow leak or faulty valve. Perform a simple water test by spraying soapy water around the valve stem and tire tread—bubbles will form at the leak location. Small punctures in the tread area can be temporarily patched, but sidewall damage or repeated leaks signal it’s time for a new tire. If air escapes around the valve stem itself, the valve core likely needs tightening or replacement.
A tire that feels unevenly inflated may have separated from the rim. Remove the tire completely, apply soapy water to the bead area, and carefully work the tire back onto the rim while inflating slowly. This often resolves mysterious pressure loss issues that seem to have no visible cause.
Maintain Optimal Tire Pressure for Longest Scooter Life
Establish a simple maintenance routine that keeps your Razor scooter tires performing at their best between rides. Check pressure at least once weekly during regular use, as scooter tires naturally lose approximately 2-3 PSI per week due to rubber’s permeability. Always check pressure before extended rides or when carrying additional weight, as underinflated tires dramatically increase rolling resistance and strain electric scooter motors.
For seasonal storage, slightly overinflate tires to 5-10 PSI above recommended levels to compensate for natural pressure loss during inactivity, but never exceed the maximum pressure printed on the tire sidewall. Store your scooter in a cool, dry place away from direct sunlight, which accelerates rubber degradation. If your scooter sits unused for more than two weeks, perform a quick pressure check before your next ride to prevent riding on dangerously underinflated tires.
Recognize When to Replace vs Repair Razor Scooter Tires
Understanding the limitations of tire repairs prevents dangerous riding situations and unnecessary expenses. Minor punctures in the tread area from small debris can often be patched temporarily using standard bicycle tire repair kits, but these fixes are not permanent solutions. Tires with punctures larger than 1/8 inch, multiple close-together punctures, or damage near the sidewall require immediate replacement rather than repair.
Sidewall damage represents the most critical failure point—any bulges, cuts, or visible cord material means the tire’s structural integrity is compromised and must be replaced immediately. Similarly, tires showing significant dry rot (characterized by deep cracks in the rubber) have degraded beyond safe use regardless of pressure retention. If you find yourself adding air more than once weekly despite no visible punctures, the tire has reached the end of its service life and needs replacement.
Properly inflated Razor scooter tires transform your riding experience from sluggish and unsafe to smooth and responsive. By correctly identifying your valve type, using appropriate inflation equipment, and following the precise techniques outlined in this guide, you’ll maximize both performance and safety while extending the life of your scooter’s components. Regular pressure checks take less than two minutes but prevent the most common causes of premature tire failure and unexpected breakdowns. When you encounter inflation problems, the troubleshooting steps provided help you quickly diagnose issues and determine whether a simple fix or full tire replacement is needed. Make tire maintenance part of your regular scooter care routine, and you’ll enjoy reliable, efficient rides that keep you moving safely through your neighborhood or commute.


