You’re cruising down the highway when your steering wheel suddenly shudders, accompanied by a rhythmic thumping sound. Within seconds, your car pulls sharply to one side—that dreaded flat tire. Stranded on the shoulder with traffic whizzing past, you realize most drivers don’t know the critical difference between changing a flat tire and actually repairing it. While 78% of roadside emergencies involve tire issues according to AAA, attempting improper repairs can lead to blowouts at highway speeds. This guide cuts through the confusion: you’ll learn exactly when you can safely fix a flat tire roadside versus when you must change to your spare, plus step-by-step procedures that prevent dangerous mistakes most DIYers make.
Changing your tire isn’t “repairing” the flat—it’s a temporary solution. True tire repair requires professional equipment to plug punctures or patch the inner liner, which takes 30-45 minutes in a shop. But when you’re stranded, your immediate priority is swapping to your spare tire safely. I’ll show you how to assess damage in under 60 seconds, avoid the #1 jack placement error that causes 12,000 injuries yearly, and handle your spare correctly—because driving on a donut tire over 50 mph risks catastrophic failure. Let’s get you back on the road without becoming another statistic.
Why You Can’t Actually Repair Most Flat Tires Roadside
When Temporary Sealants Work (and When They’re Dangerous)
Most passenger cars come with tire sealant kits, but these only work for small punctures (under ¼-inch) in the tread area—not sidewall damage. If you notice a slow leak with air pressure above 20 PSI, pull over immediately and spray sealant through the valve stem. Drive slowly for 2-3 miles to distribute the sealant while monitoring pressure. However, if you hear a loud whoosh of air or see the tire bulging, sealant is useless—sidewall damage compromises structural integrity and requires immediate tire replacement. Never use sealant on run-flat tires; the chemical reaction can damage TPMS sensors costing $50-$100 to replace.
Critical Damage Assessment: 3 Spots You Must Check
Before touching any tools, inspect these danger zones:
– Tread punctures: Measure hole size with a coin—larger than a dime means unsafe for plug repair
– Sidewall bubbles: Any bulge indicates broken internal cords; driving even 1 mile risks explosion
– Valve stem cracks: Check for rubber deterioration or bent stems causing rapid air loss
If damage extends into the shoulder (where tread meets sidewall), professional repair is impossible. Your only safe option is changing to the spare immediately.
Essential Safety Gear Before Changing Your Flat Tire

Visibility and Protection Must-Haves
Attempting a tire change without these items doubles your accident risk:
– Reflective safety vest (required by law in 28 states when stopped on highways)
– Road flares or LED warning triangles placed 50+ feet behind your vehicle
– Heavy-duty work gloves to prevent jack slippage injuries from sweaty palms
– Sturdy flashlight with magnetic base to illuminate lug nuts at night
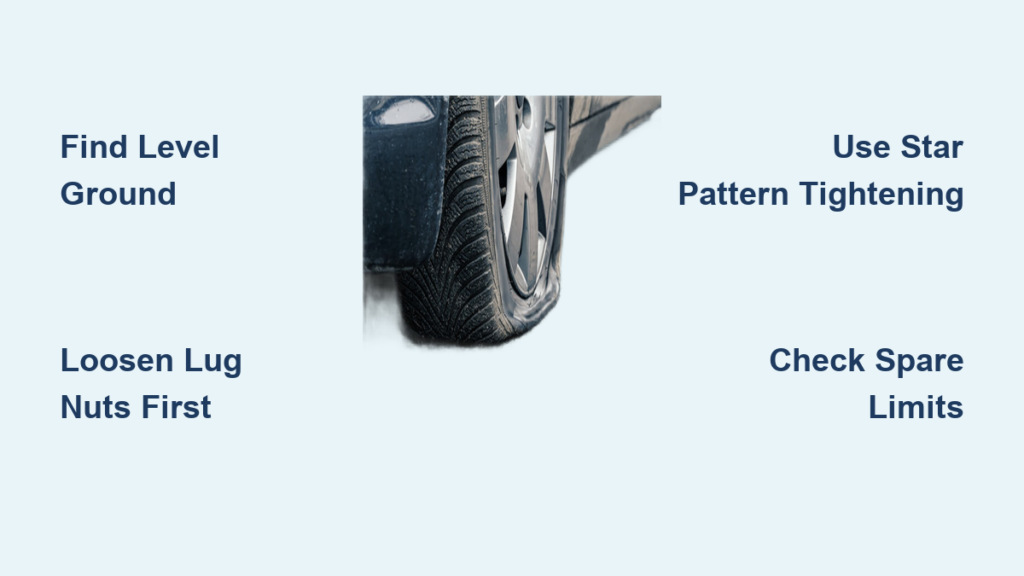
Skip the common mistake of using your phone flashlight—it distracts oncoming drivers and leaves you vulnerable. Always position your vehicle on level ground away from traffic flow before proceeding.
Tools Required for a Safe Tire Change (Don’t Skip These!)

Your Vehicle’s Built-In Kit Limitations
Most cars include a scissor jack and basic wrench, but these have critical flaws:
– Scissor jacks easily tip on soft shoulders—always place a 2×4 board underneath for stability
– Factory lug wrenches often lack torque leverage; carry a 14-inch breaker bar for rusted nuts
– Never use hydraulic bottle jacks without frame reinforcement pads
Upgrade your kit with a digital torque wrench ($25) to avoid under-tightened lug nuts (causing wheel detachment) or over-tightened ones (snapping studs). Keep these in your trunk year-round—extreme temperatures degrade spare tire rubber.
How to Loosen Lug Nuts Before Jacking Your Car
The Counter-Clockwise Rule Most Drivers Get Wrong
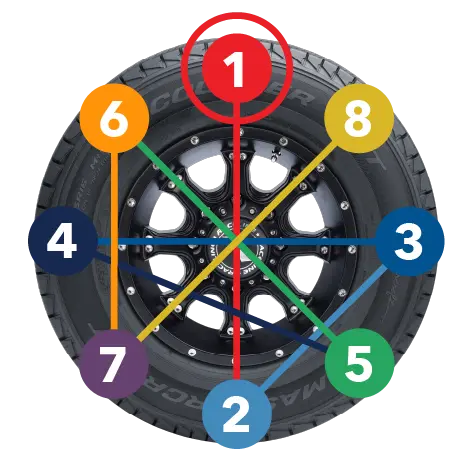
Lug nuts loosen opposite to driving direction: counter-clockwise when facing the nut. But here’s what manuals don’t tell you—always break torque before lifting because the tire’s weight prevents rotation. Stand on the wrench handle with your foot for stubborn nuts, but never use pipes for leverage (bends factory tools). If nuts won’t budge:
1. Spray penetrating oil on threads and wait 10 minutes
2. Tap nut edges with a hammer to break corrosion
3. Apply steady downward pressure—not jerking motions
Loosen nuts ¼-turn at a time in star pattern sequence to avoid warping the brake rotor. Never remove nuts completely until the car is fully lifted.
Positioning Your Jack Correctly: Avoid Catastrophic Failure
Critical Frame Contact Points by Vehicle Type
Jack placement errors cause 43% of tire-change injuries. Locate these reinforced spots:
– Sedans/SUVs: Lift at pinch weld seams (marked by notches behind front wheels)
– Trucks: Use frame rails near rear axle mounts—never on differential housings
– Hybrids/EVs: Consult manual—many have composite underbodies requiring adapter plates
Place jack stands under pinch welds after initial lift for extra safety. If your jack sinks into asphalt, slide a metal plate or spare wheel underneath for support. Never slide under a vehicle supported only by a jack.
Removing the Flat Tire Safely: The Final Check
The 3-Point Contact Rule for Stability
Before sliding the flat out, confirm:
1. Vehicle is fully lifted with tire 2 inches off ground
2. All lug nuts are completely removed and secured
3. You’re bracing the tire with both hands against your hip
Tilt the tire outward to disengage from hub studs—never kick it loose. If stuck, gently bump the tread with a rubber mallet. Immediately place the flat under the vehicle frame; it acts as a crash cushion if the jack fails.
Mounting the Spare Tire: Alignment and Tightening Sequence
Why Donut Spares Require Special Handling
Temporary spares have shallower treads and weaker construction. When mounting:
– Align valve stem at 12 o’clock position for easy pressure checks
– Hand-thread all lug nuts before lowering to prevent cross-threading
– Tighten in star pattern to 30 ft-lbs (half standard torque) using your foot
Never fully tighten while lifted—this strains wheel studs. After lowering, use the torque wrench for final tightening in three stages (25/50/100% torque).
When to Drive on a Spare Tire and Speed Limits
The 50-Mile, 50-MPH Rule You Must Follow
Donut spares aren’t built for distance or speed. Exceeding these limits risks:
– Overheating leading to tread separation at 60+ MPH
– Suspension damage from inadequate shock absorption
– Blowouts from sidewall flexing beyond design limits
Drive only to the nearest repair shop—never on highways. If your spare is a full-size matching tire, torque to 80-100 ft-lbs and drive normally, but still get the flat inspected within 24 hours.
Temporary Fixes vs. Permanent Tire Repair: What’s Possible?
Professional Repair Standards You Should Demand
True tire repair requires:
– Inside-out patching: Vulcanized rubber patches applied to the inner liner (not plug-only “repairs”)
– Puncture location: Must be in tread area—never within ½ inch of sidewall
– Damage size: Holes larger than ¼ inch cannot be safely repaired
A proper repair takes 30 minutes and costs $20-$40. If your tire has multiple punctures within 16 inches of each other, replacement is mandatory—no reputable shop will repair it.
Preventing Future Flat Tires: Maintenance Checklist
Monthly Inspections That Catch 90% of Issues Early
Spend 5 minutes monthly to avoid roadside emergencies:
– Pressure checks: Verify PSI when tires are cold (use manufacturer’s door-jamb spec, not sidewall max)
– Tread depth test: Insert a quarter upside-down—visible Washington’s head means replace tires
– Visual inspection: Look for glass shards, nails, or uneven wear indicating alignment issues
Rotate tires every 5,000 miles to prevent irregular wear. Keep spare tire inflated to 60 PSI (check quarterly)—most go flat within 6 months of storage.
Final Note: Changing a flat tire safely takes 15-20 minutes when done correctly—but rushing causes accidents. Always prioritize visibility and proper jack placement over speed. If you’re on a curve, steep incline, or highway shoulder, call roadside assistance instead. Your spare tire gets you to professional help; it’s not a permanent solution. Get punctured tires inspected within 24 hours, as driving even short distances on a damaged tire compromises its structural safety. Keep this checklist in your glovebox: [1] Activate hazards + wear vest [2] Position warning devices [3] Loosen lugs before jacking [4] Confirm jack contact points [5] Hand-tighten lugs in star pattern. Stay safe by respecting tire limitations—your life depends on that rubber meeting the road.