
You’re driving down the highway when suddenly your Hyundai starts pulling to one side and that unmistakable thumping sound confirms your worst fear—a flat tire. Instead of waiting for roadside assistance in potentially dangerous conditions, you remember your Hyundai Tire Mobility Kit stored in the trunk. This temporary solution can get you back on the road safely if you know exactly how to use Hyundai tire repair kit components correctly. Understanding this process before you need it can save you time, stress, and potential danger during an actual emergency.
The Hyundai Tire Mobility Kit works by injecting specialized sealant into your punctured tire while simultaneously inflating it to a driveable pressure. Unlike traditional spare tires, this compact system provides a temporary fix that allows you to drive to the nearest service facility. But improper use can render the kit ineffective or even create additional hazards. This guide reveals exactly how to use Hyundai tire repair kit components in the correct sequence, avoid common mistakes, and recognize when professional help is needed.
Locate and Prepare Your Hyundai Tire Mobility Kit Components
Before attempting any repair, you must correctly identify and prepare all kit components. Hyundai designs this system with specific connections that only work when used precisely as intended—improper preparation is the leading cause of failed repairs.
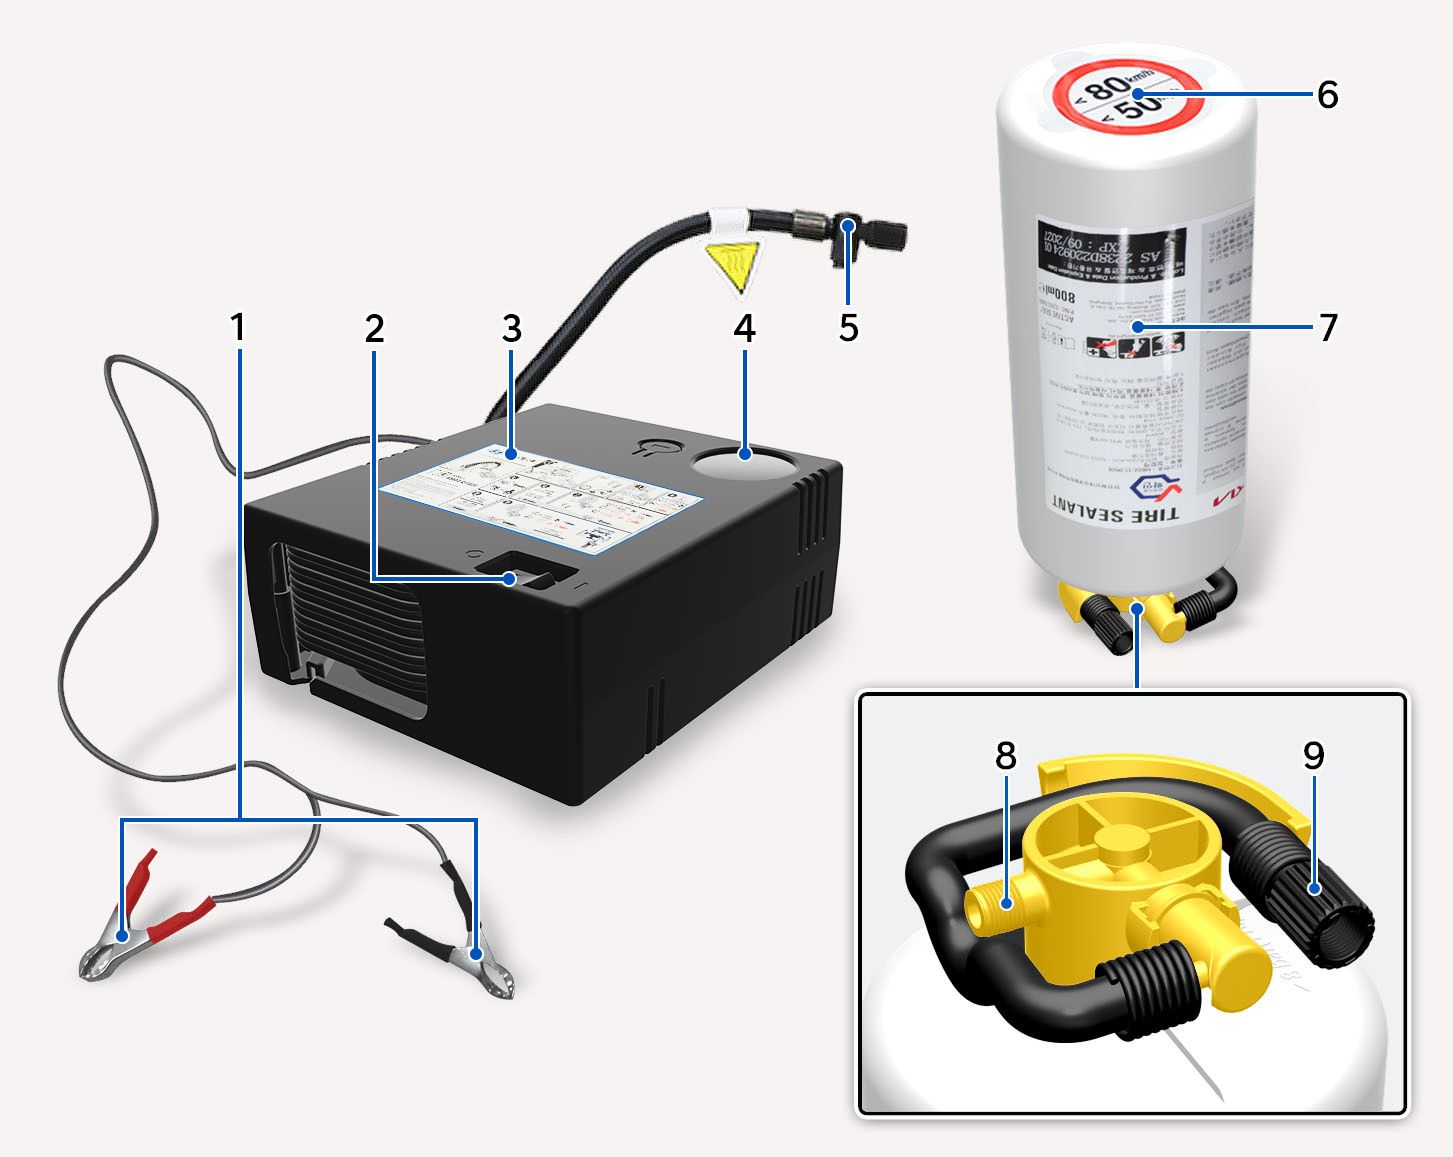
Retrieve the Tire Mobility Kit from its storage location, typically under the cargo floor in your trunk. Lay out all components in a logical sequence: sealant bottle, filling hose, compressor with pressure gauge, power cord, and speed restriction label. Each element serves a critical function in the repair process, and missing even one component will prevent successful operation.
Secure the Speed Restriction Label in Your Line of Sight
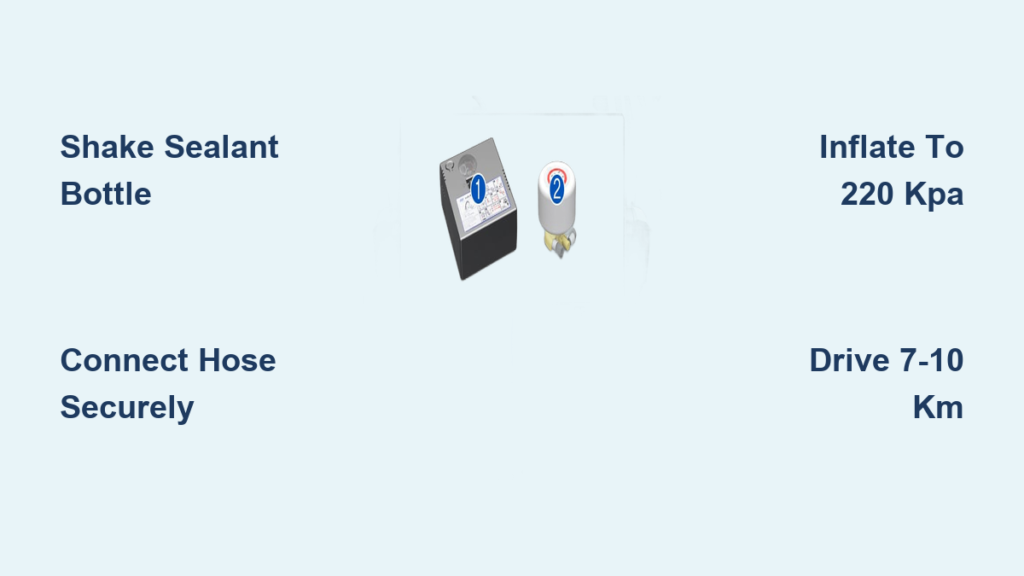
Immediately detach the speed restriction label from the sealant bottle and place it where you’ll constantly see it while driving—on your steering wheel or dashboard is ideal. This isn’t just a suggestion; Hyundai mandates this step because driving faster than 80 km/h (50 mph) on a temporarily repaired tire dramatically increases the risk of sealant failure and sudden tire blowout. That visible reminder could prevent a dangerous situation.
Shake the Sealant Bottle Vigorously Before Connection
Hold the sealant bottle firmly and shake it for at least 10-15 seconds to properly suspend the sealing compounds. These ingredients separate during storage, and inadequate mixing is why many DIY repairs fail—the sealant won’t flow correctly to the puncture site. Critical tip: After shaking, stand the bottle with the filling hose connection facing upward when making connections. This orientation prevents air from entering the system, which would disrupt the sealant flow and compromise your repair.
Establish Proper Hose Connections for Effective Sealant Flow
With your sealant properly prepared, you must now create secure connections that will deliver the repair compound into your damaged tire. Loose or improper connections cause the most common repair failures, so pay close attention to this step.
Remove the tire valve cap completely and set it somewhere safe where it won’t roll away. Inspect the valve stem for debris or damage—if you notice any obstruction, carefully clear it with a small brush or compressed air before proceeding. A clean valve stem is essential for creating an airtight connection with the injection hose.
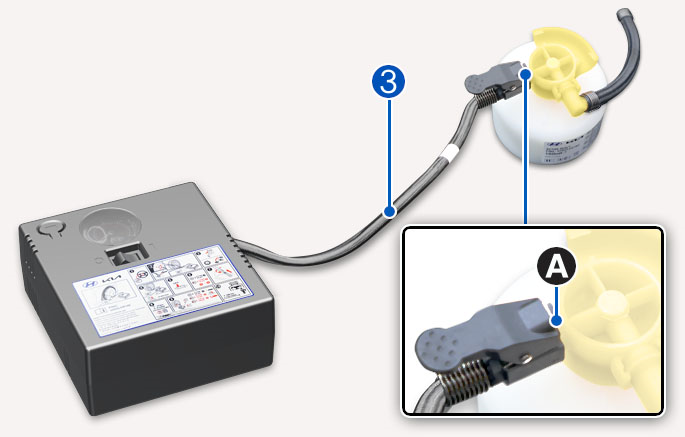
Connect the sealant injection hose directly to the tire valve stem, pressing firmly until you feel a secure, airtight seat. You should hear a slight click when properly engaged. Warning: If the connection isn’t fully seated, sealant will leak out during injection or, worse, flow backward through the system and clog your filling hose. Check the connection by gently tugging on the hose—it shouldn’t come loose.
Next, connect the filling hose to the sealant bottle’s connection point, again ensuring a tight fit. Keep the sealant bottle upright with the filling hose facing upward throughout this process. This orientation maintains proper sealant flow and prevents air from being drawn into the inflation system.
Activate the Compressor with Critical Safety Precautions
With all connections securely established, you’re ready to power on the compressor to inject sealant and inflate the tire simultaneously. This phase requires careful monitoring to avoid overinflation and recognize when proper pressure has been achieved.
Confirm the compressor’s ON/OFF switch is in the OFF position before plugging the power cord into your vehicle’s cigarette lighter socket. Never connect another vehicle’s tire mobility kit to your Hyundai’s power outlet—differences in electrical current capacity between manufacturers can cause electrical fires or damage your vehicle’s systems. With your vehicle ignition ON (you’ll see the ¢ indicator illuminated), switch the compressor ON and allow it to run for 5-7 minutes.
Monitor Pressure Gauge Continuously During Inflation
Keep your eyes on the compressor’s integrated pressure gauge throughout the inflation process. Hyundai specifies minimum and maximum pressure thresholds you must follow:
- Do not exceed the recommended tire pressure found on your driver’s side B-pillar label
- Never drive if tire pressure remains below 200 kPa (29 psi)
- Stop immediately if pressure exceeds safe levels for your specific tire size
Maintain a safe distance from the tire during inflation—sealant contains chemicals that can cause eye and skin irritation if contact occurs. If you accidentally get sealant on your skin, flush thoroughly with water and seek medical attention if irritation persists.
Recognize When Your Repair Will Fail
The Tire Mobility Kit only works for punctures approximately 4 mm (0.16 inches) or smaller. If your tire damage exceeds this size, the sealant will leak out faster than it can be injected. Additionally, if your tire fails to reach at least 220 kPa (32 psi) after 7 minutes of inflation, do not attempt to drive—call for professional assistance instead. Continuing to operate the vehicle risks sudden tire failure that could lead to a serious accident.
Complete the Mandatory 7-10 km Distribution Drive
After achieving proper inflation, you must immediately drive your Hyundai for 7-10 kilometers (4-6 miles) to distribute the sealant throughout the tire. This step isn’t optional—it uses centrifugal force to spread the sealant evenly so it can flow to and seal the puncture site.
Drive at speeds between 20-80 km/h (12-50 mph), with the speed restriction label clearly visible as your reminder. The lower speed threshold ensures sufficient centrifugal force for proper sealant distribution, while the upper limit protects the temporarily repaired tire from excessive stress.
Watch for Critical Warning Signs While Driving
Pay close attention to any unusual vibrations, ride disturbances, or noises coming from the tire area during your distribution drive. These symptoms indicate incomplete sealing or ongoing damage that requires immediate attention. If you experience any warning signs:
- Gradually reduce your speed
- Proceed with caution to pull safely off the road
- Do not continue driving—call for roadside assistance
- Wait in a safe location away from traffic
Continuing to drive with an improperly sealed tire risks complete failure at high speeds, creating a dangerous situation for you and other drivers.
Verify and Adjust Tire Pressure After Distribution

After completing your 7-10 km distribution drive, stop at a safe location to verify your repair’s success. This post-drive verification ensures the sealant has properly sealed the puncture and your tire maintains adequate pressure.
Check the tire pressure using the compressor’s integrated gauge, but remember: the gauge may display a higher reading while the compressor is running. For an accurate measurement, turn the compressor OFF completely and wait 30 seconds before checking pressure. Adjust to the proper level specified in your vehicle documentation—if pressure has dropped significantly, you may need to add more air.
When to Repeat the Distribution Process
If the air pressure doesn’t remain constant after your initial distribution drive, Hyundai recommends repeating the process. Drive another 7-10 km at speeds of 20 km/h or higher, then recheck and adjust tire pressure. Sometimes sealant needs additional time and centrifugal force to fully seal larger or awkwardly located punctures. However, if pressure remains below 220 kPa (32 psi) after two attempts, seek professional assistance immediately.
Know When Professional Service Is Absolutely Necessary
The Hyundai Tire Mobility Kit provides only a temporary solution—never a permanent repair. Contact an authorized Hyundai dealer immediately if:
- The puncture exceeds 4 mm (0.16 inches) in size
- There is visible sidewall damage
- Tire pressure cannot be maintained above 220 kPa (32 psi)
- Unusual vibrations or noises persist after repair
- Sealant continues to leak from the tire
Even after a successful temporary repair, have your tire inspected by a professional as soon as possible. The sealant is designed to get you to a service facility safely, not for long-term use.
Essential Safety Reminders for Every Repair Attempt
Before you ever need to use your Hyundai tire repair kit, memorize these critical safety points:
- Never operate the compressor continuously for more than 10 minutes (risk of overheating)
- Always verify tire pressure reaches at least 220 kPa (32 psi) before driving
- Never attempt to drive if pressure remains below 200 kPa (29 psi)
- Strictly observe the 80 km/h (50 mph) maximum speed limit
- Immediately stop if you experience unusual vibrations or noises
These thresholds exist for your safety—ignoring them dramatically increases the risk of tire failure and potential accidents.
Maintain Your Kit for Future Emergencies
After each use, clean all hose connections and wipe down the sealant bottle to remove residue. Store the complete kit in its designated location, secured against movement during normal driving. Check the sealant bottle’s expiration date periodically—you’ll find it printed on the bottle—and replace it before it expires, as expired sealant loses effectiveness.
By following these precise steps and respecting the kit’s limitations, you can effectively address tire emergencies and reach professional service safely. The key to success lies in proper preparation, careful attention to connection integrity, strict adherence to pressure specifications, and knowing when professional assistance is the safer option.


