
You’re driving down the highway when you feel that unsettling wobble—your tire is going flat. Instead of waiting for roadside assistance, you can fix it yourself in minutes with the right knowledge of how to use tire repair kit. These compact emergency solutions transform roadside panic into a manageable situation, letting you plug small punctures from nails or screws and drive safely to a professional repair shop. Knowing how to use tire repair kit properly could save you hours of waiting and hundreds of dollars in towing fees. This guide walks you through every critical step to ensure your emergency repair holds until you reach professional help.
Most tire repair kits solve the immediate problem in 15-30 minutes, getting you back on the road when you need it most. While not a permanent fix, understanding how to use tire repair kit correctly provides crucial peace of mind during unexpected roadside emergencies. Let’s dive into exactly what you need to know to handle a flat tire confidently.
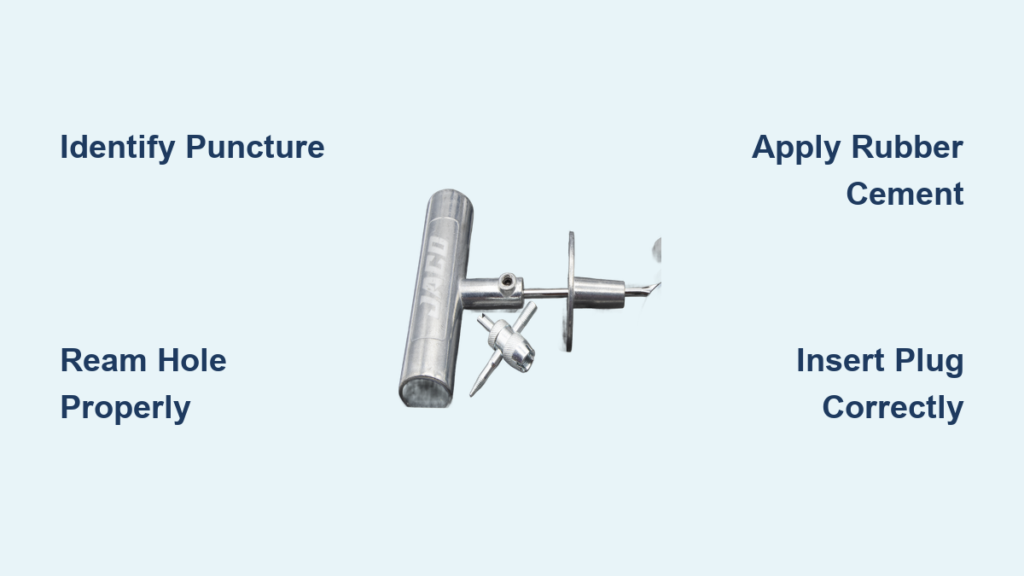
Identify Your Tire Repair Kit Components
Before disaster strikes, familiarize yourself with the essential tools that make up your emergency solution. Knowing exactly what each component does prevents confusion when you’re stressed and stranded.
Plug strips form the heart of your repair system. These rubber strips, typically 3-6 inches long, feature a sticky sealant coating that bonds with your tire’s interior. When inserted correctly through a puncture, they create an airtight seal that stops air loss immediately. Premium kits include reinforced plugs with synthetic fibers that resist pulling out under pressure—critical for maintaining your repair during the drive to a service station.
Rubber cement serves as the invisible hero of your tire repair kit. This specialized adhesive creates a waterproof bond between the plug and your tire’s inner lining. Apply it generously to both the plug strip and insertion tool—thin applications fail under pressure. Quality cement remains flexible after drying, allowing your repair to move with the tire as it flexes during driving.
The insertion tool (often called a plugger) features a hollow needle design that pulls the plug through the puncture. Look for models with ergonomic handles and chrome-vanadium steel construction—cheap plastic versions often snap under pressure. Some kits include T-handle versions that provide crucial leverage when working in awkward positions or with stubborn punctures.
Reaming tools prepare the puncture for successful repair. Their spiral surface cleans damaged rubber from the hole while creating a roughened surface that improves cement adhesion. Skipping this step is the #1 reason DIY tire repairs fail—proper reaming creates the channel your plug needs to seal effectively.
Assess Your Puncture Before Starting
Not all flat tires can be fixed with a repair kit—attempting repairs on incompatible damage wastes time and creates dangerous situations. A quick assessment ensures you’re using the right solution for your specific problem.
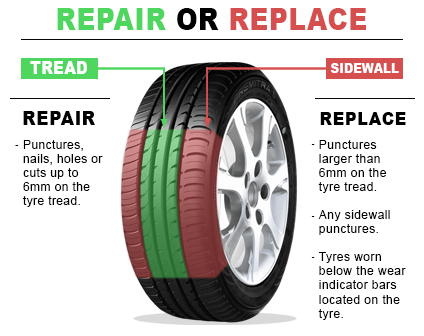
Check the puncture location first—repair kits only work on tread-area damage. If the hole sits in the shoulder (where tread meets sidewall) or on the sidewall itself, replacement is your only safe option. These areas experience extreme flex during driving, and no plug can maintain a seal under such stress. Punctures larger than 3/8 inch (about the size of a pencil eraser) also exceed what most kits can fix safely.
Examine the hole’s shape carefully. Clean, round punctures from nails or screws are ideal for plug repairs. Jagged tears or holes with visible internal damage require professional attention. Run your hand over the entire tread surface—multiple punctures from driving over debris fields are common and easily missed during initial panic.
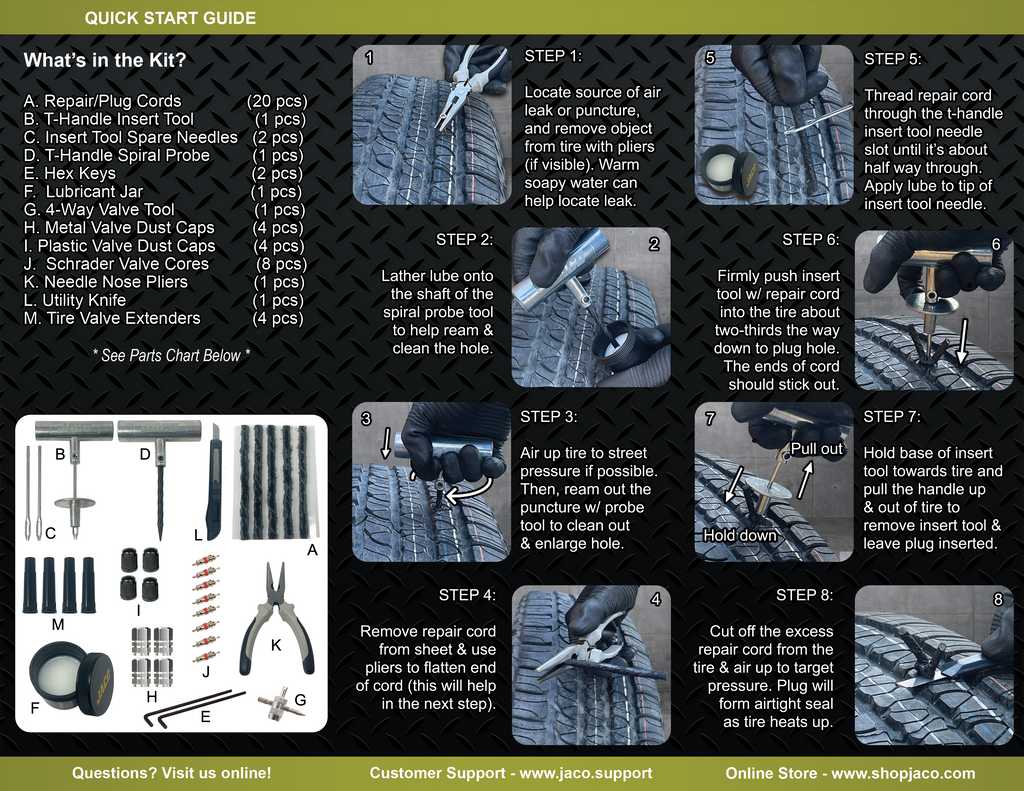
Execute Your Emergency Tire Repair Properly
With assessment complete, follow these precise steps to create a repair that holds until professional service. Rushing through these stages compromises your safety and the repair’s effectiveness.
Remove the foreign object carefully. If a nail or screw remains embedded, pull it straight out at the same angle it entered using pliers. Twisting while removing enlarges the hole and makes successful repair impossible. If the object is already gone, inspect the hole to confirm it’s clean and well-defined.
Ream the puncture thoroughly—this is critical. Insert the reaming tool at the original puncture angle and work it in and out with a twisting motion for 10-15 seconds. You should feel resistance decrease as damaged rubber clears. Proper reaming creates the channel your plug needs to seal effectively—skipping this step causes most DIY repair failures.
Prepare the plug with generous cement application. Cut a 4-5 inch plug strip and coat it completely with rubber cement until it appears wet and glossy. Don’t be stingy—adequate cement creates the airtight seal that makes your repair last. Coat the insertion tool’s needle as well, focusing on the section that contacts the tire’s interior.
Insert the plug at the correct angle. Thread the plug through the insertion tool, pull it through until centered, then push the entire needle through the puncture. The plug should emerge inside the tire cavity while both ends remain visible outside. Withdraw the tool slowly while maintaining pressure on the plug—leave about 1 inch protruding outside for trimming later.
Seal and test your repair. Allow 5-10 minutes for cement curing before trimming excess plug flush with the tread surface. Apply a final cement coat over the trimmed area, then inflate to your vehicle’s recommended pressure (typically 32-35 PSI). Spray soapy water around the repair site—bubbles indicate leaks requiring additional attention.
Follow Critical Post-Repair Driving Guidelines
Your work isn’t done once the tire holds air—understanding these limitations keeps you safe until professional service.
Treat plug repairs as temporary solutions only. Drive to a professional repair facility within 24-48 hours—most tire experts consider plug repairs “get-you-home” fixes, not permanent solutions. The plug seals the hole but doesn’t address internal structural damage to belts or cords.
Observe strict speed limitations. Keep speeds below 50 mph and avoid highways whenever possible. Higher speeds generate heat and stress that can cause plug failure. Don’t tow trailers or carry heavy loads—the additional weight increases pressure on your temporary repair.
Monitor pressure frequently. Check tire pressure every 25-50 miles during your journey to the service station. Significant pressure loss requires immediate attention—don’t risk continuing with a failing repair.
Recognize When Your Kit Won’t Work
Certain situations demand professional service instead of DIY attempts—knowing these prevents dangerous decisions.
Sidewall and shoulder damage cannot be safely repaired with plug kits regardless of puncture size. The extreme flexing in these areas makes permanent sealing impossible. If your puncture sits near the tire’s outer edges where it meets the sidewall, replacement is your only safe option.
Large punctures exceeding 1/4 inch diameter typically overwhelm standard repair kits. Similarly, any visible structural damage—separated belts, bulges, or cracks—requires immediate tire replacement regardless of puncture size.
Run-flat tires have specific repair limitations outlined in your vehicle manual. These specialized tires often require professional assessment even for small punctures due to their reinforced sidewall construction.
Maintain Your Kit for Emergency Readiness
A neglected repair kit fails when you need it most—regular maintenance ensures reliability.
Check cement consistency annually. Quality rubber cement should be thin and pourable—not thick or solidified. Dried cement creates weak bonds that fail under pressure. Replace expired cement before it becomes useless during an emergency.
Store your kit properly. Keep it in your vehicle’s trunk rather than exterior compartments exposed to temperature extremes. Extreme heat dries cement while extreme cold makes plugs brittle. Mark your kit with the purchase date and schedule annual inspections.
Restock after use. Even if you only use one plug strip, inspect all components thoroughly after an emergency repair. Cement containers left open dry out faster, and used tools may need cleaning before your next roadside emergency.
Knowing how to use tire repair kit properly transforms a stressful roadside breakdown into a manageable situation. While not a permanent solution, a correctly executed plug repair gets you safely to professional service while avoiding costly towing fees. Keep your kit maintained, understand its limitations, and practice the steps in advance—when you’re stranded on a rainy highway, that preparation makes all the difference. Most importantly, remember that any plug repair requires professional follow-up within 48 hours—your temporary fix bought you time, but proper tire repair demands expert assessment and equipment.


