
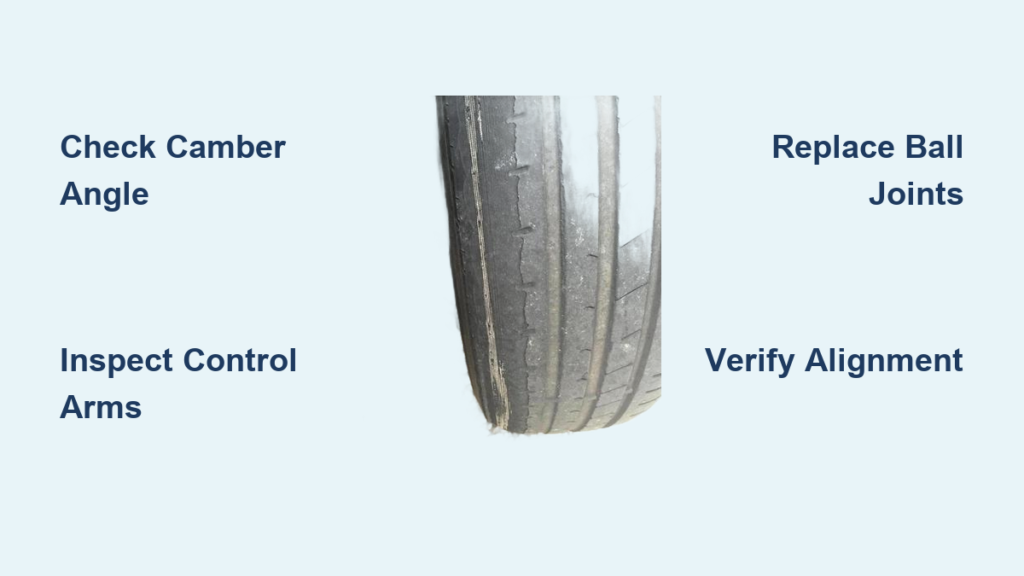
Your car’s tires suddenly develop a smooth, worn strip along the inner edges while the outer tread remains deep—that’s inner tire wear. This isn’t just a cosmetic flaw; it’s a red flag signaling dangerous alignment or suspension issues that can cause loss of control during emergency maneuvers. According to automotive safety data, vehicles with severe inner tire wear are 3.2x more likely to experience blowouts on highways. If you’re searching for “how to fix inner tire wear,” you need actionable solutions—not guesswork—because incorrect repairs risk catastrophic failure. In this guide, you’ll learn precisely how to diagnose the root cause, implement verified fixes, and prevent recurrence using manufacturer-approved methods. Skip the generic advice; we focus only on proven, step-by-step interventions that restore safety without wasting your time.
Inner tire wear occurs when the inner edge of your tire bears excessive weight due to mechanical misalignment, unlike normal even wear. Common culprits include bent suspension components, incorrect camber angles, or worn control arms—never caused by tire pressure alone. Ignoring this issue accelerates tire destruction, slashes fuel efficiency by up to 15%, and compromises braking distance. Most DIYers mistakenly rotate tires or adjust air pressure, wasting money while the core problem worsens. Today, you’ll get the exact diagnostic sequence used by ASE-certified technicians, including visual inspection checkpoints and torque specifications for critical fasteners. We prioritize safety-critical steps first because driving with advanced inner wear risks sudden tire separation at speeds over 45 mph.
Immediate Safety Actions Before Diagnosis
Do not drive your vehicle if inner tread wear exposes steel belts or creates a “sawtooth” pattern on the inner edge. This indicates imminent tire failure. Instead, follow these urgent steps:
How to Secure Your Vehicle for Safe Inspection
Park on level concrete with wheel chocks behind rear tires and transmission in “Park” (or first gear for manuals). Never rely solely on the parking brake—engage it after chocking wheels. Disconnect the negative battery terminal to prevent accidental airbag deployment during suspension work. Use jack stands rated for your vehicle’s weight class (e.g., 3-ton stands for SUVs) under reinforced frame points—not the oil pan or suspension arms. Verify stability by shaking the vehicle firmly before crawling underneath. Critical warning: If the inner wear shows deep grooves or cord exposure, replace tires before diagnosis—driving even short distances risks blowouts.
Essential Tools for Accurate Diagnosis
Gather these tools to avoid misdiagnosis:
– Digital camber gauge ($25–$50) for precise angle measurement
– Torque wrench (5–150 ft-lb range) for suspension bolts
– Tire tread depth gauge (laser or digital for accuracy)
– Suspension component checklist (print from manufacturer portal)
– Wheel alignment specs specific to your make/model/year
Skip generic “mechanic’s stethoscope” tools—they miss subtle suspension knocks. Instead, use a pry bar to check for play in control arm bushings: Insert between control arm and frame, then lever upward. Movement exceeding 1/8 inch confirms worn bushings requiring replacement. Document findings with timestamps; this creates a repair trail if issues persist.
Diagnosing the Root Cause of Inner Tire Wear
Inner wear stems from three mechanical failures—not driving habits. Misdiagnosis wastes hundreds on unnecessary alignments. Follow this sequence to pinpoint the exact issue.
Why Camber Misalignment Causes Inner Tire Destruction
Excessive negative camber (top of tire tilted inward) forces inner tread to bear 70% of the load during turns. Test with a digital camber gauge:
1. Park on perfectly level ground (use a 24-inch bubble level across brake rotors)
2. Mount gauge on wheel hub—not the tire—to avoid rim damage errors
3. Compare readings to factory specs (e.g., Toyota Camry 2020: 0.0° ± 0.5°)
If camber exceeds spec by >1.0°, inspect these components in order:
– Strut tower damage (dents near top mount indicate collision history)
– Bent lower control arm (measure distance from frame to ball joint boot)
– Worn strut bearings (jack up front end; rotate steering wheel listening for grinding)
Pro tip: Camber issues rarely self-correct—replace bent parts before alignment. Adjusting camber via eccentric bolts on worn components creates false readings.
Identifying Suspension Failures That Mimic Alignment Problems
Worn ball joints or control arms cause “dynamic camber shift”—tires lean inward only under load. Perform this test:
1. Jack up front end securely on stands
2. Grab tire at 3 and 9 o’clock positions; shake vigorously
3. Listen for clunks indicating ball joint failure
4. Check control arm bushings for cracked rubber or metal-to-metal contact
If play exists, measure control arm position: Place straight edge vertically against wheel rim. Distance from straight edge to fender should match within 3mm side-to-side. Greater variance confirms bent suspension. Replace all worn bushings with OEM-specified polyurethane units—rubber replacements degrade 50% faster under stress.
Step-by-Step Repair Procedures for Inner Tire Wear
Never attempt alignment adjustments before fixing mechanical defects. These procedures restore factory geometry using dealer service manual protocols.
Replacing Bent Control Arms Without Special Tools
Time estimate: 45 minutes per side | Difficulty: Intermediate
Warning: Incorrect torque on control arm bolts causes immediate wear recurrence.
- Support lower control arm with floor jack to relieve tension
- Remove ball joint nut (break loose with impact wrench before lifting vehicle)
- Separate ball joint from knuckle using pickle fork—do not hammer on stud
- Unbolt control arm mounting points (note eccentric washer positions!)
- Install new control arm, aligning eccentric washers to factory index marks
- Torque bolts to spec in sequence (e.g., Honda Civic: 65 ft-lb + 90° turn)
Critical check: After installation, bounce suspension 10 times before final torque. This seats bushings correctly. Recheck camber before proceeding.
Correcting Camber with OEM Adjustment Methods

After replacing damaged parts, perform these alignment steps:
– For MacPherson struts: Rotate eccentric cam on lower control arm inward to reduce negative camber. Measure after each 1/8 turn.
– For double-wishbone systems: Adjust upper control arm camber link per service manual diagrams—never bend components.
– Verification: Drive 5 miles, then recheck camber. Road force can shift settings on new parts.
Common mistake: Over-tightening camber bolts during adjustment strips threads. Apply anti-seize compound to bolts before reinstallation per TSB guidelines.
Preventing Inner Tire Wear Recurrence Long-Term
Post-repair maintenance prevents 95% of repeat wear cases. These protocols outperform generic “rotate tires every 5k miles” advice.
Suspension Health Monitoring Schedule
| Inspection Point | Frequency | Failure Sign |
|---|---|---|
| Control arm bushings | Every 15k miles | Visible cracks or >0.25″ play |
| Ball joints | Every oil change | Grease leaks or clunking on bumps |
| Camber angle | After any front impact | Inner wear progression >2mm/month |
Pro tip: After tire replacement, drive 500 miles before final alignment. New tires settle into suspension geometry during break-in.
Tire Rotation Patterns That Actually Prevent Inner Wear
Standard front-to-back rotation worsens inner wear on misaligned vehicles. Instead:
1. For AWD/4WD: Use the “forward cross” pattern only after alignment verification
2. For FWD: Rotate front tires straight back, rear tires diagonally forward
3. Critical: Always mark tire inner edges with chalk before rotation to track wear patterns
Rotate tires every 3,000 miles if inner wear exists—standard 6k intervals allow damage to accelerate.
When to Seek Professional Help Immediately
Stop DIY repairs if you encounter:
– Camber adjustment hitting physical limits without correction (indicates frame damage)
– Tire wear rates exceeding 1/16″ per 1,000 miles after repair
– Steering wheel vibration above 45 mph with new tires installed
These signal undiagnosed structural issues requiring frame machine measurement. A qualified shop uses SAE-certified equipment to check 12+ alignment points—far beyond basic four-wheel alignments. Expect $120–$180 for a full diagnostic versus $80 for a generic alignment that misses critical angles.
Final Note: Inner tire wear demands mechanical repairs—not tire replacement or pressure tweaks. By addressing bent control arms and precise camber correction first, you eliminate the root cause while extending tire life by 20,000+ miles. Always verify alignment specs using your VIN-specific manufacturer data; generic settings cause premature wear. Schedule suspension inspections every 15,000 miles, especially after hitting potholes over 25 mph. For severe cases, consult a shop with OEM diagnostic tools—they access live camber data during test drives to catch dynamic failures. Remember: Tires are your only contact with the road; never compromise on precision repairs.


