Waking up to a flat tire for the third time this month is frustrating, but a slow leak tire repair doesn’t have to leave you stranded. Unlike sudden blowouts, slow leaks steadily drain air through tiny holes or compromised seals that hide in plain sight. While all tires naturally lose about 1 PSI monthly, a true slow leak can cost you 5-10 PSI in just days—enough to dangerously overheat your rubber and trigger a catastrophic blowout. Your Tire Pressure Monitor System (TPMS) light flashing repeatedly after inflation is the clearest warning sign: you’ve got air escaping somewhere. Ignoring this issue damages your tires, reduces fuel efficiency, and creates serious safety risks. This guide reveals exactly how to diagnose and fix common slow leak sources yourself—or know when to seek professional help—keeping your tires properly inflated and road-ready.
Pinpoint Your Exact Slow Leak Source in 10 Minutes
Before attempting any slow leak tire repair, you must identify the precise escape point. Guessing wastes time and money while driving on underinflated tires compounds damage. Skip the vague “check for leaks” advice and follow this targeted approach instead.
Confirm It’s Not Normal Air Loss
Tires naturally lose 1 PSI monthly due to permeation through rubber, but true slow leaks drain 2+ PSI weekly. Test your baseline by inflating all tires to manufacturer specs (found on your driver’s door jamb), then recheck pressure after 7 days with a quality digital gauge. If one tire consistently loses 3+ PSI while others maintain pressure, you’ve confirmed a genuine slow leak needing repair.
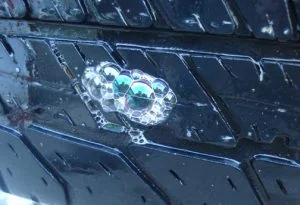
Locate Punctures With High-Pressure Soap Test
Most tread punctures hide small nails or screws embedded deep in rubber. Overinflate the suspect tire to 50-60 PSI (well above normal), then apply soapy water liberally across the entire tread surface. Watch for tiny bubbles forming—these pinpoint air escape routes. For leaks losing only 2-3 PSI monthly, this overpressure technique forces enough air through microscopic holes to reveal them. Don’t neglect the tire’s inner edge; many punctures occur near the bead area where visual inspection is difficult.
Identify Valve Stem Leaks in 60 Seconds
Remove the valve cap and spray soapy water directly on the stem base where it meets the wheel. Bubbles appearing at this junction indicate a failing stem seal. If bubbles form around the core itself, simply replace the $2 valve core using a $5 removal tool—no tire dismounting required. This common DIY fix solves nearly 30% of slow leak cases that owners mistakenly blame on punctures.
Fix Common Slow Leak Tire Repair Scenarios
Once you’ve diagnosed your leak type, apply these targeted solutions. Each method addresses specific failure points while maintaining tire safety and performance.
Repair Tread Punctures Under ¼ Inch Safely
Punctures within the central 75% of the tread can be permanently repaired when done correctly. While plug-only “repairs” create unsafe temporary fixes that compromise tire integrity, proper patching requires removing the tire to access the inner liner. Professionals use a cured rubber stem combined with a bonded patch that seals both the puncture channel and inner surface. This maintains the tire’s speed rating and structural strength. If your local shop refuses this repair for small punctures, seek a second opinion—many shops push unnecessary replacements to increase profits.
Reseal Bead Leaks Caused by Rim Corrosion
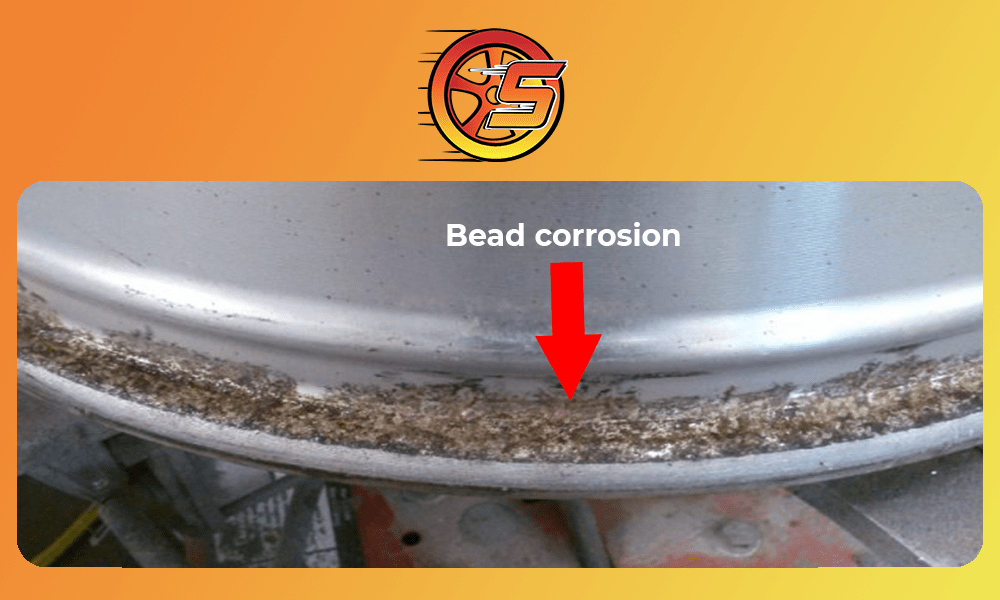
Corrosion between tire bead and rim creates the most common slow leak after punctures. For aluminum wheels, oxidation eats microscopic channels that bleed air. For steel rims, rust performs the same destructive function. To fix: deflate the tire completely, remove it from the rim, then thoroughly clean the bead seat area with a wire brush. Apply fresh mounting compound (specialized bead sealant works best), then remount and inflate the tire while listening for the “pop” that confirms proper bead seating. This $10 DIY fix solves most bead-related leaks without wheel replacement.
Replace Aging Valve Stems Properly
Valve stems degrade after 5-7 years, causing subtle leaks that worsen over time. Don’t just replace the core—install new stems during your next tire rotation. Professionals remove the old stem from the wheel’s backside, insert a new rubber or metal stem, and secure it with a retaining nut. Quality stems cost $5-$10 each and prevent 20% of recurring slow leaks. Always install new valve caps too—they protect the core from debris and add an extra sealing layer.
When to Skip Slow Leak Tire Repair and Replace

Some damage makes safe repair impossible. Knowing these critical thresholds prevents dangerous compromises with your safety.
Sidewall and Shoulder Damage Requires Immediate Replacement
Any leak originating in the sidewall or shoulder area (the curved transition between tread and sidewall) means tire replacement—not repair. These zones endure extreme flexing forces that would rip any patch loose. Visible cracks, bulges, or cuts in these areas indicate structural failure that could lead to sudden blowouts. No legitimate tire professional will attempt repairs here due to safety regulations and liability concerns.
Multiple Repairs Compromise Tire Integrity
Tires can safely handle only limited repairs—typically no more than two punctures, with at least 16 inches between them. More repairs create overlapping damage zones that weaken the tire carcass. If your tire has required three or more puncture fixes, replacement becomes the only safe option regardless of tread depth. Continuing to patch creates unpredictable failure points that could separate at highway speeds.
Prevent Future Slow Leaks With These Proven Strategies
Avoid recurring slow leak tire repair headaches with these maintenance habits that address root causes before they develop.
Monthly Pressure Checks Catch Leaks Early
Check tire pressure every 30 days using a calibrated digital gauge—never rely solely on TPMS. Measure when tires are cold (before driving). Consistent monitoring catches slow leaks when pressure drops exceed 2 PSI monthly, allowing prompt repair before damage occurs. This simple habit prevents 90% of long-term tire damage from undetected leaks.
Annual Rim Inspections Prevent Corrosion Leaks
During tire rotations, inspect wheel rims for curb rash, chipped paint, or early oxidation. For aluminum wheels, apply clear coat to scratched areas to prevent oxidation. Steel rims need rust prevention treatment on any exposed metal near the bead seat. Addressing these issues during routine maintenance prevents the most common bead seal failures.
Rotate Tires Every 5,000 Miles to Even Wear
Uneven tread wear creates stress points that accelerate bead separation and puncture vulnerability. Follow your vehicle manufacturer’s rotation pattern to distribute wear evenly across all tires. This simple practice extends tire life by 20-30% while reducing slow leak occurrences by maintaining consistent bead pressure against the rim.
Cost-Saving Slow Leak Tire Repair Options
Professional repairs typically cost $10-$30 depending on the issue, but smart shoppers can reduce expenses without compromising safety.
Walmart’s $10 Rim Leak Fix Secret
Many Walmart Auto Care Centers will dismount, clean, remount, and balance a tire with rim leaks for just $10 if you bring the wheel assembly in yourself. This beats the $50-$100 quote from dealerships for the same service. Call ahead to confirm availability—some locations have discontinued this service, but many still offer it as a customer goodwill gesture.
Free Repairs at Tire Purchase Locations
Most tire retailers (Discount Tire, Tire Rack, etc.) provide free slow leak tire repair for the life of the tire if you originally purchased them there. This includes puncture repairs, valve stem replacements, and bead reseating. Always check your purchase documentation for these hidden benefits before paying for repairs elsewhere.
Never Risk These Dangerous Slow Leak “Repairs”
Some “solutions” create greater hazards than the original leak. Avoid these dangerous shortcuts that compromise your safety.
Fix-a-Flat Sealants Cause Hidden Damage
While aerosol sealants temporarily stop leaks, they coat the tire interior with sticky residue that hides internal damage and creates dangerous imbalance. Mechanics report finding hardened sealant chunks inside tires that throw off balance weights and create vibration issues. Reserve these products for absolute emergencies only—they’re not a proper slow leak tire repair solution.
External Plug Kits Destroy Tire Integrity
Those $5 plug kits sold at auto stores create unsafe repairs by only filling the puncture channel without sealing the inner liner. The tire’s structural integrity relies on that inner liner remaining intact. Driving at highway speeds with plugged tires risks sudden air loss when the plug dislodges. Professional patching from the inside maintains safety; external plugs compromise it.
A slow leak tire repair done correctly takes 30 minutes and $10, but ignoring it risks catastrophic failure that could cost thousands in accident damages. By targeting the specific leak source—whether puncture, valve stem, or bead seal—you maintain safe, properly inflated tires that deliver optimal performance. Remember: your tires are the only connection between your vehicle and the road. Investing proper time and care into slow leak repairs isn’t just about convenience—it’s about keeping yourself and others safe every time you drive. Check pressure monthly, address leaks immediately, and never compromise on proper repair methods that preserve your tire’s structural integrity.