
That dreaded thump-thump sound while driving is enough to make any Tesla owner’s heart sink. When your Model Y suddenly develops a flat tire during your morning commute or your Model 3 gets a puncture in the parking lot, knowing how to remove a Tesla tire properly means the difference between waiting hours for roadside assistance and getting back on the road in under 30 minutes. Unlike conventional vehicles, Teslas present unique challenges with their low ride height, aluminum frames, and underbody battery packs that demand special attention during tire changes.
The process requires specific tools and techniques that differ significantly from traditional vehicles—using the wrong jack point could damage your $15,000 battery pack, while improper lug nut torque might cause wheel detachment. This comprehensive guide walks you through every critical step of removing and replacing a Tesla tire safely, whether you’re dealing with a sudden flat or preparing for seasonal wheel swaps. You’ll learn the exact tools needed, precise jack point locations for your specific model, and manufacturer-specified torque values that keep your wheels securely attached.
Essential Safety Steps Before Removing Your Tesla Tire
Before you even touch a tool, creating a secure work environment prevents accidents that could damage your vehicle or cause injury. Find a level, well-lit surface—your garage is ideal, but a quiet parking lot works too. Engage the parking brake immediately, but experienced Tesla owners know a crucial extra step: hold the ‘P’ button on your drive stalk for 5-10 seconds to ensure the rear calipers lock firmly. This creates maximum stability during the tire change, especially vital since Tesla’s electronic parking brake only engages the rear wheels.
If you’re stranded on a highway, activate your hazard lights immediately and deploy warning triangles from your emergency kit 50-100 feet behind your vehicle. Wheel chocks for the front tires are non-negotiable—despite engaging Park, the rear-wheel-only parking brake means your Tesla could still roll forward if the jack slips. Never position yourself under a vehicle supported only by a floor jack; jack stands must bear the weight once lifted. However, if you’re simply swapping wheels and won’t go beneath the car, many experienced owners skip jack stands for efficiency—this decision depends entirely on your comfort level and specific circumstances.
Why Tesla’s Aluminum Frame Demands Extra Safety Precautions
The lightweight aluminum construction of Tesla vehicles creates unique safety considerations during tire changes. Unlike steel-framed cars, aluminum can dent or crack if improper pressure is applied at incorrect points. The battery pack running beneath the passenger compartment adds another layer of risk—positioning a jack even slightly off the designated lift point could puncture this critical component. Always verify your jack’s position from multiple angles before applying significant pressure, and never use makeshift supports like cinder blocks that could shift under the vehicle’s weight.
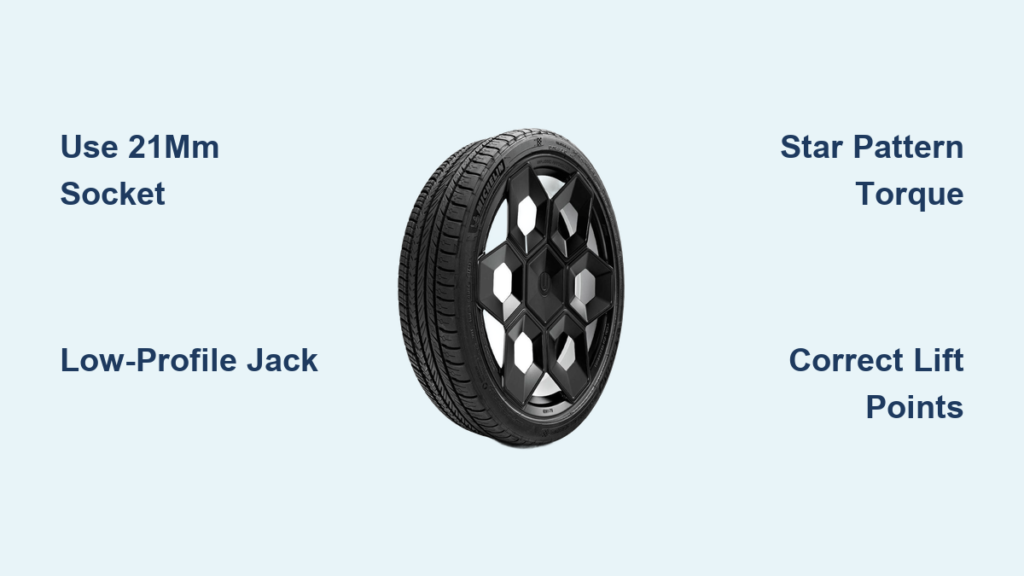
Must-Have Tools for Tesla Tire Removal: 21mm Socket & Low-Profile Jack

Gathering the correct equipment before starting prevents frustrating interruptions midway through your tire change. The non-negotiable foundation is a 21mm deep socket that fits all Tesla lug nuts—standard sockets often lack the depth needed for Tesla’s recessed nuts. Pair this with a 1/2-inch breaker bar for initial loosening of stubborn nuts, followed by a standard ratchet for removal. Most critically, you must have a calibrated 1/2-inch torque wrench set to Tesla’s specification of 129 foot-pounds (175 Newton meters) for final tightening—guessing torque values risks wheel detachment or damaged components.
Your lifting equipment requires special attention due to Tesla’s low ground clearance. A low-profile floor jack rated for at least 2 tons is essential, especially for heavier models like the Long Range Dual Motor Model Y weighing 4,416 pounds. Standard jacks often can’t fit beneath Teslas—the Model 3 sits approximately one inch lower than the Model Y, creating clearance issues. Tesla-specific jack pads (also called puck adapters) protect your frame rails and align perfectly with designated lift points. The Racing Red Edition “Safe Jack” system works across all Tesla models, while ReverseLogic’s low-profile pad receives consistent praise from owners as a superior single solution compared to cheap imported sets.
Why Standard Jacks Fail with Tesla’s Low Ride Height
Many owners learn the hard way that conventional floor jacks simply won’t fit beneath their Tesla. The Model 3’s lowest point measures just 4.7 inches from the ground, leaving insufficient clearance for standard jack heads even with Tesla puck adapters. If your jack lacks adequate clearance, try this proven workaround: first raise the front slightly using Tesla’s included scissor jack at the front jack point (under the driver door), creating enough space to position your floor jack beneath the rear jack point. Alternatively, drive your front wheels onto 2×4 wooden blocks in your garage, raising the vehicle just enough for proper jack placement.
Finding Correct Tesla Jack Points: Avoid Battery Damage
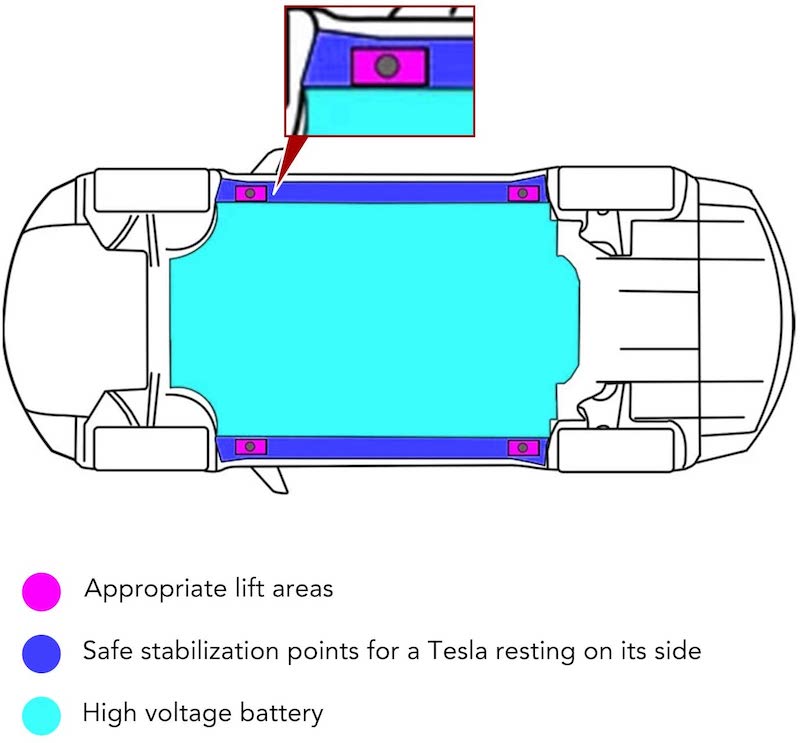
Your Tesla has exactly four designated lift points—using any other location risks catastrophic damage to the battery pack or frame. These points appear as reinforced sections along the frame rails beneath each door opening, identifiable by small holes in the rail. Consult your owner’s manual (page 183 for Model Y) for precise locations—never guess when it comes to lift points. The front points sit just behind the front wheels, while rear points position ahead of the rear wheels, all aligned with the vehicle’s centerline.
Position your jack carefully beneath the chosen point, placing the puck adapter directly on the lift point before raising. Lift extremely slowly, checking constantly for proper alignment—Tesla’s aluminum frame won’t give warning signs before failing. If your jack slips or the vehicle shifts unexpectedly, lower immediately and reassess. Many owners report success lifting both wheels on one side from a single front lift point due to Tesla’s robust frame construction, but always prioritize stability over speed.
Model-Specific Jack Point Locations for Model 3, Y, S, and X
While all Teslas share the same fundamental lift point locations, slight variations exist between models. Model S and X feature slightly higher clearance than 3 and Y models, making jack placement somewhat easier. Model 3 owners should note their extremely low front profile requires extra care when positioning the jack—many find the rear lift points more accessible for initial practice. Performance variants with larger brake calipers may require additional clearance when removing wheels, so factor this into your lifting height.
Step-by-Step: Removing Your Tesla Wheel After Lifting
With your vehicle properly lifted and stabilized, begin by removing the center cap if your model has one. Tesla includes a specialized cap puller tool—hook it onto the cap’s edge and twist to release. Once exposed, remove lug nuts completely in a star pattern (opposite bolts sequentially), preventing uneven pressure on the wheel hub. Set nuts aside in a container where they won’t roll away—losing even one nut compromises safety.
Pull the wheel straight off the hub, applying gentle wiggling motion if brake calipers create interference (common with performance models). When installing the replacement tire, align it carefully with the hub studs before pushing fully into place. Hand-tighten lug nuts in the star pattern to secure the wheel before lowering—never skip this step, as improper alignment can damage hub components.
How to Remove Tesla Center Caps Without Damage
The elegant center caps on Tesla wheels conceal lug nuts but can frustrate first-time changers. The included cap puller has two prongs designed to grip the cap’s inner edge—insert it fully before twisting counterclockwise. If you’ve lost the original tool, use two flathead screwdrivers inserted opposite each other, but wrap their tips in cloth to avoid scratching the cap. Never use excessive force, as broken caps require expensive replacements from Tesla service centers.
Proper Lug Nut Torque for Tesla: 129 Foot-Pounds Explained
Torquing lug nuts correctly isn’t optional—it’s a critical safety specification. Tesla mandates 129 foot-pounds (175 Newton meters) for all models, a value you must verify with a calibrated torque wrench. Under-torqued nuts can loosen during driving, while over-torquing risks shearing bolts or damaging aluminum hubs. Follow the two-stage tightening process: first pass at 50-60% torque in star pattern, second pass at full specification. Many experienced owners recommend rechecking torque after 50-100 miles as components settle.
Why Star Pattern Tightening Prevents Wheel Warping
Tightening lug nuts sequentially around the wheel creates uneven pressure that can warp brake rotors over time. The star pattern distributes force evenly across the wheel hub, maintaining proper alignment with the brake assembly. Visualize drawing a star between opposite bolts—this sequence ensures uniform clamping force. Skipping this step might seem faster, but improper torque patterns cause premature brake wear and vibration issues that require expensive corrections later.
Lowering Your Tesla Safely After Tire Replacement
Before lowering, double-check that jack pads have been removed from beneath the vehicle—leaving them in place could damage adapters or cause uneven settling. Lower extremely slowly, watching for any unusual noises or movements. Once tires touch ground, perform a final torque check on all lug nuts—vehicle weight shifting during lowering can slightly alter tension. For models with center caps, align the “T” emblem with the valve stem before pressing firmly into place.
What to Do After Changing a Tesla Tire: Compact Spare Limitations

Unlike conventional vehicles, Model 3 and Y don’t include full-size spares—most come with a tire repair kit containing sealant and compressor. Some configurations include a compact spare tire with strict limitations: never exceed 50 miles or 50 mph, and avoid aggressive braking or sharp turns. Sidewall punctures require professional assessment as they compromise structural integrity beyond safe repair. Establish a monthly tire inspection routine checking tread depth, sidewall condition, and pressure—preventing flats beats changing tires any day.
When shopping for equipment, invest in quality jack pads and a reliable low-profile jack—they’ll pay for themselves after just a couple of seasonal wheel swaps while protecting your vehicle from costly damage. Remember: proper tire maintenance isn’t just about convenience—it’s fundamental to preserving your Tesla’s performance, safety, and resale value.


