
Your tires are the only part of your vehicle that makes direct contact with the road, and their tread depth determines how well your car handles in wet conditions. Knowing how to measure tire tread properly helps you avoid dangerous hydroplaning, reduces stopping distances on wet roads, and ensures you’re driving with safe, legal tires. If you’ve ever wondered how to check if your tires need replacing or how to perform this critical safety check yourself, this guide delivers practical methods you can use immediately. Whether you’re preparing for a road trip or performing routine maintenance, these techniques will help you assess your tire condition accurately without expensive equipment.
Regular tire tread measurement should be part of your vehicle care routine, especially before seasonal changes or long journeys. Worn tires dramatically increase your risk of accidents in rainy conditions, yet many drivers ignore this critical safety component until it’s too late. This comprehensive guide covers multiple reliable methods for measuring tire tread depth, from the simple coin test you can do anywhere to professional-grade measurement techniques that provide precise readings. By the end of this article, you’ll know exactly how to check your tires properly and when it’s time for replacement.
The Penny Test: Quick Tread Check You Can Do Anywhere
The penny test remains the most accessible method for checking tire tread depth without specialized tools. This technique uses a common household coin to determine if your tires have sufficient tread remaining for safe operation.
Perform the penny test correctly with these precise steps:
Hold a penny with Lincoln’s head pointing downward and insert it into the tire’s deepest tread groove. Position the coin so Lincoln’s head faces toward you while the coin rests against the tire surface. If you can see all of Lincoln’s head above the tread surface, your tire depth has fallen below the critical 2/32-inch threshold and needs immediate replacement. When the tread covers part of Lincoln’s forehead but not his entire head, you still have adequate tread but should monitor wear closely. Tires with tread reaching Lincoln’s nose or covering it completely have sufficient depth for current driving conditions.
For accurate results, test multiple locations across each tire’s surface—including the center, inner shoulder, and outer edge. Tires often wear unevenly due to alignment issues, improper inflation, or driving habits. Focus your examination on the areas where wear typically occurs first, which for most passenger vehicles is the center tread. If any section of your tire fails the penny test, schedule professional inspection immediately rather than waiting for further deterioration.
Using a Tread Depth Gauge for Precision Measurements
While the penny test provides a general estimate, a dedicated tread depth gauge delivers exact measurements in 32nds of an inch or millimeters. These affordable tools cost between $5-$20 and provide reliable readings you can track over time to monitor wear rates.
Digital tread depth gauges feature an LCD screen that displays precise measurements to the nearest 0.01 mm. To use one, press the probe firmly into the tread groove until the base sits flush against the tread block, then read the digital display. These gauges eliminate interpretation errors and allow you to record exact measurements for comparison during future checks.
Analog tread depth gauges operate with a sliding scale that moves as you insert the probe. These battery-free tools are extremely durable for occasional use. Read the measurement where the indicator aligns with the gauge body, typically marked in both fractional inches and metric measurements.
Stick-style tread depth gauges work like miniature rulers with a sliding probe. These compact tools fit easily in your glove compartment and provide reasonably accurate readings without delicate components. Insert the probe into the tread until the base contacts the tread surface, then read the measurement where the probe stops.
For thorough assessment, measure tread depth in multiple locations across each tire’s circumference. Record your measurements to track wear patterns and identify potential alignment or inflation issues early. Most automotive professionals recommend checking tread depth monthly or before any long road trip.
Understanding Tread Wear Indicators Built Into Your Tires
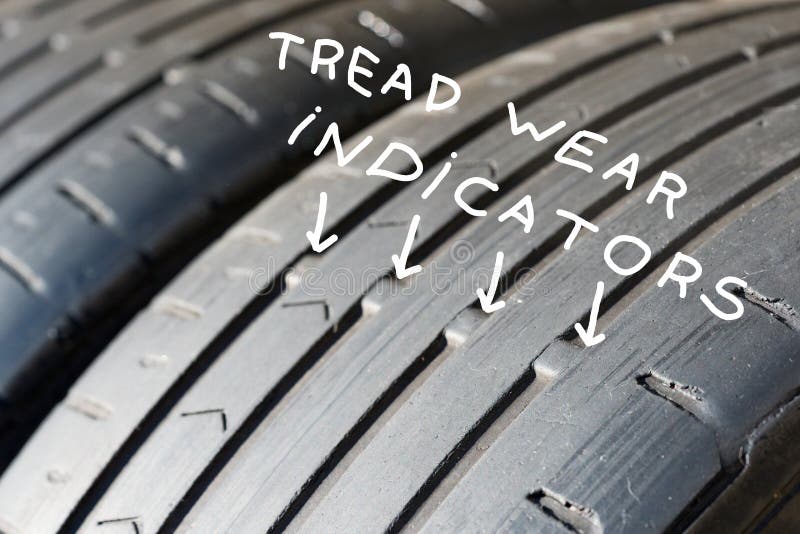
Modern tires incorporate built-in tread wear indicators that provide visual warnings when tread depth reaches dangerous levels. These small raised rubber sections, also called wear bars, run perpendicular across the tire’s grooves at regular intervals.
Locate these indicators by examining your tire’s grooves—they appear as narrow rubber bridges connecting adjacent tread blocks. When surrounding tread wears down to the same level as these indicators, your tire has reached the minimum safe depth of 2/32 of an inch. At this critical point, the indicators become flush with the adjacent tread surface, creating a nearly smooth appearance across the tire.
Most tires feature six to eight wear indicators spaced around the circumference. Check multiple grooves and positions on each tire, as wear patterns can vary significantly across the surface. Some specialty tires may have indicators only in specific grooves, so consult your tire documentation if you’re uncertain about their placement.
These built-in indicators serve as an excellent secondary check alongside the penny test and gauge measurements. When indicators become visible or flush with the tread surface, schedule tire replacement immediately rather than risking further wear.
Legal Tread Depth Requirements by Region
Tire tread regulations exist to ensure vehicles maintain adequate traction on wet roads, protecting both drivers and other road users. Understanding these requirements helps you avoid fines and, more importantly, ensures your vehicle remains safe to operate.
U.S. federal standards require a minimum tread depth of 2/32 of an inch measured in any two adjacent tread grooves across three-quarters of the tire’s circumference. This applies to all passenger vehicles, light trucks, and SUVs operating on public roads. Tires worn below this threshold are considered unsafe and illegal regardless of appearance or age.
Canadian requirements mirror the U.S. standard at 2/32 of an inch minimum tread depth across the tire’s circumference. Provincial enforcement varies, but this federal standard provides the baseline for all Canadian jurisdictions.
European regulations typically require a minimum of 1.6 mm (approximately 1/16 inch) of tread depth, which is slightly less than the U.S. standard when converted. However, many European countries recommend tire replacement at 3 mm for optimal wet weather performance, particularly for high-speed driving.
State and provincial enforcement varies in how strictly tread depth violations are prosecuted. Some jurisdictions include tread depth checks during routine traffic stops or vehicle inspections, while others primarily enforce these standards following accidents. Regardless of enforcement frequency, operating with tires below minimum tread depth compromises your safety and could affect liability in accident situations.
Measuring Different Tire Types Properly

Passenger tires, light truck tires, and specialty tires each have unique tread patterns that require slightly different measurement approaches for accurate assessment.
Passenger car tires typically feature symmetrical tread patterns with consistent grooves that make measurement straightforward. Focus on center grooves for wear rate assessment, as these areas often wear fastest on front-wheel-drive vehicles. Measure at least three points around each tire’s circumference to account for potential uneven wear.
All-terrain and light truck tires often start with deeper original tread depths (15/32 to 18/32 of an inch). While the penny test still applies, adjust your interpretation since these tires begin with more tread. Measure in both center grooves and shoulder lugs, as off-road use causes accelerated wear in different areas.
Winter tires use specialized tread compounds and siping (small slits in tread blocks) that affect wear appearance. The penny test remains valid, but examine siping carefully—winter tires lose effectiveness when siping wears smooth even if substantial tread depth remains. Consider replacing winter tires when tread reaches 5/32 of an inch rather than waiting for the legal minimum.
When to Replace Your Tires Based on Measurements

Knowing when to replace tires involves more than just reaching minimum tread depth. Age, damage, and irregular wear patterns all influence replacement decisions.
Replace tires immediately when tread depth reaches 2/32 of an inch, when sidewall damage is visible, when bulges appear on the tire surface, or after impact damage from potholes. These conditions create immediate safety risks regardless of tread depth.
Plan for replacement when tread depth reaches 4/32 of an inch if you frequently drive in rainy conditions, at high speeds, or with heavy loads. Proactive replacement before reaching the legal minimum ensures consistent performance in challenging conditions.
Consider tire age alongside tread depth. Most manufacturers recommend replacement after six to ten years regardless of tread remaining, as rubber compounds degrade over time. Check the four-digit DOT code on the tire sidewall—the first two digits indicate the week of manufacture and the last two indicate the year.
Maintaining Optimal Tread Depth Through Proper Care
Preventive maintenance extends tire life and maintains optimal tread depth throughout the tire’s service life.
Maintain proper inflation pressure according to your vehicle manufacturer’s specifications, not the maximum pressure listed on the sidewall. Check pressure monthly when tires are cold and adjust for temperature changes—tire pressure drops approximately one PSI for every ten degrees Fahrenheit temperature drop.
Rotate tires every 5,000 to 8,000 miles according to your vehicle’s recommended pattern. Rotation ensures front and rear tires wear at similar rates, extending the useful life of the set and preventing premature single-tire replacement.
Monitor alignment and address handling changes promptly. If your vehicle pulls to one side or the steering wheel is off-center when driving straight, have the alignment checked. Alignment issues cause rapid and uneven tread wear that can destroy a set of tires within a few thousand miles.
Regular tread measurement, combined with proper inflation, rotation, and alignment maintenance, keeps your tires performing optimally and provides the traction you need for safe driving in all conditions. By mastering these simple measurement techniques, you’ll ensure your vehicle maintains maximum safety and performance throughout your tires’ service life.


