

Your tires are the only part of your vehicle that actually touches the road, making their condition critical for safety. When your tire tread wears down below safe levels, you risk hydroplaning on wet roads, reduced braking performance, and even blowouts. Knowing how to check tire tread wear properly can help you avoid dangerous situations and costly accidents. In this guide, you’ll learn multiple reliable methods to assess your tire tread depth at home, recognize dangerous wear patterns, and determine exactly when it’s time for replacement—without needing special equipment.
Why Measuring Tire Tread Depth Matters for Road Safety
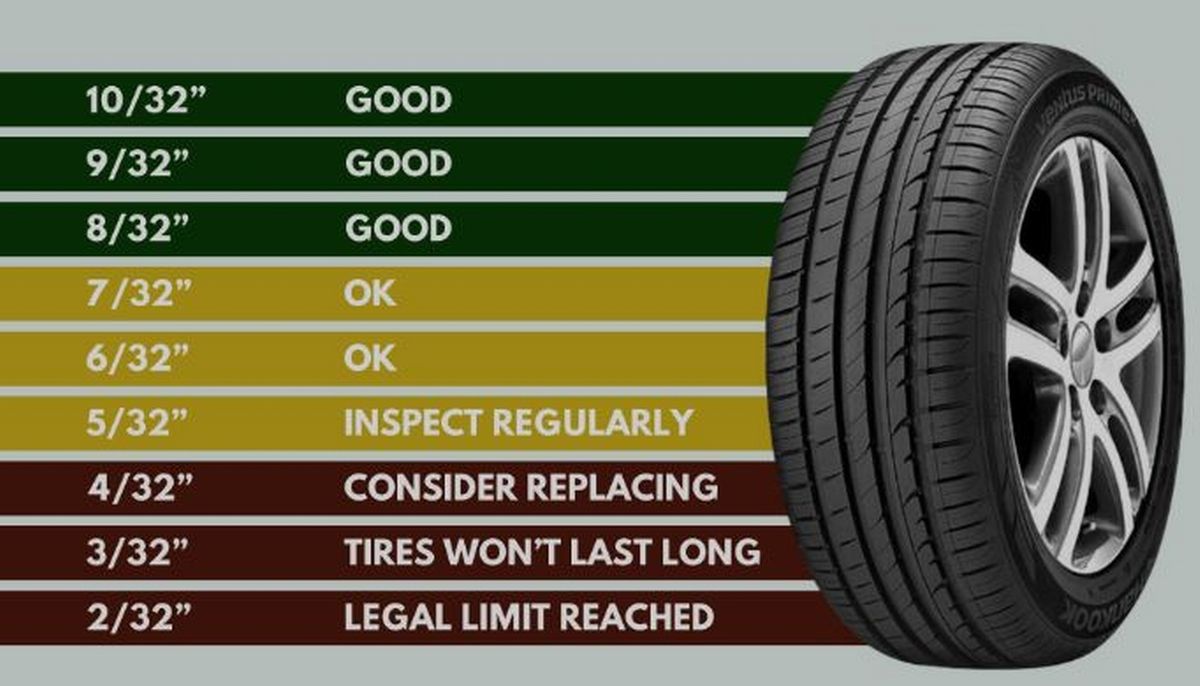
Driving on tires with insufficient tread depth dramatically increases stopping distances, especially in wet conditions. As tread wears down, the tire’s ability to channel water away from the contact patch diminishes, creating a dangerous film of water between your tires and the road. The legal minimum tread depth in most states is 2/32 of an inch, but safety experts recommend replacing tires at 4/32 of an inch for significantly better wet weather performance. Ignoring tread wear can lead to complete loss of vehicle control during emergency maneuvers or heavy rain.
How Tire Tread Design Affects Performance
Modern tire treads feature complex patterns of grooves, sipes, and blocks designed to maintain grip in various conditions. The deep circumferential grooves evacuate water, while lateral grooves help with cornering traction. As these features wear down, the tire’s performance degrades unevenly depending on driving habits, alignment issues, and inflation pressure. Understanding how these elements work together helps you recognize when wear has reached critical levels.
5 Reliable Methods to Check Tire Tread Wear at Home

Penny Test: The Quick Emergency Check
Insert a penny into your tire’s tread groove with Lincoln’s head facing down. If you can see the top of Lincoln’s head, your tread depth is below 2/32 of an inch and the tire needs immediate replacement. This method provides a quick safety check but isn’t precise enough for determining optimal replacement timing. For a more conservative safety margin, use the quarter test instead—when Washington’s head disappears completely, you still have approximately 4/32 of an inch remaining.
Quarter Test: The Safer Alternative to the Penny Method
Place a quarter in the tire groove with Washington’s head facing downward. If the top of his head remains covered by the tread, you have at least 4/32 of an inch of tread depth remaining—the recommended minimum for safe wet weather driving. This test gives you more safety margin than the penny test and helps prevent premature tire replacement while maintaining adequate safety.
Built-In Tread Wear Indicators: Your Tires’ Warning System
Most modern tires feature small rubber bars molded into the tread at regular intervals across the tire. These indicators sit at 2/32 of an inch depth—when your tread becomes flush with these bars, it’s legally time for replacement. Locate these indicators by examining the tire’s circumferential grooves; they appear as small, narrow bars connecting otherwise separated tread blocks. When three or more adjacent tread blocks reach the wear bars, replace the tire immediately regardless of mileage.
Visual Pattern Analysis: Diagnosing Underlying Problems

Uneven tread wear patterns reveal specific vehicle issues that need correction:
- Center wear: Overinflation causing excessive pressure on the center of the tread
- Shoulder wear: Underinflation leading to excessive flexing at the tire edges
- Feathering: Alignment issues causing tires to scrub sideways
- Cupping: Worn suspension components creating uneven contact patches
Document these patterns with photos before tire replacement to help your mechanic diagnose and correct the underlying problem, preventing premature wear on new tires.
Step-by-Step Professional Tread Depth Measurement
Using a Tread Depth Gauge for Accurate Results
- Clean the tire surface thoroughly with a stiff brush to remove embedded stones and debris
- Select three measurement points across the tire tread (inner edge, center, outer edge)
- Press the gauge’s probe perpendicularly into the deepest part of the main groove
- Read the measurement in 32nds of an inch or millimeters
- Repeat at multiple locations around the tire circumference
- Record the lowest measurements as they determine your tire’s safety margin
Professional mechanics take at least six measurements per tire to account for irregular wear patterns. If your lowest measurement falls below 4/32 of an inch, plan for replacement soon. Below 2/32 of an inch requires immediate action.
Creating a Tread Depth Map for Each Tire
For the most accurate assessment, create a simple chart noting measurements at 12, 3, 6, and 9 o’clock positions on each tire. Significant differences between these points (more than 2/32 of an inch) indicate alignment or inflation problems that need correction. This mapping technique helps identify developing problems before they become safety hazards.
When to Replace Tires Based on Tread Depth
Legal Requirements vs. Safety Recommendations
While most states require replacement at 2/32 of an inch tread depth, safety organizations strongly recommend replacing tires at 4/32 of an inch. At 4/32, stopping distances on wet roads increase by approximately 25% compared to new tires. At 2/32, stopping distances can double in wet conditions, turning a routine stop into a potential collision.
Age Considerations Beyond Tread Depth
Tires older than six years should be inspected annually by a professional regardless of tread depth. Rubber compounds degrade over time, leading to dry rot and reduced structural integrity. Check your tire’s manufacture date using the DOT code on the sidewall—tires manufactured more than ten years ago should be replaced immediately, even with adequate tread.
Preventing Premature Tire Wear
Proper Inflation: The Most Critical Factor
Check tire pressure at least once a month when tires are cold (before driving or after the vehicle has been parked for three hours). Use the manufacturer’s recommended pressure found on the driver’s side door jamb, not the maximum pressure listed on the tire sidewall. Proper inflation ensures even tread contact with the road, distributing wear evenly across the tire surface.
Regular Rotation Schedule for Even Wear
Rotate your tires every 5,000-7,000 miles following the pattern recommended in your vehicle’s owner’s manual. Front tires typically wear faster than rear tires due to steering and engine weight distribution. Regular rotation helps equalize wear patterns and extends overall tire life by up to 30%.
What to Do When You Discover Dangerous Tread Wear
Immediate Action Steps for Severely Worn Tires
If your tread depth falls below 2/32 of an inch:
- Reduce driving speed significantly, especially on wet roads
- Increase following distance to at least four seconds
- Avoid hard braking or sharp turns
- Schedule tire replacement immediately—do not delay
- If driving is absolutely necessary, avoid highways and wet conditions
Driving on bald tires isn’t just illegal—it dramatically increases your risk of losing control during routine driving maneuvers. The minimal cost of new tires pales in comparison to potential accident expenses.
Professional Inspection for Underlying Issues
After replacing worn tires, have a qualified technician inspect your vehicle’s alignment, suspension, and wheel balance. These components often contribute to abnormal tire wear patterns. Addressing these issues prevents your new tires from wearing prematurely, maximizing your investment and maintaining optimal safety.
Final Tire Tread Safety Checklist
Before every long trip and during regular maintenance intervals, perform this quick tire tread assessment:
- ✅ Use the quarter test at multiple points across each tire
- ✅ Check for visible wear indicators becoming flush with tread
- ✅ Examine tread for uneven patterns indicating alignment problems
- ✅ Measure actual depth with a gauge if possible
- ✅ Inspect sidewalls for cracks, bulges, or embedded objects
- ✅ Verify proper inflation pressure for current driving conditions
Tire maintenance represents one of the most cost-effective safety investments you can make for your vehicle. By regularly checking your tire tread wear using these methods, you’ll ensure optimal performance in all driving conditions while avoiding the dangerous consequences of worn tires. Remember that when it comes to tire safety, proactive replacement based on tread depth measurements always beats reactive emergency repairs after an accident.


