

Mounting a semi truck tire requires specialized knowledge and proper technique to ensure safety and performance on the road. Commercial truck tires present unique challenges with their substantial weight (often exceeding 150 pounds) and the critical safety implications of improper installation. When done correctly, proper tire mounting prevents dangerous roadside failures, extends tire life, and maintains optimal fuel efficiency. This guide delivers specific, actionable instructions for mounting semi truck tires safely and effectively, drawing from industry best practices that keep professional mechanics and owner-operators protected while working with these massive components.
Many drivers and technicians underestimate the risks involved in semi truck tire mounting, not realizing that improperly seated beads or incorrect inflation procedures can lead to explosive failures. Following the precise steps outlined here ensures you avoid common mistakes that could result in costly tire damage or serious injury. By the end of this guide, you’ll understand exactly how to mount a semi truck tire with confidence, from selecting the right equipment to performing the critical final safety checks before returning the vehicle to service.
Required Equipment for Semi Truck Tire Mounting

Having the correct specialized tools is non-negotiable when mounting semi truck tires, as standard passenger vehicle equipment lacks the capacity and strength needed for commercial applications. A heavy-duty commercial tire changer represents the centerpiece of your setup, specifically designed with reinforced components to handle tires ranging from 19.5 to 24.5 inches in diameter. These industrial units feature powerful bead breakers capable of separating stubborn truck tire beads that have become fused to the rim through corrosion or prolonged use.
Your essential toolkit must include:
- Commercial-grade tire changer with sufficient clamping force (minimum 5,000 lbs)
- High-torque impact wrench (minimum 1,500 ft-lbs capacity) for lug nut removal
- Wheel dolly rated for 300+ pounds to safely maneuver assemblies
- Clip-on inflation chuck with safety cage for controlled inflation
- Calibrated torque wrench specifically for commercial vehicle lug patterns
- Heavy-duty safety gloves with cut resistance for handling sharp wheel edges
Never attempt semi truck tire mounting with standard passenger car equipment, as the increased force requirements can damage both the tire and your tools, creating dangerous situations. Position all equipment within easy reach before beginning work to maintain workflow and prevent unsafe reaching or stretching during critical operations.
Critical Safety Measures Before Starting
Commercial tire safety protocols differ significantly from passenger vehicle procedures due to the immense stored energy in large, pressurized tires. Before touching any tools, implement these essential safety measures:
- Verify work area stability: Confirm you’re working on level concrete or asphalt—never on dirt or uneven surfaces where vehicle movement could occur
- Implement multiple safety restraints: Engage parking brake, shift transmission to lowest gear, and chock wheels diagonally opposite the work area
- Establish safety perimeter: Mark a 15-foot radius around the work area where no personnel should stand during inflation
- Wear mandatory PPE: Safety glasses with side shields, steel-toed boots, and heavy-duty gloves must be worn at all times
A single overlooked safety step can lead to catastrophic consequences. Many tire technicians have been seriously injured during inflation when standing in the “line of fire” directly in front of or behind the tire. Always position yourself at a 45-degree angle to the tire’s sidewall during inflation procedures, ready to move quickly if necessary.
Thorough Component Inspection Protocol
Before mounting begins, conduct a systematic inspection of both tire and wheel components to identify potential failure points:
Tire inspection checklist:
– Examine sidewalls for cuts, bulges, or embedded objects that compromise structural integrity
– Check tread for uneven wear patterns that might indicate alignment issues
– Verify manufacturing date code (tires older than 6 years shouldn’t be mounted regardless of tread depth)
– Confirm proper size and load rating match vehicle specifications
Wheel inspection requirements:
– Inspect for cracks around bolt holes and spoke areas using a bright LED flashlight
– Check bead seating surfaces for rust, pitting, or damage that could prevent proper sealing
– Verify wheel bolt pattern matches vehicle hub configuration
– Inspect all lug nut seats for damage that could affect torque retention
Discard any component showing questionable integrity—never mount damaged tires or wheels on commercial vehicles where failure could cause accidents.
Proper Vehicle Positioning and Support
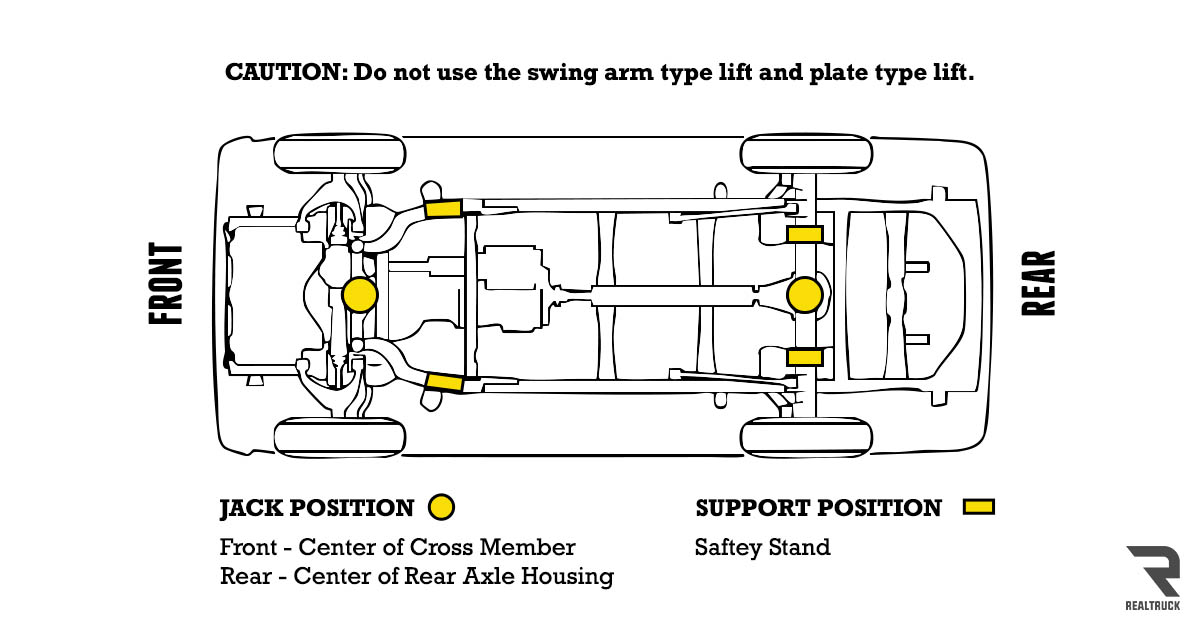
Commercial vehicle positioning requires specific techniques to prevent movement during tire service:
- Park on level surface with transmission in lowest gear and parking brake fully engaged
- Chock wheels diagonally opposite the work area using heavy-duty rubber chocks
- For drive axle work, chock both rear wheels on the opposite side
- For trailer tires, ensure landing gear is fully extended and supporting weight
- Use jack stands rated for commercial vehicle weights (minimum 10-ton capacity)
Never rely solely on hydraulic jacks to support the vehicle during tire mounting. Position jack stands under reinforced frame points specified by the manufacturer—never on suspension components. Lift the vehicle only high enough to provide clearance for tire removal and installation, typically 6-8 inches.
Step-by-Step Tire Mounting Procedure
Break Old Tire Beads Properly
Deflate the tire completely by removing the valve core and waiting 5 minutes for residual air to escape. Position the wheel assembly vertically in the tire changer with the top bead facing outward. Apply steady pressure with the bead breaker arm at the 12 o’clock position, working toward the 3 and 9 o’clock positions. Rotate the wheel 180 degrees and repeat for the bottom bead. Avoid excessive force that could damage the wheel’s bead seat.
Mount New Tire with Correct Technique
- Apply specialized mounting lubricant evenly to both wheel bead seats
- Position the wheel with valve stem hole at 6 o’clock position
- Work the lower bead onto the rim using the mounting head, starting at the valve stem
- Apply additional lubricant as needed while working around the circumference
- Once lower bead is seated, position the upper bead and repeat the process
- Rotate the wheel while applying downward pressure on the sidewalls to seat beads evenly
Achieve Proper Bead Seating During Inflation
Inflation requires the most caution in the entire mounting process:
- Attach clip-on chuck securely and step outside the safety perimeter
- Inflate in 10 PSI increments, checking bead seating after each burst
- Listen for the distinctive “pop” indicating both beads have seated simultaneously
- Continue to target pressure (typically 80-100 PSI for steer/drive tires)
- Never exceed the maximum pressure molded into the tire sidewall
If beads won’t seat, add more lubricant through the valve stem and work the tire manually—never exceed 40 PSI during initial seating attempts.
Correct Lug Nut Torque Sequence
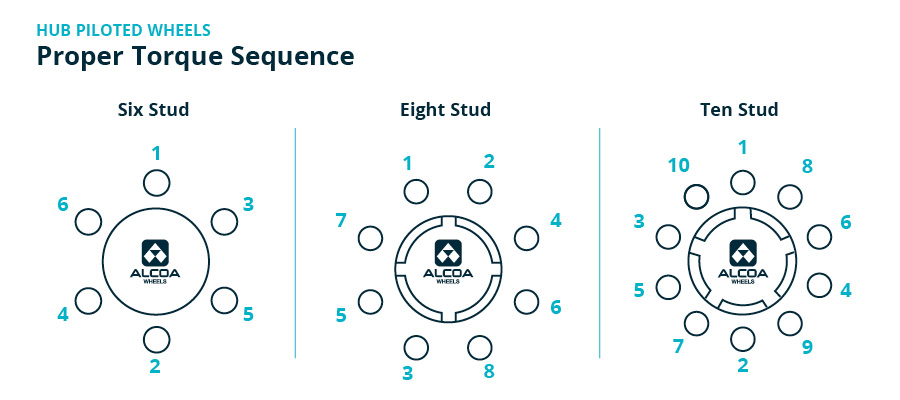
Improper lug nut torque causes more wheel-related incidents than any other factor in commercial trucking:
- Install wheel assembly by hand to prevent cross-threading
- Tighten lug nuts in star pattern to 50% of final torque while vehicle is lifted
- Lower vehicle completely before final torque application
- Torque to manufacturer specification (typically 450-550 ft-lbs) in proper sequence
- Recheck torque after 50 miles of operation
Use only calibrated torque tools—never “guesstimate” tightness. Document all torque values in maintenance records for compliance purposes.
Final Safety Verification Before Road Use
Complete these critical checks before returning the vehicle to service:
- Visually inspect both bead areas for uniform seating around entire circumference
- Perform soap-and-water leak test at bead seats and valve stem
- Verify tire pressure with calibrated gauge (not just the inflator display)
- Check for proper clearance between tire and suspension components
- Confirm all lug nuts are present and properly torqued
Take five minutes for a slow-speed test drive (under 15 mph) to detect any vibration or unusual noises before normal operation. This final step catches mounting errors that visual inspection might miss.
Mounting semi truck tires correctly protects not only your investment but everyone sharing the road with your vehicle. Following these precise procedures prevents dangerous roadside failures and extends tire life significantly. Remember that proper tire mounting isn’t just about getting the tire on the wheel—it’s about ensuring every component works together safely under the extreme conditions commercial vehicles face daily. Regularly review these steps before each mounting job, as complacency leads to mistakes with potentially catastrophic consequences. Your attention to detail today keeps you and others safe on the highway tomorrow.


