

Nothing ruins a smooth tire inflation session like air hissing out instead of filling your tire. Whether you’re topping up car tires before a road trip, maintaining bicycle wheels for your daily commute, or preparing motorcycle tires for weekend rides, knowing exactly how to connect an air hose to your tire valve prevents wasted time, air loss, and potential damage to sensitive valve components. This essential skill ensures proper tire pressure for safety, optimal performance, and extended tire life. By the end of this guide, you’ll confidently connect air hoses to any valve type without leaks or frustration.
Identify Your Tire Valve Type
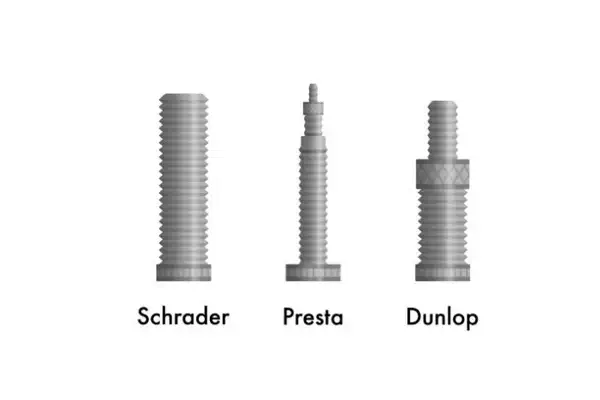
Before attaching any air hose, correctly identifying your tire valve type is critical—using the wrong connection method can damage valves and cause air leaks that compromise tire integrity.
Schrader valves dominate automotive applications, appearing on nearly all passenger cars, light trucks, and many motorcycles. These robust valves feature a spring-loaded center pin approximately 8mm in diameter with four external threads at the top. When you press the center pin, air flows through while the internal rubber seal prevents leakage when the pin returns to position. You’ll recognize Schrader valves by their wider profile compared to other valve types and the small pin visible in the center that depresses when pressed.
Presta valves are standard on most bicycles, particularly road bikes and performance mountain bikes. These slender 6mm valves have a locknut at the top that must be unscrewed before inflation. Unlike Schrader valves, Presta valves have a fixed center pin and rely on a small nut at the top to seal the valve when tightened. Presta valves require specific adapters for most standard air hoses, though many quality bicycle floor pumps include built-in compatibility.
Dunlop valves, sometimes called Woods or Regina valves, blend characteristics of both Schrader and Presta designs. Primarily found on European bicycles and some Asian import models, these valves have a base wider than Presta but narrower than Schrader. The valve core threads onto the valve body, requiring specialized fittings that differ from both other common valve types.
Choose the Right Air Hose Fitting
Selecting the appropriate air hose fitting for your valve type ensures a secure connection that prevents air loss during inflation.
Standard Schrader-compatible hoses work directly with automotive tires without adapters. These hoses feature threaded fittings that screw onto valve threads, creating a secure seal while pressing the internal pin to release air. Premium Schrader fittings include lever-lock or twist-lock mechanisms that establish an airtight connection before inflation begins, preventing the air loss common with basic push-on chucks.
Presta-specific hoses typically incorporate integrated adapters that slide over the narrow valve body and lock securely. These adapters effectively convert the 6mm Presta valve to interface with standard air hose connections. Higher-end hoses often feature reversible heads with one side for Schrader and another for Presta, eliminating the need for separate adapters during bicycle maintenance.
Dunlop-compatible fittings are less widely available and frequently require specialty adapters. If your air hose lacks Dunlop compatibility, a Presta adapter often works due to similar internal diameters, though you may need to hold the adapter firmly to maintain the seal during inflation.
Quick-release chuck systems provide the fastest connection across all valve types when paired with appropriate adapters. These chucks automatically latch onto the valve when pressed and release with a trigger squeeze. Quick-release systems prevent air loss during connection and disconnection, making them particularly valuable for tires that struggle to maintain pressure.
Connect Air Hose to Schrader Valve
Schrader valves offer the most straightforward connection process, but proper technique remains essential for efficient inflation without air loss.
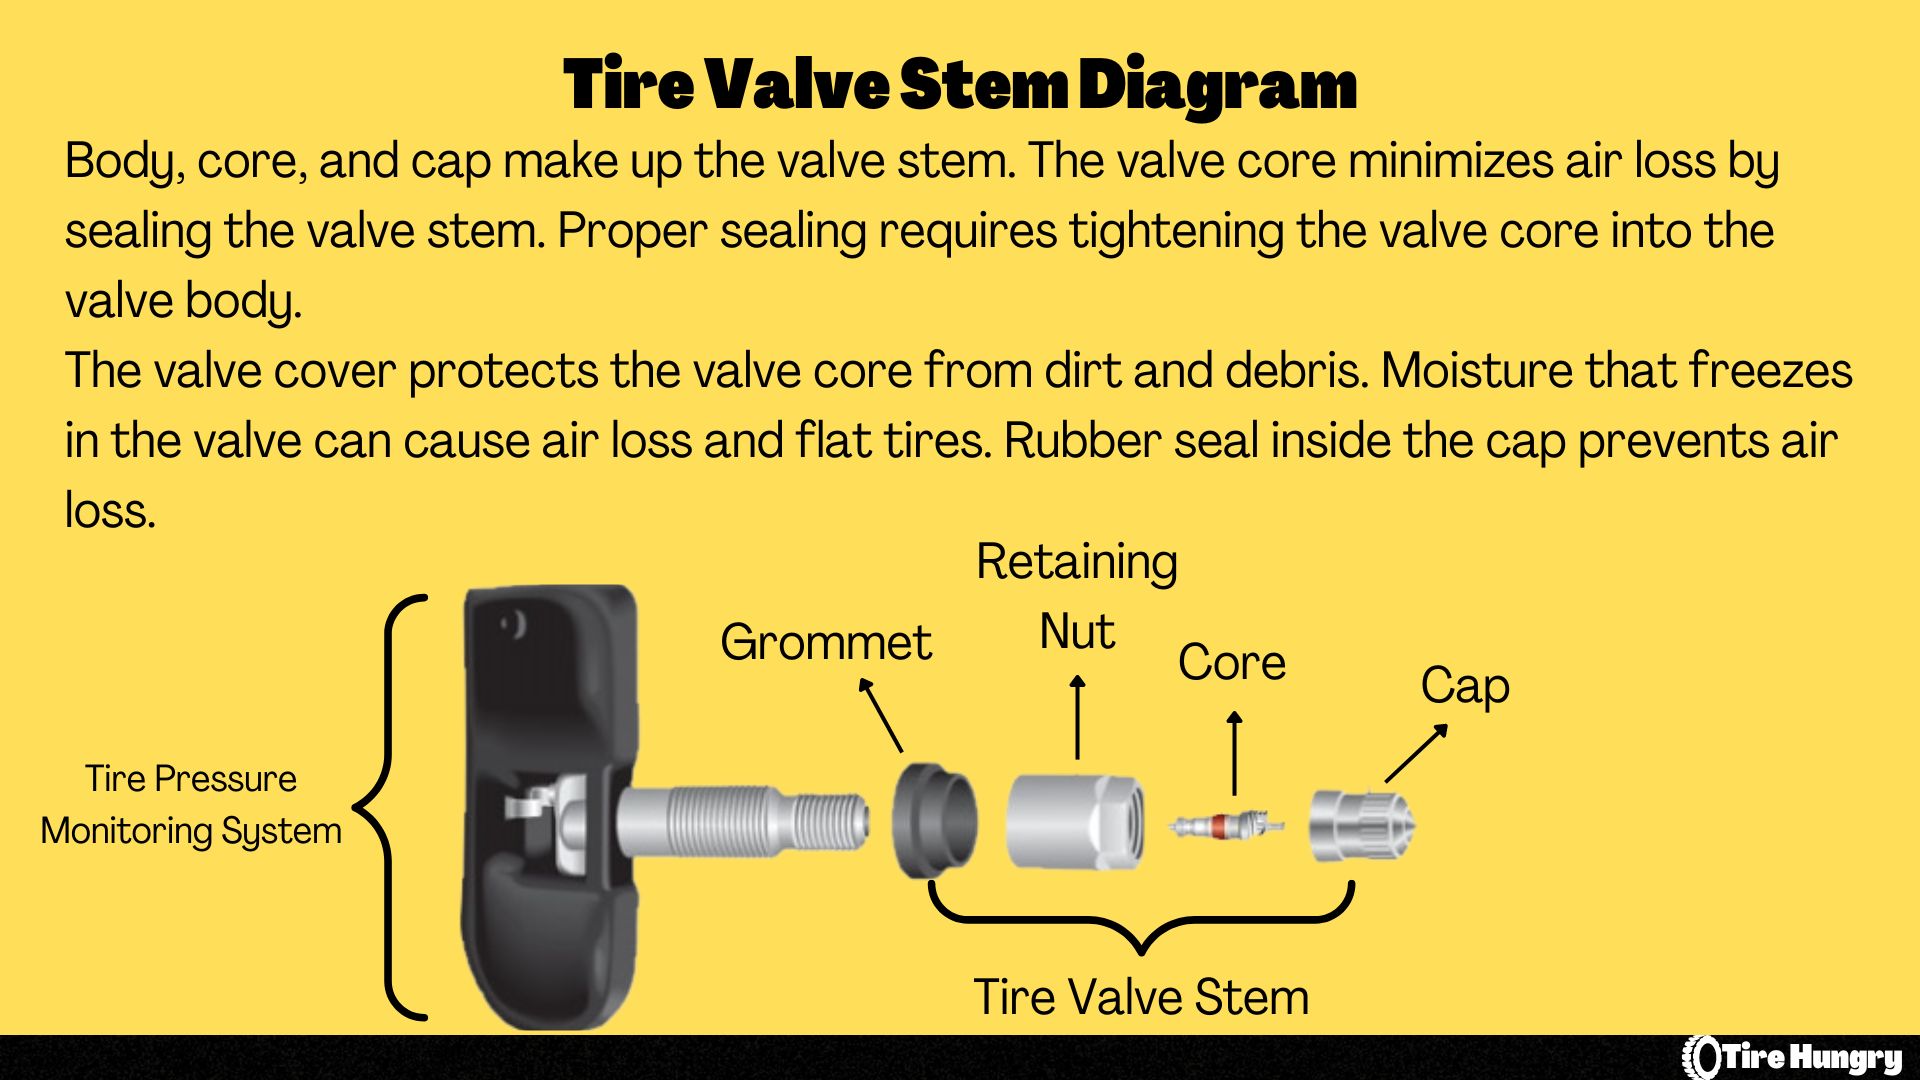
Remove the valve cap completely and set it aside in a clean location. Never attempt to connect with the cap still in place—it blocks valve threads and prevents a proper seal. The cap serves only to protect the valve when not in use.
Attach the air hose fitting by threading it clockwise onto the valve stem. Begin with hand-tightening, then engage the chuck lever or twist-lock mechanism to secure the connection. For lever-style chucks, push firmly until you hear a click and the lever flips down to lock position. The lever should move smoothly without requiring excessive force that could damage valve components.
Verify the seal before inflating by pressing the fitting against the valve while listening and feeling for escaping air. A proper connection produces no hissing sounds. If you detect air leakage, disconnect and try again—repositioning often resolves seal issues caused by minor debris or misaligned threads.
Begin inflation once you’ve confirmed a solid seal. Most Schrader connections allow continuous airflow without holding the chuck, but keep one hand on the connection to monitor for developing leaks. Inflate in short bursts, checking pressure with a gauge between bursts to avoid dangerous overinflation.
Disconnect properly by first releasing remaining pressure from the hose, then unlocking the chuck mechanism before pulling straight off the valve. Immediately replace the valve cap to protect against debris and prevent accidental pin compression.
Connect Air Hose to Presta Valve
Presta valves require more careful handling due to their delicate construction but become easy to manage with proper technique.
Unscrew the valve locknut completely and push it down against the tire to expose the valve core. The locknut should move freely—if stuck, apply minimal penetrating oil and work gently before inflating. Never force a stuck locknut as this can damage or break the valve stem.
Attach the adapter if your air hose lacks Presta-specific capability. Slide the adapter over the valve body, ensuring it sits flush against the rim. Check that any rubber gasket is present and in good condition. If your adapter has a retaining nut, thread it onto the valve by hand to prevent cross-threading.
Connect the air hose to the adapter using standard Schrader connection technique—push and lock for quick-release chucks or thread and tighten for screw-on types. With Presta valves, you often need to maintain slight pressure on the fitting to keep the valve open if your adapter lacks a positive-locking mechanism.
Inflate carefully as Presta valves are more susceptible to damage from high-pressure bursts. Add air in short pulses, checking pressure frequently. Road bike tires typically require 80-130 PSI, while mountain bike tires need 25-50 PSI depending on conditions.
Reverse the process when disconnecting by first releasing hose pressure, then disconnecting the air hose from the adapter. Screw the locknut back onto the valve finger-tight to seal it, then install the valve cap to protect the delicate assembly during storage and riding.
Troubleshoot Common Connection Problems
Even with proper technique, connection issues occasionally arise. Understanding these common problems prevents frustration during critical inflation needs.
Air leaking at the valve fitting typically results from debris on the valve seat, damaged O-rings, or improper fitting alignment. Disconnect and clean the valve thoroughly, inspecting for damage to internal rubber seals. Check your fitting’s O-rings and replace cracked or deformed ones. Reposition the fitting to ensure proper thread engagement or full lock mechanism engagement.
Valve core stuck open causes continuous air loss that prevents proper inflation. For Schrader valves, this often means a failed internal spring or debris preventing pin reseating. Remove and inspect the core with a valve core tool, cleaning or replacing as needed. Presta valves stuck open usually indicate a damaged or missing locknut—replace the entire valve stem if this occurs.
Fitting won’t thread onto valve signals cross-threading or debris in the threads. Remove the fitting and inspect both threads for damage. Clean with a small brush and retry with careful alignment. Never force a fitting onto a valve as this strips threads and requires valve replacement.
Rapid pressure loss after inflation suggests a leak elsewhere in the system. Submerge the inflated tire in water to locate bubbles, or apply soapy water to the tire surface and valve area. Common leak points include the valve stem base, tire bead, and punctures in the tire body.
Follow Essential Safety Precautions
Inflation involves pressurized air that demands safety awareness to prevent injuries and equipment damage.
Protect your eyes with safety glasses during inflation, especially for high-pressure applications. A sudden valve or fitting failure can propel components at dangerous speeds. Eye protection is non-negotiable with pressurized systems.
Never exceed recommended pressure for your tires. Overinflation causes blowouts, bead separation, and catastrophic failures. Use a reliable gauge and check pressure frequently during inflation sessions.
Inspect equipment before use for visible damage, excessive wear, or corrosion. Replace damaged hoses, cracked fittings, and corroded valve cores immediately—replacement costs are minimal compared to injury risks.
Maintain control of the air hose during inflation, especially with quick-release fittings. A sudden disconnection can cause dangerous hose whipping. Keep the hose secured and avoid standing directly in line with the tire during inflation.
Store equipment properly after use. Drain moisture from compressor tanks to prevent corrosion. Store hoses loosely coiled rather than tightly wound to avoid kinks and internal damage.
Properly connecting an air hose to your tire valve becomes effortless once you understand the specific requirements for each valve type. Whether working with automotive Schrader valves or delicate bicycle Presta valves, matching your fittings correctly, establishing solid seals, and maintaining attention throughout the process ensures optimal tire pressure for safety, performance, and longevity. Keep your inflation equipment well-maintained, follow safety protocols, and you’ll enjoy reliable tire pressure management for years to come.


