
Your tire sidewall isn’t just rubber with random numbers—it’s a critical information panel that reveals everything about your tire’s capabilities, limitations, and safety specifications. Knowing how to read a tire sidewall correctly ensures you select the right replacements, maintain proper safety standards, and understand your vehicle’s performance limits. If you’ve ever stared at those mysterious codes wondering what “P225/60R16 97V” actually means, this guide gives you the expertise to decode every marking like a professional. Within minutes, you’ll confidently interpret tire specifications for safer driving and smarter purchasing decisions.
Break Down the Tire Size Code: P225/60R16 Explained
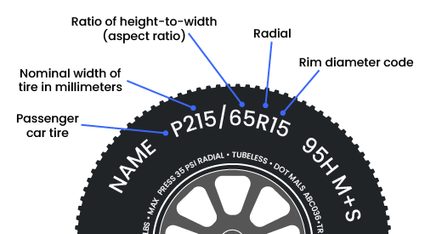
The sequence of numbers and letters on your tire’s sidewall forms a precise code describing its physical dimensions and performance capabilities. Let’s dissect a common example: P225/60R16 97V—this single string contains everything you need to know about the tire’s fundamental specifications.
Start with the first character to identify your tire category. The “P” indicates a passenger vehicle tire designed specifically for cars, minivans, and smaller SUVs. If you see “LT” instead, that signifies a light truck tire built for heavier loads in trucks and larger SUVs. Special trailer tires carry “ST” markings, while temporary spares show “T.” Some tires omit this letter entirely, indicating Euro-Metric sizing which may have different load capacities than equivalent P-Metric tires.
The three-digit number immediately following (225 in our example) represents the tire width in millimeters—the distance from one outer sidewall edge to the other when properly mounted and inflated. This isn’t the tread width but the entire cross-section measurement. Wider tires (higher numbers) typically offer better grip but increase road noise, while narrower tires provide a smoother ride with potentially less traction.
The two digits after the slash (60) indicate the aspect ratio—the sidewall height expressed as a percentage of the tire width. In this case, 60% of 225mm equals approximately 135mm of sidewall height. Lower aspect ratios (50 or below) mean shorter, stiffer sidewalls for sportier handling, while higher ratios (65+) provide more cushioning for comfort-oriented driving.
Identify Construction Type and Wheel Size Compatibility
The letter following the aspect ratio reveals your tire’s internal structure. The “R” in P225/60R16 signifies radial construction, which accounts for over 98% of modern passenger tires. Radial tires feature plies arranged perpendicular to the direction of travel with steel belts beneath the tread, delivering superior fuel efficiency, heat resistance, and tread life compared to older designs.
If you encounter “B,” that indicates belted bias construction—a hybrid design with some radial benefits but bias-ply characteristics. Rare markings like “X” or “D” denote cross-ply or diagonal construction found only on vintage or specialty tires. Some manufacturers use a dash (-) instead of a letter to indicate bias-ply construction.
The final number (16 in our example) specifies the rim diameter in inches—the exact wheel size your tire requires. This measurement corresponds to the wheel flange diameter where the tire beads seat. Installing a 16-inch tire on a 17-inch wheel is physically impossible; the beads simply won’t seal properly. Common passenger vehicle sizes range from 13 to 22 inches, with 15-18 inches dominating the market.
Calculate Load Capacity Using the Load Index Number

Following the size designation, you’ll typically find a two- or three-digit number called the load index (97 in our P225/60R16 97V example). This code corresponds to the maximum weight your tire can safely carry when properly inflated.
A load index of 97 translates to 1,609 pounds (730 kg) per tire according to standardized charts. Never install tires with a lower load index than your vehicle manufacturer specifies—this creates dangerous overloading conditions that accelerate wear and risk catastrophic failure. Check your driver’s door jamb sticker or owner’s manual for your vehicle’s required minimum load index.
Determine Maximum Safe Speed with the Speed Rating
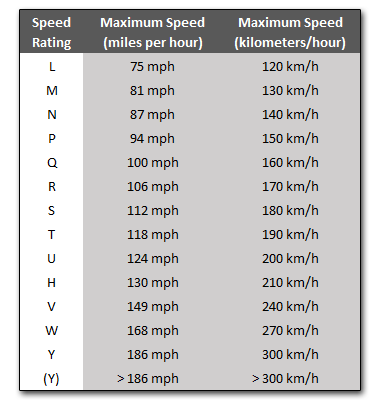
The letter following the load index (V in our example) indicates your tire’s maximum speed capability under full load conditions. Each letter corresponds to a specific speed limit:
- V-rated tires handle up to 149 mph (240 km/h)
- H-rated tires reach 130 mph (210 km/h)
- T-rated tires max out at 118 mph (190 km/h)
- S-rated tires support 112 mph (180 km/h)
This rating reflects engineering limits, not recommendations—you should never test these maximum speeds. Exceeding your tire’s speed rating, even briefly, generates dangerous heat buildup that can cause structural failure. Always match or exceed your vehicle manufacturer’s speed rating requirements.
Check Tire Age Using the DOT Manufacturing Date Code
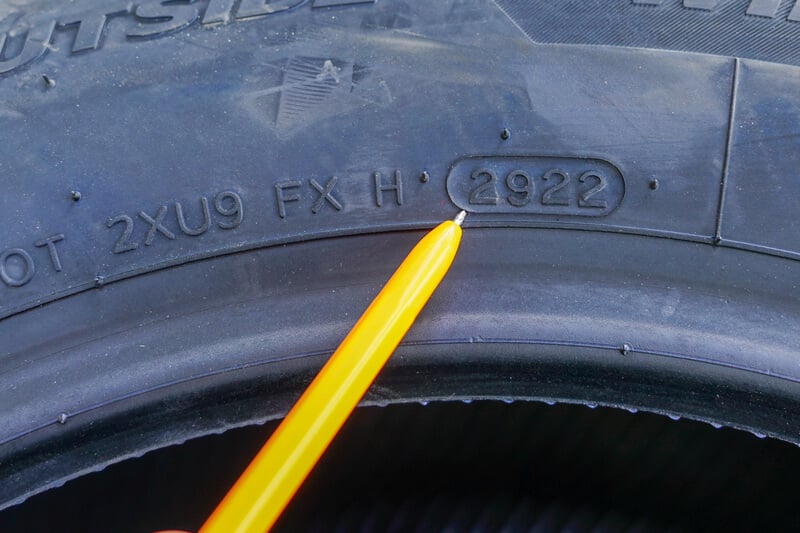
The DOT code on your tire’s sidewall contains crucial manufacturing information, especially the four-digit date code at the end. For example, “DOT XXXX XXXX 2921” means the tire was manufactured in the 29th week of 2021.
This date matters more than you might think—tire rubber degrades over time regardless of tread depth. Most manufacturers recommend replacing tires after six years, with many professionals suggesting five years for vehicles driven frequently or in harsh conditions. Never purchase tires with manufacturing dates older than six months unless you’re certain they’ve been stored properly.
Interpret UTQG Ratings: Treadwear, Traction, and Temperature
The Uniform Tire Quality Grading (UTQG) system provides three critical performance metrics molded into the sidewall:
- Treadwear rating (e.g., 400): Higher numbers indicate longer expected life relative to a baseline tire (a 400 rating should last twice as long as 200)
- Traction grade (AA, A, B, or C): Measures wet braking performance, with AA being best
- Temperature grade (A, B, or C): Indicates heat resistance during sustained high-speed driving
While useful for comparing tires within the same brand, UTQG ratings aren’t standardized across manufacturers, so direct comparisons between brands can be misleading.
Recognize Certified Winter Tire Symbols
Look for the three-peak mountain snowflake symbol ( Alpine symbol) to identify tires certified for severe winter conditions. This isn’t just marketing—tires with this symbol have passed rigorous testing for snow traction and must maintain flexibility below 40°F (4°C).
Don’t confuse this with “M+S” (mud and snow) markings, which indicate only basic all-season capability without specific winter performance testing. For true winter safety in snow and ice, always choose tires with the mountain snowflake certification.
Spot Special Feature Indicators: Directional and Run-Flat Tires
Additional sidewall markings reveal important functional characteristics:
- Directional tires show a rotation arrow indicating the required mounting orientation for optimal water evacuation
- Run-flat tires carry labels like RFT, ZP, or SSR, allowing continued driving for limited distances after air loss
- Performance tires may include additional speed/load specifications for extreme conditions
Mounting directional tires backward severely compromises wet-weather performance and increases hydroplaning risk. Run-flat tires require compatible vehicle systems and typically can’t be repaired after air loss.
Verify Correct Replacement Tires Using Sidewall Information
When replacing tires, use your sidewall information to ensure proper fit and performance:
- Match the exact size designation (P225/60R16) to maintain speedometer accuracy and handling characteristics
- Confirm load index meets or exceeds your vehicle manufacturer’s minimum requirement
- Ensure speed rating equals or surpasses your vehicle’s top speed capability
- Check manufacturing date—avoid tires older than six months unless properly stored
- Verify seasonal suitability—summer, all-season, or winter certification based on your climate
Installing mismatched tires affects braking distances, handling stability, and electronic safety systems like ABS and traction control. When in doubt, consult your vehicle’s door jamb tire information sticker—it specifies the exact tire requirements for your model.
Prevent Costly Mistakes by Reading Sidewall Markings Correctly
Understanding how to read a tire sidewall prevents common errors that compromise safety and performance. Many drivers unknowingly install tires with insufficient load capacity for their vehicle, creating dangerous overloading conditions. Others mistakenly purchase winter tires without the certified mountain snowflake symbol, thinking “M+S” markings indicate true winter capability.
Before your next tire purchase, examine your current tires’ sidewalls using this guide. Record the complete size designation, load index, speed rating, and manufacturing date. This information ensures you select appropriate replacements that maintain your vehicle’s safety systems and performance characteristics. Proper tire selection isn’t just about fit—it’s about preserving the engineering integrity of your entire vehicle.
By mastering these sidewall codes, you’ll make informed decisions that enhance safety, optimize performance, and maximize tire life—turning what once seemed like cryptic markings into valuable knowledge that puts you in control of your vehicle’s most critical safety component.


